Contact Management
At its core, the membership management system is a sophisticated database with an easy to use interface that allows you to track and summarize all relevant data regarding your contacts and members. Adding contacts and updating information is a snap. You’ll never lose your contact information and you’ll have access to your data anytime, anywhere.
Contents
- 1 Add a New Organization Contact
- 2 Add New Contact - Individual
- 3 View Contacts
- 4 Managing Contacts
- 4.1 Update Contact/Organization Logo/Image
- 4.2 Update Organization/Individual Membership Status
- 4.3 Add Tags to an Organization/Individual
- 4.4 Update a Contact Organization/Business Profile Information
- 4.4.1 Add Additional Contact Info
- 4.4.2 Add Additional Individual Contacts to an Organization/Business
- 4.4.3 Add/Remove a Business/Organization to Lists/Committees
- 4.4.4 Update a Business/Organization Categories
- 4.4.5 Assign Staff to a Business/Organization
- 4.4.6 Add Related Organizations to a Business/Organization
- 4.5 Update a Contact's Directory Listing
- 4.6 Manage an Individual Contact's Billing
Add a New Organization Contact
- Click the Quick Actions button
- Click Contacts - Add Organization
- Fill in the Contact Information
- Phone, email or website - once this field is entered, a drop-down list will be displayed to select further details
- Address Information (optional)
- Individuals (optional)
- Click Done
The new organization contact is now added to your database.
Add New Contact - Individual
- Click the Quick Actions Button
- Click Contacts - Add Individual
- Fill in Contact Information
- General
- Phone/Emails/Sites – when this information is entered, and additional text box will be displayed to provided further details
- Address
- Organization – you can associate the individual to an existing organization contact, or assign a new organization.
- Click Done
View Contacts
Click Contacts in the left-hand navigation panel.

All contacts in your database are displayed by default. You can view contacts in a card format by clicking the ![]() icon, or in a list view by clicking the
icon, or in a list view by clicking the ![]() icon.
icon.
Additional filtering options are available in the Show Only drop-down list. These options are described in the table below:
| Show Only Option | Description |
|---|---|
| Orgs | Select this option to filter the list to only organization type contacts. |
| Individuals | Select this option to filter the list to only individual type contacts. |
| Staff | Select this option to filter the list to only your staff members. |
| Owe Money | Select this option to filter the list to only those members who have open invoices. |
| Assigned to Me | If you assign members to specific staff members, this option will allow the staff member logged in to view only the members to which he/she is assigned. |
| Active | Select this option to filter the list to only active members |
| Task Due/Overdue | If using the projects/tasks module, select this option to display only members for which your staff has due or overdue tasks |
| Task Due/Overdue Assigned to me | This option will allow the staff member logged in to view only the members to which he/she is assigned for whom he/she has task that are due or overdue. |
| Event Attendees Potential Contacts | Select this option to view individual who have attended your events. This is a way to identify potential prospective members; or associate individuals to appropriate organizations. |
You may also filter the results by clicking the Customize Results button, and selecting additional options.

Managing Contacts
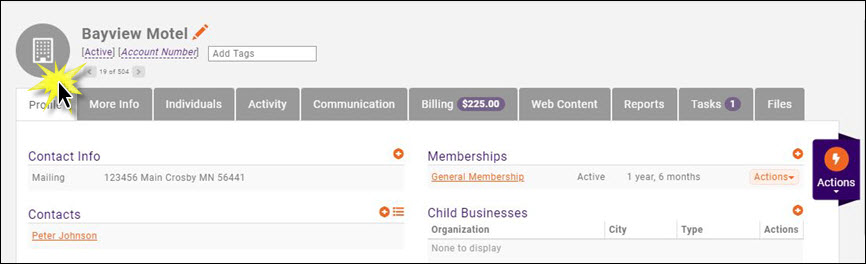
Update Contact/Organization Logo/Image
You can easily upload a contacts logo to the database from the contact's page.
- Click the image icon to the left of the contact name.
- The Image Manager dialog box will open.
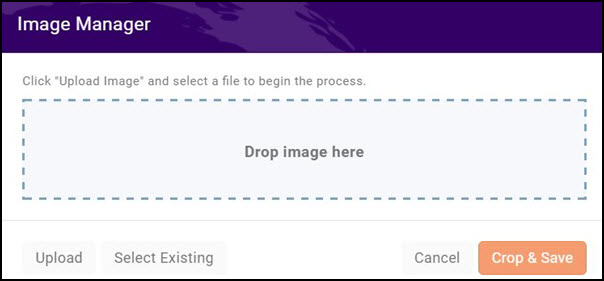
- Drag and drop the desired image or click Upload to browse and select the desired file. NOTE: If you have previously uploaded the desired image, you can click Select Existing to choose the image from the Cloud.
- Crop the image as desired and click Crop and Save.


Update Organization/Individual Membership Status
The status field below the organization/individual name is an indication of membership status. This field is driven by the status shown in the Membership section on the profile tab.

Best practice is to allow the system to dynamically update the status. However, if you do wish to change the status, Allow users to manually update status must be enabled under Setup > Contact Status Options.

To change the status:
- Click the status next to the organization/individual's name.
- Select the desired status from the drop-down list.
- Click the
 icon to save the status.
Add Tags to an Organization/Individual
You can add tags to your Organization/Individuals to make it easy to track something specific about that organization/individual. For example, if an individual has expressed interest in volunteering, you could add "volunteer" as a tag. The Contacts Report may be used to generate a report based on specific tags.

To add a tag:
- Type the tag name in the Add Tags text box. If you have previously used the tag, the type ahead functionality will find the tag name.
- Click enter on your keyboard.
You can add as many tags as you wish. To remove a tag, click the x next to the tag name.
|
|
NOTE: You can view and edit all tags by going by going to Setup > Miscellaneous > Tags. See View/Manage Tags for instructions. |
View/Manage Tags
Under Setup > Miscellaneous > Tags you can see a list of all tags and how they are being used in your system. You can also edit the name of a tag or globally delete a tag.
- Click Setup in the left-hand navigation panel.
- Click Tags in the Miscellaneous section.

A list of all current tags and the number of usage (by module) will be displayed.
Edit a Tag Globally
- Click Setup in the left-hand navigation panel.
- Click Tags in the Miscellaneous section.
- Click the tag that you wish to edit.
- Edit the name of the tag.
- Click Done.

Delete a Tag Globally
- Click Setup in the left-hand navigation panel.
- Click Tags in the Miscellaneous section.
- Click the tag that you wish to delete.
- Click Delete.
- Click OK to confirm the delete.

Update a Contact Organization/Business Profile Information
The Profile tab for a contact provides the ability to update a variety of information about a business/organization.
- Click Contacts in the Navigation Panel to view and search for the contact OR type the name of the contact in the header search box.
- On the profile tab, you may update the following information:
Add Additional Contact Info
This function allows you to add additional email, phone, address information to a contact.
- Click the + icon in the Contact Info Section.
- On the Add Contact Info screen you may add additional phone numbers, email addresses, address information, etc.
- Click Done when completed.
Add Additional Individual Contacts to an Organization/Business
- On the Contact Profile tab, click the + sign adjacent to Contacts. The Add New Contact screen will display.
- Enter the desired information for the new contact.
- Click Done.
Provide Info Hub Access to new Individual Contact
Once you have setup a new individual contact in the database, you will need to send the log-in instructions to the Info Hub
- Click the Actions button to view common tasks.
- Click User Login.
- Select the access level you wish to assign to this individual.
- Login Info
- Password Reset Email - This field will be populated with the email address entered when the individual was added to the system. You may change this if needed.
- Send Login Instructions Email - Click this check-box to send an email to the individual which will provide the instructions to setup their log-in credentials.
- Click Done.

An automated email (example show below) will be sent to the individual.

The individual will be able to step through setting up access to the Info Hub.
Reset an Info Hub Users Password
If an Info Hub user has forgotten his/her password, you can send a reset password email from the individual's page.
- Click the Actions button to view common tasks.
- Click User Login.
- Click the Send Password Reset Email check-box.
- Click Done.

An email will be sent with instructions for resetting the password.
Add/Remove a Business/Organization to Lists/Committees
- On the Contact Profile tab, click the pencil icon adjacent to Lists/Committees. A list of the lists/committees that are configured in your system will be displayed. Those lists/committees to which the contact already belongs will be select. Deselect the check-box to remove the contact from a list/committee.
- Click the check-box for those list/committees to which you wish to associate this contact.
- Click Done.
Update a Business/Organization Categories
- On the Contact Profile tab, click the pencil icon adjacent to Categories. A list of the categories that are configured in your system will be displayed. Those categories to which the contact already belongs will be selected. Deselect the check-box to remove the contact from a category.
- Click the check-box for those categories to which you wish to associate this contact.
- Click Done.
Assign Staff to a Business/Organization
- On the Contact Profile tab, click the + icon adjacent to Assigned Staff.
- On the Assigned Staff screen:
- Select a Related Person' from the drop-down list. All of your staff members will be displayed in the list. You may add additional related persons by clicking the + icon.
- Select a Relationship Type from the drop-down list. You may add relationship types by clicking the + icon.
- Click Done.
Add Related Organizations to a Business/Organization
- On the Contact Profile tab, click the + icon adjacent to Related Organizations.
- On the Related Organization screen:
- Type in the Related Organization name. If the related organization exists in the database, the field will automatically populate. If the related organization does not exist in the database, you will first need to set it up as a contact prior to setting up the relationship.
- Select a Relationship Type from the drop-down list. You may add relationship types by clicking the + icon.
- Click Done.
Update a Contact's Directory Listing
How a contact is displayed on your web-site can be configured and updated on theMore Info tab of a contacts page. You can maintain internal notes, fill in description of the contact, enter key words, and manage custom fields.
You can also manage a contacts directory listing and web content of the Web Content tab of the contacts page.
- On the Web Content tab, click the Add Directory Listing button.
- NOTE: If a directory has already been configured for the contact, you may click the pencil icon in the actions column to edit that directory.
- On the Add/Edit Directory Listing screen, configure the following
- (NOTE: The options that will be displayed for configuration will be dependent on your directory type listing configuration):
-
- Directory - Select the desired directory from the drop-down list. This list will be populated with the directories that you have configure in your system.
- List Level - Select the desired Directory Listing Type from the drop-down list. The list will be populated with the directory listing types you have configured in your system.
- Alternative Display Name (Leave Blank if Same as Contact) - This option allows you to enter a name other than the contact name to be displayed on the web-site. You will leave this field blank if you wish to display the contact name that is in the database.
- Short Description (Max length: 255 characters) - Enter a short description of this contact. This information may be displayed on the web-site when the contact is first displayed.
- Description - This description is a more complete description of the contact which is displayed when the contact is selected on the web-page.
- Keywords - Enter key words which can be used to search for this contact.
- Categories - Enter the directory categories under which this contact will be listed.
- Highlights (for Directory) - Enter highlights for this contact.
- Images - You may add images for this directory.
- Click Done.
Manage an Individual Contact's Billing
On the contact's Billing tab, multiple billing functions may be performed.

View an Individual Contact Balance
The balance for an individual contact will be displayed in the Balances section of the contact's Billing tab. This section will also display any credits the contact currently has.
View an Individual Contact Recurring Fee Schedule
The recurring fee schedule for an individual contact may be viewed in the Billing Fees and Schedule section of the contact's Billing tab.
View/Delete/Add an Individual Contact Stored Payments
Contacts may choose to store payment methods from the Info Hub, or may request that you store a payment from the back-office. Payment methods that have been stored for a contact may be viewed in the Stored Payments Profile section of the contact's Billing tab.

You may delete a stored payment by clicking the hyper-link for the payment in the Profile Name column.
Add a New Stored Payment (IPP)
- Click the the + button in the Stored Payments Profile section of the contact's Billing tab.
- Type - Select Integrated Payment Processing.
- Payment Gateway - Select the appropriate payment gateway from the drop-down list.
- Enter Card Information.
- Click Done.

Manage an Individual Contact's Invoices/Payments
Transaction History for an individual contact may be viewed and managed in the Billing History section of the contacts Billing tab. From this tab, you will be able to accept cash/check/credit card payments, create write-offs, download or email invoices.

Accept Payments
Accept a Check Payment
- Click the drop-down arrow on the Actions button for the invoice you want to pay. Click Enter Check.
- Enter the following:
- Payment From - This will automatically be populated with the name associated to the invoice.
- Payment Date - The date will default to the current date, and may be changed.
- Check Number - Enter the check number as a reference number.
- Amount - Enter the amount of the check.
- If multiple invoices are displayed, select the invoice to which this payment is to be applied.
- Click Done.

Accept a Credit Card Payment
- Click the drop-down arrow on the Actions button for the invoice you want to pay.
- Click Enter Credit Card.
- Enter the following information:
- Payment From - This will display the member the invoice was sent to. You may change this if necessary.
- Stored Payment Methods If a credit card has been stored for this member, you will be able to select this payment from the list.
- Card Information - Select the appropriate Payment Gateway.
- Enter Card Information - Enter the required credit card information fields.
- Store Payment Info For Future - if the member wishes you to do so, you may click this check-box to store this credit card number for future use.
- Amount - enter the amount to process in this transaction. The amount due on the invoice will be displayed by default, but you may change this.
- If multiple invoices are displayed, select the invoice to which this payment is to be applied.
- Click Done to process the credit card payment.
Accept Cash Payment
On an individual contact's Billing tab
- Click the drop-down arrow on the Actions button for the invoice you want to pay.
- Click Enter Cash.
- Enter the following:
- Payment From - This will automatically be populated with the name associated to the invoice.
- Payment Date - The date will default to the current date, and may be changed.
- Amount - Enter the amount of the check.
- If multiple invoices are displayed, select the invoice to which this payment is to be applied.
- Click Done.
Create A Write-off
- Select Billing in the Navigation Panel.
- Click the Invoices tab. Customize the list to display only unpaid invoices to make it easier to locate the invoice you wish to write-off.
- Click the Create Write Off icon in the Actions column.
- Configure the following as necessary:
- Write Off Date - The date will default to the current date.
- Notes - This field is for internal use and is a required field.
- Purchase Details - This field displays the invoice details, and may not be edited.
- Write Off Items - This field displays the fee items on the invoice, and the associated account. The Write Off Amount will be populated with the original amount on the invoice.
- Click Done to complete the write-off.
