Event Management
Contents
- 1 Events Initial Setup
- 2 Add a New Event
- 3 View Events
- 3.1 Customize your Event Display
- 3.2 Set Up Event Registration and Fee Details
- 3.3 Add Sessions to an Event
- 4 Manage Event Attendees
- 5 Manage Event Exhibitors
- 6 Event Management FAQ's
Events Initial Setup
Event Settings Defaults
The Event Settings options allow you to configure the defaults to be used for your events. Setting up the defaults will save you time when creating events, and may be over-ridden as needed for individual events.

- Select Setup in the Navigation panel.
- Click Event Settings in the Event section.
- On the Event Settings screen, you may configure the following to be the default for the events that you will setup
- (NOTE: You will be able to over-ride default settings as needed when you create an event):
- Payment Gateway - Select the payment gateway you wish to use by default for your events.
- Invoice Line Item Description Option - Select how you would like to display fee items for an event on invoices.
- Confirmation HTML for Event Attendee Registration - Enter the confirmation that you would like displayed to registrants after they have completed their registration.
- Confirmation HTML for Event Sponsor Registration - Enter the confirmation that you would like displayed to a sponsor after they have completed their registration.
- Max Event Invited Attendees to Store
- Default Contact For Event Approval Tasks - Select the individual who, by default, will be responsible for approval of events.
- Click Save to save your changes.
Create Calendars
To display your events (whether publicly, member only, or internally) you will need to setup your calendars.
- Click Setup in the Navigation Panel.
- Click Calendars in the Event section. A list of calendars currently configured in your system will be displayed.
- Click the Add button.
- On the Add/Edit Calendar screen configure the following:
- Name - This is the name that will display on your web-site, if you choose to display this calendar.
- Description - This is a description of the calendar for internal use.
- Is Public Viewable- Select this check-box if you wish this calendar to be viewed by the public.
- Is Member Viewable - Select this option if you wish this calendar to be viewed by members.
- Allow Public Submission - Select this option if you wish to allow the public to submit events on this calendar.
- NOTE: Events submitted by public will require approval by your approver.
- Allow Member Submission - Select this option if you wish to allow your members to submit events on this calendar.
- NOTE: You may allow members to submit events without approval. This is a function of the access level they have been granted.
- Group - Optional, select a group to associate to this calendar.
- Is Active - Select this check-box to activate the calendar. If it is not set as an active calendar, it will be be available for you to plan event on, nor to be displayed on your web-site or Info Hub.
- Click Done to save your new calendar.

Modify an Existing Calendar
You may modify any of your existing calendars.
- Click Setup in the Navigation Panel.
- Click Calendars in the Event section. A list of calendars currently configured in your system will be displayed.
- Click the link for the calendar you wish to modify.
- Make your desired modifications and click Done.
Set Up Goods & Services for Your Event
Prior to setting up your event, you will want to setup the appropriate fee items for the event. Refer to Set Up Goods & Services for details.
Add a New Event
You may add a new event by clicking the Quick Actions button in the header bar, or by clicking the Add Event button on the Events page.

- Click the Quick Actions button in the header bar.
- Click Add Event.
- On the Add New Event screen, configure the following settings:
- Name - Enter a name for the event. This is the name that will display on your web-site.
- Contact - Enter the contact person for the event.
- Description - Provide a description of the event. This description will be displayed on your web-site.
- Location - Enter location information. This information will be displayed on your web-site.
- Active Date - Enter the date that you wish to begin displaying this event on your web-site.
- Start At/End At - This is the start time and end time of the event.
- Enable Registration - Select this check-box to allow registration for this event. If this is not selected, a registration button will not be displayed on your web-site, however, your staff members would be able to register people from the back-office.
- Time/Hours Details - This section allows you to enter descriptive information about the time/hours of the event (such as when registration opens, when dinner starts, when auction starts).
- Event Contact Details - This text box allows you to enter further contact information, i.e. name, phone number, email, etc.
- Category - To assist you in filtering, sorting and/or report on this event, you may select a category from the drop-down list. This is optional.
- Calendar - Select the calendar(s) on which you want to display this event. The event may be displayed on multiple calendars.
- Event has Sessions/Breakouts - If you are using the Expo module, enabling this option will allow you to add sessions to your event. Click here for further information on setting up sessions.
- Event has Exhibitors - If you are using the Expo module, enabling this option will allow you to manage your exhibitors.
- Status - Select the status of this event.
- Click Save to save the new event.
View Events
You may view your events, by selecting Events in the Navigation Panel OR you may type the event name in the Search box in the header bar. When you select events in the navigation panel all of your events will be displayed. You may view the events in list format or in card format by clicking the icons on the right-hand side of the screen.

Click the name of Event you wish to customize to open the event's page. The Event page is setup with several different tabs that provide the functionality to customize and manage your event.

Customize your Event Display
The Overview tab of your event allows you to update the information supplied when the event was first created. You can update the general information, description, location, pricing, contact information. You may also add images and videos on the overview tab.
Add a Main Image to Your Event

- On the Event page, click the image icon next to the event name. The Image Manager will be displayed.
- On the Image Manager screen, you may either drag & drop the image onto the screen OR click the upload button to browse to your image, and upload.
- Position selection rectangle around area you would like to use.
- Crop & Save.
Add an Image Gallery to Your Event
- On the Overview tab for your event, click the the Add button in the Images section.
- You may drag an image into the image box OR click the Upload button to browse to your image.
- Enter, optional, Title and Caption for the image.
- Click Crop & Save.
Follow the steps above to add additional images. You may change the order in which images are displayed by clicking the Reorder button.
Display a Video for your Event
- On the Overview tab for your event, click the the Add button in the Videos section.
- Enter the URL to the location of your video.
- Click Done.

Display Map Location for Your Event
To include a map of the event location on your web-site, you must enter address information in the Location fields on the event's Overview page.

- Click the pencil icon in the Location section on the event's Overview tab.
- Configure the address. The more accurate the address, the more accurate the map will be.
- NOTE: If you consistently hold events at the same location, you can create it as a Venue by clicking the + adjacent to Venue and entering the address information. This will save the venue information and allow you to select it each time you create an event.
- (Optional). Enter Location Description. This allows you to enter further details about the location, and will be displayed on your web-site.
- Click Done.

Set Up Event Registration and Fee Details
Your event registration form. fees, discounts, and so on, are setup on an Event's Attendee Setup tab.
Setup Overall Registration Options
You can configure: your registration open/end dates, maximum attendees, visibility, and so on under the Overall Registration Options.
- On the Attendee Setup tab, click the pencil icon adjacent to Overall Registration Options.
- You may configure the following:
- Registration Start Date - This is the date that you wish registration to start; until this date, the Register button will not be displayed on your web-site.
- Registration End Date - This is the date that you wish to close registration. After this date, the Register button will no longer display on your web-site, and a message indicating that registration is closed will be displayed.
- Max Attendees - This setting allows you to define the maximum number of people who may register for the event. Once the maximum has been reached, the Register button will no longer display on your web-site, and a message will be displayed. If this field is left blank, there is no limit to your attendance.
- External Registration Link - If you are including an event on your calendar, but registration for this is not managed through your software, enter the URL for the registration site here.
- Allow Waiting List - Click this option to allow a waiting list. If this option is selected, when your maximum number of attendees has been reached, registrants will be notified that they can be added to a waiting list.
- Show Registered Attendees Publically - Select this check-box if you wish to display the registered attendee list on your public web-site.
- Show Registered Attendees To Members - Select this check-box if you wish to display the registered attendees for the event in Info Hub.
- Enable Registration - This check-box must be selected in order for people to register for the event.
- NOTE: Staff members would be able to register people for the event from the back-office even if this box is not checked.
- Collect Donations - If you are using the Fundraising module, this check box will allow you to also add a donation collection option to your registration form.
- Session Changes Allowed Until - If you are using the Event Expo module, this check box allows you to set a time limit on when registrants can make changes to the sessions they have signed up for.
- Click Done.

Configure Your Registration Form Settings
By default, the registration form for an event will require name and email address (organization will be included on the form, but is not required). You may configure your registration form and add custom fields in the Registration Form Settings section of the event's Attendee Setup tab.
If you wish to add custom fields to the registration form, the custom fields must first be created. You can easily create these by clicking the Actions icon on the right hand-side of the events screen. ![]()
- Click the Actions button.
- Click Manage Custom Fields.
- Click the Add Custom Fields button.
- If you have previously created a custom field for events, you can select it from the Use Existing Field list OR
- Enter a Name for the custom field. This is used internally in the database.
- Enter a Display Name. This is the name that will be displayed on the registration form.
- Select the Custom Field Data Type. This is the type of response that you expect for this custom field. For Example: If you want to know if the attendee has any dietary restrictions, you can select the Yes No data type.
- The Characters Allowed option lets you define the number of characters that may be entered when a Text data type is selected.
- Group/Section. N/A for Event Registration custom fields.
- Properties
- Select Is for Attendees if this field should be displayed on the registration form.
- Select Is Required to require registrants to fill in the custom field.
- If Is Required for Staff to require staff members to complete this field when they are registering an attendee from the back-office.
- Click Done to save the new custom field.


Setup your Event Fees
The registration fees for your event are configured in the Registration Types section of the Attendee Setup tab.

Different registration types may be added by clicking the down arrow on the Add Type button.

Add a Free Registration Type
- Click the Add Type button.
- Enter a Name for the Free Registration Type.
- Enter the Registrations Available (0 if unlimited). This option will limit the number of free registrations available, and will not allow registration with this type when the limit has been met.
- Enter the Number Of Attendees (0 if unlimited). This option will limit the total number of attendees for this type of registration.
- Enter a Description for this registration type.
- Settings options - these settings allow you to define which users can register with this type of registration. This would also display the registration types on your public page.
- Select the Is For Members check-box if you want this registration type to be available to your members.
- Select the Allow Non-Members check-box if this registration type is also available to non-members.
- Select the Is Displayed For Non-Members check-box if you wish to display this registration type to non-members, even if you have not chosen to allow this registration type for them.
- Click Done.

Add a Paid Registration Fee
- Click the down arrow on the Add Type button.
- Click Add Simple Paid Registration Fee.

- Enter a Name for the Free Registration Type.
- Enter the Registrations Available (0 if unlimited). This option will limit the number of free registrations available, and will not allow registration with this type when the limit has been met.
- Enter the Number Of Attendees (0 if unlimited). This option will limit the total number of attendees for this type of registration.
- Enter a Description for this registration type. The description will be displayed on your web-site.
- Settings options - these settings allow you to define which users can register with this type of registration. This would also display the registration types on your public page.
- Select the Is For Members check-box if you want this registration type to be available to your members.
- Select the Allow Non-Members check-box if this registration type is also available to non-members.
- Select the Is Displayed For Non-Members check-box if you wish to display this registration type to non-members, even if you have not chosen to allow this registration type for them.
- Select a fee item from the Item list. This is the previously setup registration fee for this event. Click here for further information on setting up fees.
- Enter, override or accept the Price.
- Click Done.
Add a Table/Group Registration Fee
- Click the down arrow on the Add Type button.
- Click Add a Table/Group Registration Type.

- Enter a Name for the Free Registration Type.
- Enter the Registrations Available (0 if unlimited). This option will limit the number of free registrations available, and will not allow registration with this type when the limit has been met. If you are setting up a registration type based on tables, this would be the number of tables available.
- Enter a Description for this registration type. The description will be displayed on your web-site.
- Settings options - these settings allow you to define which users can register with this type of registration. This would also display the registration types on your public page.
- Select the Is For Members check-box if you want this registration type to be available to your members.
- Select the Allow Non-Members check-box if this registration type is also available to non-members.
- Select the Is Displayed For Non-Members check-box if you wish to display this registration type to non-members, even if you have not chosen to allow this registration type for them.
- Select the Reserve All Attendees check-box to reserve all attendees.
- Select a fee item from the Item list. This is the previously setup registration fee for this event. Click here for further information on setting up fees.
- Enter, override or accept the Price.
- Enter the number of attendees per registration in Attendees per Table/Group.
- Click Done.
Set Up Discounts for your Event
Discounts are setup on the Event Attendee Setup tab.

Click the drop-down arrow on the Add Discount tab to select the type of discount you wish to setup.

Add a Early Registration Discount
- Click the down arrow on the Add Discount button.
- Click Add Early Registration Discount.
- Enter a Name for the discount.
- Discount Available Starting On - Enter the date this discount takes effect.
- Ends On - Enter the date this discount is no longer valid.
- Select a Discount Type from the drop-down. Previously created discount types will be included in the list. Click the + button to add a new discount type.
- Select your Discount Price Method:
- Reduce Price by Percentage - Enter the percentage by which the standard price will be discounted.
- Reduce Price by Amount - Enter the dollar amount that will be subtracted from the standard price.
- Set Price To - Enter the price that will be used instead of the standard price.
- Click the Advanced Options check-box (optional)
- Applies To (Registration Type) - Selecting one or more registration types allows you to limit the use of this discount to specific registration types. For example, if you have setup registration types for members and non-members, you could choose to only allow members to use this registration type.
- Total Available - This allows you to limit the number of this type of discount that can be used.
- Limit Per Purchase - This allows you to limit the number of this discount type that can be used per purchase.
- Click Done.

Add Promo Code Discount
- Click the down arrow on the Add Discount button.
- Click Add Promo Code Discount.
- Enter a Name for the discount.
- Discount Available Starting On - Enter the date this discount takes effect.
- Ends On - Enter the date this discount is no longer valid.
- Enter a Promo Code. This is defined by you, and you can then share it.
- Select a Discount Type from the drop-down. Previously created discount types will be included in the list. Click the + button to add a new discount type.
- Select your Discount Price Method:
- Reduce Price by Percentage - Enter the percentage by which the standard price will be discounted.
- Reduce Price by Amount - Enter the dollar amount that will be subtracted from the standard price.
- Set Price To - Enter the price that will be used instead of the standard price.
- Click the Advanced Options check-box (optional)
- Applies To (Registration Type) - Selecting one or more registration types allows you to limit the use of this discount to specific registration types. For example, if you have setup registration types for members and non-members, you could choose to only allow members to use this registration type.
- Total Available - This allows you to limit the number of this type of discount that can be used.
- Limit Per Purchase - This allows you to limit the number of this discount type that can be used per purchase.
- Can Be Used With Other Discounts - Select this check-box if this discount can be used in conjunction with other discounts.
- Click Done.

Add Discount for Membership Type
- Click the down arrow on the Add Discount button.
- Click Add Discount for Membership Type.
- Enter a Name for the discount.
- Discount Available Starting On - Enter the date this discount takes effect.
- Ends On - Enter the date this discount is no longer valid.
- Select a Membership Type from the drop-down.
- Select a Discount Type from the drop-down. Previously created discount types will be included in the list. Click the + button to add a new discount type.
- Select your Discount Price Method:
- Reduce Price by Percentage - Enter the percentage by which the standard price will be discounted.
- Reduce Price by Amount - Enter the dollar amount that will be subtracted from the standard price.
- Set Price To - Enter the price that will be used instead of the standard price.
- Click the Advanced Options check-box (optional)
- Applies To (Registration Type) - Selecting one or more registration types allows you to limit the use of this discount to specific registration types. For example, if you have setup registration types for members and non-members, you could choose to only allow members to use this registration type.
- Total Available - This allows you to limit the number of this type of discount that can be used.
- Limit Per Purchase - This allows you to limit the number of this discount type that can be used per purchase.
- Can Be Used With Other Discounts - Select this check-box if this discount can be used in conjunction with other discounts.
- Click Done.

Add Volume Discount
- Click the down arrow on the Add Discount button.
- Click Add Volume Discount.
- Enter a Name for the discount.
- Discount Available Starting On - Enter the date this discount takes effect.
- Ends On - Enter the date this discount is no longer valid.
- Enter a Minimum Quantity for Discount.
- Select a Discount Type from the drop-down. Previously created discount types will be included in the list. Click the + button to add a new discount type.
- Select your Discount Price Method:
- Reduce Price by Percentage - Enter the percentage by which the standard price will be discounted.
- Reduce Price by Amount - Enter the dollar amount that will be subtracted from the standard price.
- Set Price To - Enter the price that will be used instead of the standard price.
- Click the Advanced Options check-box (optional)
- Applies To (Registration Type) - Selecting one or more registration types allows you to limit the use of this discount to specific registration types. For example, if you have setup registration types for members and non-members, you could choose to only allow members to use this registration type.
- Total Available - This allows you to limit the number of this type of discount that can be used.
- Limit Per Purchase - This allows you to limit the number of this discount type that can be used per purchase.
- Can Be Used With Other Discounts - Select this check-box if this discount can be used in conjunction with other discounts.
- Click Done.

Customize Registration Instructions and Confirmation Messages
On the Event Attendee Setup page, you can customize the instructions displayed on your registration page. You can also customize the confirmation displayed after registration is completed.

Click the pencil icon to edit your messages.
Add Sessions to an Event
If you are using the Expo module, you will be able to add sessions to an event, allowing your attendees to customize their own agenda.

To best organize your sessions, it is best practice to create the timeslots (agenda) for your sessions first:
- On the Event page, click the Sessions/Breakouts tab.
- Click the Timeslots button.
- Click the + button to add a new timeslot.
- Enter a Name for the timeslot.
- Click the calendar icon to select a Start Time.
- Click the calendar icon to select an End Time.
- Click Done


Repeat the steps above to add additional timeslots to your agenda.
Now you can add the sessions that apply to the timeslots.
- On the Event page, click the Sessions/Breakouts tab.
- Click the Add Session button.
- Enter a Name for the session.
- Enter a Description of the session. This description will be displayed in the summary section for the event on your registration page.
- Select the Timeslot for the session.
- Select the Location for the session. To add locations, click the + button.
- Enter the Attendee Limit (0 if unlimited). If there is a limit to the number of people who may register for a session, this will close the session once registration has met the limit.
- Select the Event Registration Types to associate to this session. This allows you to define which registration types are allowed to take this new session. If, for example, all sessions are included in the event registration fee, you would simply select the event registration fee.
- You may upload a Main Photo for the session by clicking the pencil icon. The photo will be displayed on your registration page.
- If you wish to provide a Speaker name, and Title and Details (biography) information, click the + button to enable the fields. To add biography details, click the edit link under Details. Biography information will be displayed in the speakers section on your event page.
- Click Done to save the new session.


Repeat the steps above to add additional sessions.
Manage Event Attendees
The Events Module provides a variety of ways to manage your event attendees.
Send Event Invite
- Select the Attendees tab.
- Click the Actions button.
- Click Send Event Invite Email.


The Send Email screen will automatically populate the subject "Event Invite", you may change this to better describe your event. The message will default to the Event Invite template, including merged fields. The use of merge fields personalizes the invite for each recipient, and provides information specific to the event that you are working with. You may edit the template to meet your specific needs.
If you want to schedule the email to be sent at a future date, enter a date in the Delay Delivery Until text box.
If you have previously sent an Event Invite, clicking Ignore Recipients that have Registered, Declined, Been Invited,... check-box will limit the email to those individuals who have not previously received the invite.
Re-send a Previously Sent Event Invite
- Select the Attendees tab.
- Click the Actions button.
- Click Re-send Event Invite.


The Send Email screen will automatically populate the subject "Event Invite", you may change this to better describe your event. The message will default to the Event Invite template, including merged fields. The use of merge fields personalizes the invite for each recipient, and provides information specific to the event that you are working with. You may edit the template to meet your specific needs.
If you want to schedule the email to be sent at a future date, enter a date in the Delay Delivery Until text box.
Cancel a Registration
You can cancel a registration on the event Attendees tab.
- On the Event Attendees tab, click the down arrow on the Actions button for the attendee you want to cancel.
- Click Cancel Registration.
- Review the Cancel Attendance screen and click Done.


Manage Event Exhibitors
If you are using the Expo module, you can add and manage exhibitors to your events on the Event page.
Setup Exhibitor Registration Page
- On the Event page, click the Exhibitor Setup tab.
- Configure your Exhibitor Registration Options:
- Click the pencil icon for Exhibitor Registration Options.
- Configure the following settings:
- Registration Start Date - This is the date you wish to open registration for your exhibitors.
- Registration End Date - This is the date that registration will close for exhibitors.
- Exhibitor Directory - Select the directory you will use for the exhibitors. You can add a new directory by clicking the + button.
- Terms/Conditions - Select the terms/conditions that an exhibitor must agree to.
- Enable Registration - Click the check-box to enable on-line registration.
- Allow Logo - Select this option to allow the exhibitor to upload a logo when registering for the event.
- Click Done.


Configure Booth Types
The Booth Types (Available For All Events) section of the Exhibitor Setup page allows you to define the different types of booths (and the numbering of the booths) that you will make available to your exhibitors.
To add Booth Types:
- Click the + button in the Booth Types (Available For All Events) section.
- Enter a Name for the booth type.
- Enter a Description of the booth type.
- Select a Venue for the booth type. This indicates the location of the booth. If you have previously created venues, you may select one from the drop-down OR click the + button to add a new venue.
- Setup your Booth Configurations. This function allows you to define booth configuration types, sizing and style of booth, as well as define your booth numbers.
- Click the + button to add a new Booth Configuration.
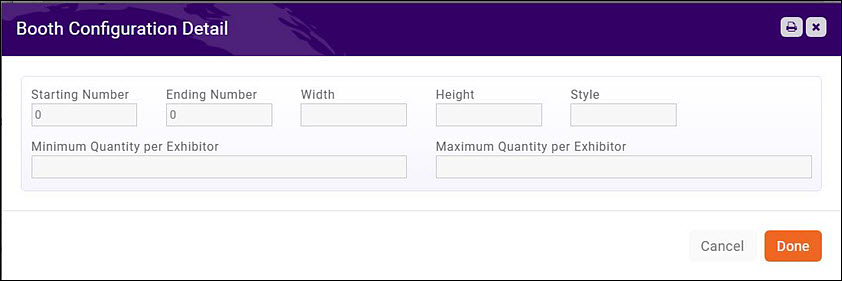
- Enter the Starting Number. This is the first booth number of this configuration type.
- Enter the Ending Number. This is the last booth number of this configuration type.
- Enter the Width and Height of this configuration type.
- Enter the Style of this configuration type.
- Minimum Quantity per Exhibitor - Enter the minimum number of this configuration type that an exhibitor may register for.
- Maximum Quantity per Exhibitor - Enter the maximum number of this configuration type that an exhibitor may register for.
- Click Done.


Event Management FAQ's
How can I setup my fees so that I can defer revenue revenue recognition to the date the event starts?
- Select Setup.
- Click Goods/Services in the Services, Products and Commerce section.
- Click New.
- Setup your goods/services for the event as you normally would (Click Here for full details of setting up Goods/Services) , with specific configuration of:
- Revenue Recognition Type: This setting allows you to configure when the revenue will be recognized. Select Fully on Event Start Date to defer revenue recognition until the start date of the event.
- Deferred Income Account: Select the deferred income account for this good/service. The drop-down list will be populated with the deferred income accounts configured in you Chart of Accounts. If you have chosen to defer the revenue for this event to a specific point in time, the revenue will be held in the deferred income account until that point in time.

With this goods/service, as registration fees are processed, the revenue will be placed in the deferred income account selected for the goods/service. On the day of the event, the revenue will be moved to the income account you selected for the goods/service. Income in the deferred revenue account can be monitored by running the Accounting Transaction Report or the Sales by Account Report.
Click Here to view reports.