Getting Started
Contents
Setup Basic Account Settings
You will configure your time zone and organization logo as one of the first steps in using your database. NOTE: The General Settings logo is the main default logo. A separate logo for invoices may be uploaded in the Finance section.
Setting Time Zone & Organization Logo
- Click Setup in the Navigation Panel.
- In the Miscellaneous section, click General Settings.
- Select your time zone from the Current Timezone drop-down list.
- Primary Logo - Click the pencil icon below Primary Logo to import your logo. The Image Manager window will open. NOTE: The pencil icon will only display when you hover your mouse below Primary Logo.
- In the Image Manager, click Upload. You will then navigate to your computer/server location of your logo.
- Select your logo and click open. You may position and crop the logo as needed.
- Click Crop and Save to save your logo.
Setup Terminology Settings
MemberZone is built to be very customizable for your needs. If needed, you can customize the terminology used in the database. For instance, if you wish you may change the default name "Organization" to "Business".
- Click Setup in the Navigation Panel.
- In the Miscellaneous section, click System Terminology. A list of terms that may be customized is displayed. NOTE: Terms listed as TODO are terms that Micronet is currently setting up for future customization.
- Click the link for the term you wish to customize. The Override Terminology screen will be displayed.
- Enter the term you wish to use in the Your Custom Term text box.
- Enter the plural version of your custom term in the Plural Form text box.
- Click Done to save your changes.
Custom Fields
Custom Fields are designed to give ultimate flexibility in managing your data. When adding a custom field, you will create a database field that is available for tracking additional desired information. For example, you may wish to track an individuals birth month so that you can send out birthday greetings. Fields may be added to your Member Application Form to capture the information at the time of application, or fields may be added directly to a record.
- Click Setup in the Navigation Panel.
- Click Custom Fields in the Miscellaneous section. A list of the custom fields currently configured in your database will be displayed.
- Click the Add button.
- On the Add/Edit Custom Field screen, configure the following:
- Field Area - Select a field area from the drop-down list. This selection dictates where you would like to use the custom field. For example, if you wish to create a field to be used on your membership application, you would select Membership Application.
- Name - Enter a name for the custom field. This will be used internally by the database.
- Display Name - Enter a display name. This is the field that will be displayed on screens in your system, as well as on forms presented to the public. NOTE: This field may include a question or statement, as needed.
- Custom Field Data Type - Select the data type for the custom field. NOTE: Selecting Drop-down will allow you to setup a list of options, and one option may be chosen. Selecting Drop-down with fill-in will allow the user to fill in an option. Multi-choice would allow the user to select more than one option.
- Usage/Behavior - (Optional/Advanced Option) Select the expected usage/behavior of this custom field.
- Group/Section - (Optional) Select the desired group section of this custom field.
- Characters Allowed - This option would limit the number of characters that could be entered in a text box response.
- Properties - Define the properties for the custom field:
- Public - Select this check-box if you wish this field to be displayed for the public. For example, if you are creating a custom field for a membership application form, you will want to ensure this checkbox is selected.
- Member Editable - (Advanced Option) Select this check-box if you want to allow members to edit this field in InfoHub.
- Required - (Advanced Option) Select this check-box to make this field required.
- Archived - (Advanced Option) If you no longer wish to use this custom field, select this check-box.
- Click Done.
Setup Up User Access Level and Credentials
Setup Access Levels
Access Levels drive what functions your staff will be able to perform in the database. You may view existing access levels by selecting Setup in the Navigation Panel, and clicking Access Levels in the Users section.
The system is populated with the following access levels:
- Staff - Admin - this access level provides full control of the overall system.
- Staff - Guest - this access level provides read only of the overall system.
- Staff - Standard - this access level provides read/edit/create/delete of the system, with the exception of the Finance sections, which are view only.
- Staff - Finance - this access level provides full editing, and full Finance access.
- User - Guest - this access level provides view only access in Info Hub.
- User - Standard - this access level provides Create/Edit in Info Hub but not the ability to delete.
- User - Primary - this access level provides full control in Info Hub. Users with this access would be able to add content without staff approval.
The above access levels may be used as initially setup, or you may customize them to meet your needs.
Create a New Access Level
- In the Navigation panel, select Setup.
- Click the Access Level link in the Users section. The Access Level screen will display a list of the pre-configured Access Levels, and the number of people assigned to each level. You may view the permissions that are associated to a particular level by clicking the hyper-link. You will see a list of each of the main functions of the database, and the access level granted.
- To create a new Access Level, click the ADD button.
- Enter a Name for the new Access Level – best practice would be to provide a name that at a glance tells you what the access level is for.
- Select the Access Level Type. The Staff and User options are a way for the system to differentiate between which access level it should display when you are creating access for a member of your chamber or association vs. creating access for a staff person.
- For each function, select the level of access you wish to provide. If you wish to provide access to the entire system with one level of access, you can do this by selecting the access level for Overall System. Or, if you wish to set specific access to individual functions, select the access for that function.
- Once all selections have been made, click Done.
Setup User Credentials
Each member of your staff who will need access to the database will need to be provided with login credentials.
Add New User
- In the Navigation Panel, click Setup.
- Click Add User in the Users section.
- Configure the following:
- Primary Contact / Password Reset Email - Enter an email address for the user. This email address is used to send an initial email to the user to complete their login credentials, and is also used when an email needs to be sent to reset a password.
- First Name
- Last Name
- Access Level - select the access level you wish to assign to this user.
- Click Done.

NOTE: If the new user already exists in the database, the system will display this on the screen, this will prevent you from creating a duplicate user.
View Staff Users
- In the Navigation Panel, click Setup.
- Click Users in the Users section. A list of all of your staff users will be displayed.

Resend User Credentials Setup Instructions
When a new user is setup in your system, an email is automatically sent to them to create their user name and password. If a user does not receive notification to setup credentials, or they have not setup their credentials, you can resend the setup instructions from the Users page (Setup > Users > Users).
Click the Resend Invite icon ![]() in the Actions column.
in the Actions column.
Send Staff User Password Reset Instructions
You can send an email providing instructions to the user on how to reset their password on the Users page (Setup > Users > Users)
Click the Send Reset Email icon ![]() in the Actions column.
in the Actions column.
Reset a Staff Users Password
You can reset a users password on the Users page (Setup > Users > Users).
Click the Reset Password icon ![]() in the Actions column.
in the Actions column.
De-activate a Staff User
- In the Navigation Panel, click Setup.
- Click Users in the Users section. A list of all of your staff users will be displayed.
- Click the link for the staff user to deactivate.
- De-select the Is Active check-box.
- Click Done.
Re-activate a Staff User
- In the Navigation Panel, click Setup.
- Click Users in the Users section. A list of all of your staff users will be displayed.
- Click the link for the staff user to deactivate.
- Select the Is Active check-box.
- Click Done.
Configure User Notifications
Your system can be automated to send notifications when certain events occur. For Example: An automated notification can be sent to a staff member when an On-line Membership Application is submitted. An administrator can setup the notifications for a staff member on the Users page (Setup > Users > Users).
- Click the Notifications icon
 in the Actions column.
- Click the notifications to which you want to subscribe this user.
- Select the users email address.
- Select how frequently you want this user to receive notifications.
- Click Done.

NOTE: Staff Users may also setup their own notifications by clicking their name in the header bar, and selecting My Notifications.
Setup Directory Listing Types
Directory Listing Types control what information about a business or individual is displayed if you choose to publish a directory of members to your website. You may, perhaps, have different levels of listings based on membership type. A basic level might include just a business name and a logo, where as an enhanced listing may include photo galleries, videos, maps, etc.
Use the following procedure to setup your Directory Listing Types:
- Click Setup in the Navigation Panel
- Click Directory Listing Types in the Website/Content Management System section. A list of the Directory Listing Types currently configured in your system will be displayed.
- Click Add.
- On the Add/Edit Directory Listing Type configure the following:
- Name - Provide a name for the Directory Listing Type.
- Description - Provide a description of the Directory Listing Type.
- Rank/Priority Placement - This option allows you to control the placement in the directory. It is designed to allow you to automatically move certain types of directory listings to the top of the directory, regardless of alphabetical order.
- Show Contact Details - Select which contact details you want to display in the directory.
- Show Custom Fields - Select the custom fields you want to display in the directory.
- Options - select the additional options to display in the directory:
- Show Membership Type
- Show Search Logo
- Use Contacts Website for Listing page
- Show Highlights
- Show Related Contacts
- Show Search Description
- Show Gallery - If selected, the member may display a gallery of photos on the web-page.
- Show Video - if selected, the member may display a video on the web-page.
- Show Map - if selected, the location of the organization will be displayed on map on the web-page.
- Show Primary Contact - if selected, the name of the primary contact will be displayed on the web-page.
- Use Contacts Website for Listing pageApplicable only when assigned to a public directory (not available in the Hub). When this option is selected, clicking on the member on your public web-site will lead to the contacts website, instead of your page.
- Click Done.

Setup Directories
You system will contain a default directory, Active Member Directory. This directory is tied to your Business Category and may contain all of your valued members. It also is configured with the Standard Listing directory listing type. Advanced options, including searching by custom field may be configured for the default.
Create a New Directory
You may create multiple directories as needed. For example, if you have several chapters, and want a separate directory for each chapter.
- Click Setup in the Navigation Panel
- Click Directories in the Website/Content Management System section. A list of the directories currently configured in your system will be displayed.
- Click the Add button.
- Configure the following:
- Name - Enter a name for the directory. This is the name that will be displayed on your web-site.
- Description - Enter a description of this directory. This description will be displayed on your web-site.
- Select the Directory Listing Type you wish to associate, by default, with this directory. You will have the ability to over-ride the directory listing type when creating Benefit Packages. Click here for more information on setting up benefit packages.
- Select the Category List to associate to this directory.
- Click the Available to Info Hub check-box if you want to include this directory on the Info Hub pages.
- Click the Advanced Options check-box.
- Click the Allow Search Filtering check-box.
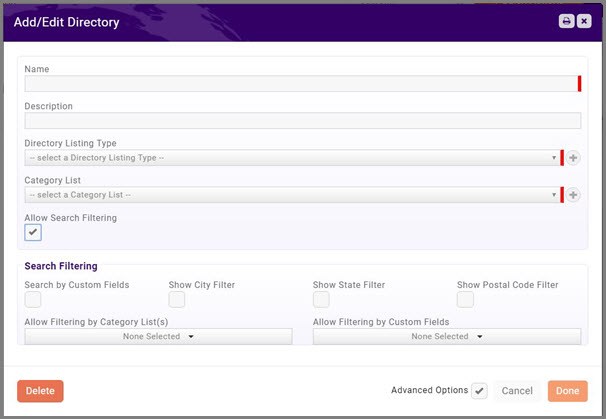
- Click Search by Custom Fields if you want to allow searching based on custom fields you have created as Directory Listing. Existing fields will be displayed at the bottom of the screen. You can add additional fields as needed by clicking the + sign. You will then select the custom fields to be used for filtering from the Allow Filtering by Custom Fields drop-down list.
- Enable City, State and Postal Code if you wish to provide these as filtering options.
- To Allow Filtering by Category List(s), select the category lists you wish to allow search on from the drop-down.
- To Allow Filtering by Custom Fields, select the custom field you wish to allow search on from the drop-down.
- Click Done.

