Difference between revisions of "Integration"
(→Supra) |
|||
| Line 1,178: | Line 1,178: | ||
#*If you have selected Custom for the Lock Box Office ID, Lock Box Agent ID and Lock Box Listing ID, enter your custom identifiers. | #*If you have selected Custom for the Lock Box Office ID, Lock Box Agent ID and Lock Box Listing ID, enter your custom identifiers. | ||
#*If you have selected NRDS ID or MLS ID, ensure these fields are populated on the Real Estate tab. You will not be able to save the record, and therefore synchronize to Supra if they are not. | #*If you have selected NRDS ID or MLS ID, ensure these fields are populated on the Real Estate tab. You will not be able to save the record, and therefore synchronize to Supra if they are not. | ||
| + | #Click '''Save'''. | ||
| + | |||
| + | ====='''<span style="color:#800080">Change an Agent’s Supra Account Record'''</span>===== | ||
| + | ---- | ||
| + | Any changes made the fields described in the table above will result in a change record being sent to Supra. As long a '''Sync to LockBox''' is enabled, the system will “notice” these changes and send them within the hour, with no interaction on your part. | ||
| + | |||
| + | ====='''<span style="color:#800080">Terminate an Agent’s Supra Account Record'''</span>===== | ||
| + | ---- | ||
| + | |||
| + | #On the Agent’s '''Profile''' tab, ensure that all required information, defined in the table above, has been populated. | ||
| + | #Click the '''Real Estate''' tab. | ||
| + | #:[[File:Real estate tab1.jpg|800px|center]] | ||
| + | #Ensure that '''Sync With LockBox''' is checked. | ||
| + | #In the '''LockBox''' section, select '''Terminated''' from the '''LockBox Member Status''' list. | ||
| + | #:[[File:Lockbox terminated.jpg|600px|center]] | ||
| + | #Click '''Save'''. | ||
| + | |||
| + | {| class="wikitable" | ||
| + | |- | ||
| + | | | ||
| + | [[File:One Row.png|25px]] | ||
| + | | style="width: 100%"| '''NOTE:''' If your system is configure to '''Use Membership Status To Determine Lockbox Status''', dropping an agent's membership to your association, will also result in the LockBox Member Status being set to Terminated. This option is only available if you have one and only one association membership type per agent. | ||
| + | |} | ||
| + | |||
| + | |||
| + | ====='''<span style="color:#800080">Suspend an Agent’s Supra Account Record'''</span>===== | ||
| + | ---- | ||
| + | |||
| + | #On the Agent’s '''Profile''' tab, ensure that all required information, defined in the table above, has been populated. | ||
| + | #Click the '''Real Estate''' tab. | ||
| + | #:[[File:Real estate tab1.jpg|800px|center]] | ||
| + | #Ensure that '''Sync With LockBox''' is checked. | ||
| + | #In the '''LockBox''' section, select '''Terminated''' from the '''LockBox Member Status''' list. | ||
| + | #:[[File:Lockbox suspended.jpg|600px|center]] | ||
#Click '''Save'''. | #Click '''Save'''. | ||
Revision as of 21:21, 15 November 2019
Contents
- 1 Connecting to Constant Contact
- 2 Mail Chimp Integration
- 3 GoToWebinar Integration
- 4 Higher Logic
- 5 Voter Voice
- 6 Builder Edition Integrations
- 7 REALTOR Edition Integrations
- 7.1 NRDS Integration
- 7.2 NAR ECommerce
- 7.3 MLS Integration
- 7.4 Lockbox
- 8 GrowthZone APIs
Connecting to Constant Contact
Through your GrowthZone software, you can sync contacts in your Lists/Committees to Constant Contact. Any additions, changes or deletions made to lists/committees that you have set to Synchronize Contacts with authorized third party newsletter solution will synchronize to Constant Contact near real-time. See Setting Up Lists/Committees for information on configuring your lists/committees to synchronize to a third party newsletter.
- Click Setup in the left-hand navigation panel.
- Click Constant Contact in the Integrations section.
- Click Connect.
- Enter your credentials for Constant Contact, and click Log-in.
- Click Allow on the Allow Access screen. This process authorizes the connection between GrowthZone and Constant Contact. Once completed, you will see the ConstantContact status updated to Connected.


After initial connection, click the Sync button. This will synchronize all of your existing lists/committees, that are set to you Synchronize Contacts with authorized third party newsletter solution, with Constant contact. NOTE: Only contacts with a default/primary email address and where Do Not Contact is not enabled, will be synchronized to Constant Contact.
Constant Contact Synchronization
Once your system is setup to synchronize to Constant Contact, the following additions, edits, and deletions performed in GrowthZone will be sent to Constant Contact in near real-time (usually within ten minutes):
- A new List/Committee is added to GrowthZone with “Synchronize contacts with authorized third party newsletter” set: The new list/committee is added to Constant Contact.
- A new contact (with valid default/primary email address) is added to the List/Committee in GrowthZone: The new contact is added within that group in Constant Contact
- A new contact (with valid default/primary email address) is added to the List/Committee in GrowthZone with Do Not Contact is set: The new contact is NOT synchronized to Constant Contact
- The “Do Not Contact” check-box is set for an existing contact in the List/Committee within GrowthZone: The existing contact is disabled in Constant Contact, and removed from the list/committee in Constant Contact.
- The "Do Not Contact" check-box is cleared for an existing contact in the List/Committee within GrowthZone: If the contact, that would previously have been disabled in Constant Contact, is re-enabled.
- An existing contact's name and/or default email address is changed (and the contact belongs to the List/Committee synched to Constant Contact): The updated contact information is sent to Constant Contact.
- An existing contact is removed from a List/Committee in GrowthZone: The contact is removed from the List/Committee in Constant Contact. If the contact is not a part of other lists, the contact is disabled.
- If a List/Committee is deleted from GrowthZone: The List/Committee is deleted from Constant Contact. If there are contacts in the Lists/Committees, and those contacts belong to no other Lists/Committees, they are disabled in Constant Contact.
- A contact who is in multiple Lists/Committees in GrowthZone is deleted from GrowthZone: The contact is deactivated in Constant Contact.
Mail Chimp Integration
Through your GrowthZone software, you can sync contacts in your Lists/Committees to Mail Chimp. Any additions, changes or deletions made to lists/committees that you have set to Synchronize Contacts with authorized third party newsletter solution will synchronize to Mail Chimp near real-time. See Setting Up Lists/Committees for information on configuring your lists/committees to synchronize to a third party newsletter.
Connecting to Mail Chimp
- Click Setup in the left-hand navigation panel.
- Click Mail Chimp in the Integrations section.
- Click Connect.
- Enter your credentials for Mail Chimp, and click Log-in.
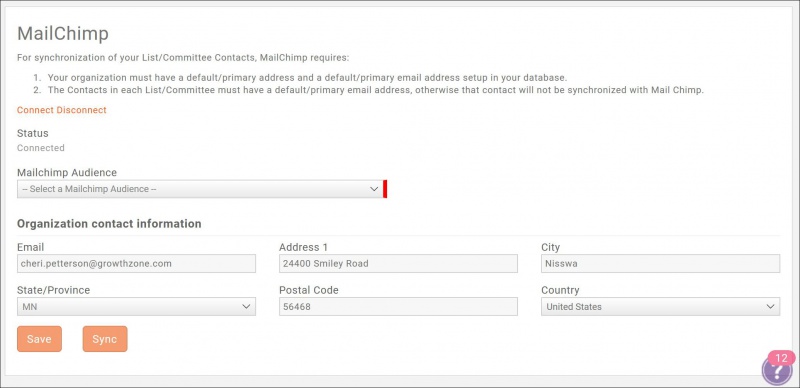
- Connection status will show Connected and your Organization Contact Information will be displayed.
- Select an Audience from the MailChimp audience drop-down list. All contacts will be brought into MailChimp in this single Audience, tagged with the name of the GrowthZone List/Committee. When sending your emails from MailChimp, you will select this audience, filtered by the desired tag. See more info on Mailchimp Tags and How to Send Emails Filtered by Tags
- Click Save.


After initial connection, click the Sync button. This will synchronize all of your existing lists/committees, that are set to you Synchronize Contacts with authorized third party newsletter solution, with Mail Chimp. NOTE: Only contacts with a default/primary email address and where Do Not Contact is not enabled, will be synchronized to Mail Chimp.
Mail Chimp Synchronization
Once your system is connected, the following additions, edits, and deletions performed in GrowthZone will be sent to Mail Chimp in near real-time (usually within ten minutes):
- A new List/Committee is added to GrowthZone with “Synchronize contacts with authorized third party newsletter” set: The new list/committee is added to Mail Chimp.
- A new contact (with valid default/primary email address) is added to the List/Committee in GrowthZone: The new contact is added within that group in Mail Chimp.
- A new contact (with valid default/primary email address) is added to the List/Committee in GrowthZone with Do Not Contact set: The new contact is NOT synchronized to Mail Chimp.
- The “Do Not Contact” check-box is set for an existing contact in the List/Committee within GrowthZone: The existing contact is unsubscribed in Mail Chimp, and removed from the list/committee in Mail Chimp.
- The "Do Not Contact" check-box is cleared for an existing contact in the List/Committee within GrowthZone: If the contact, that would previously have been disabled in Mail Chimp, is re-enabled.
- An existing contact's name and/or default email address is changed (and the contact belongs to the List/Committee synched to Mail Chimp): The updated contact information is sent to Mail Chimp.
- An existing contact is removed from a List/Committee in GrowthZone: The contact is removed from the List/Committee in Mail Chimp. If the contact is not a part of other lists, the contact is disabled.
- If a List/Committee is deleted from GrowthZone: The List/Committee is deleted from Mail Chimp. If there are contacts in the Lists/Committees, and those contacts belong to no other Lists/Committees, they are disabled in Mail Chimp.
- A contact who is in multiple Lists/Committees in GrowthZone is deleted from GrowthZone: The contact is deactivated in Mail Chimp.
|
|
NOTE: If a user unsubscribes from a list via MailChimp, Do Not Contact will be set for the contact on that list in GrowthZone. |
GoToWebinar Integration
With GoToWebinar integration, you can create your events in GrowthZone and have the corresponding event create in GoToWebinar. To enable GoToWebinar integration:
- Click Setup in the left-hand navigation panel.
- Click GoToWebinar in the Integrations section.
- Enter your GoToWebinar user name and password.
- Click Connect.

Once you have connected, you will be able to sync your events to GoToWebinar on the event's Overview tab, under General Information. Events synced, will automatically be created in GoToWebinar. When attendees register, they will receive confirmations from GoToWebinar with login instructions.
Higher Logic
The integration between the GrowthZone AMS and your Higher Logic Community site drives object creation in the community from the vast amount of up to date member data that you already track in the GrowthZone AMS. The integration ensures that your members interact with the most up to date member data, boosting member participation, collaboration and retention. Through your GrowthZone software you can sync your lists/committees to Higher Logic.
After the integration is in place, it is not necessary to complete any additional work to ensure that the data reflected on your community site remains synchronized with the GrowthZone AMS. GrowthZone uses Higher Logic's Push API Integration methodology. This type of integration allows GrowthZone to send updates directly to Higher Logic.
|
|
NOTE: The integration allows active individual members of lists/committees set to sync with a third party newsletter solution to use their InfoHub credentials to sign in to your Higher Logic communities. Data synced to Higher Logic is used for sharing the login information and cannot be edited in Higher Logic and synced back to GrowthZone. |
Higher Logic Authentication
To authenticate with Higher Logic an API Gateway Key and Tenant Code are needed for the Push API method. The API Gateway Key is generated by Higher Logic and the Tenant Code is specific to the client’s Higher Logic’s instance. The Tenant Code is generated by Higher Logic, and is entered into GrowthZone in the Higher Logic integration settings. Click Here for Higher Logic documentation on integration. Please contact support@higherlogic.com and ask for an API key that can be used to integrate your GrowthZone account. If you are just starting with Higher Logic, mention this integration to your Higher Logic Account Manager and he will give you this key.
Higher Logic Synchronization
When synchronized to Higher Logic, GrowthZone will push (near real-time) changes to the following records:
- Contact Information
- Organizations
- Membership Types
- Lists/committees to which the contact is assigned
We do NOT currently support the following types of updates via our Higher Logic integration:
- Security Groups
- Demographics
- Events
- Job History
- Education
|
|
NOTE: Individuals are pushed to Higher Logic, not organizations. When setting up lists/committees for synchronization to Higher Logic, ensure that individual contacts are added to the list/committee not a business/organization. |
Only the records of Active members associated to groups for which the Synchronize Contacts with authorized third party newsletter solution is enabled will be pushed to Higher Logic. Click Here for information on configuring groups to synchronize to a third party.
Higher Logic refers to lists/committees as Communities. If a new list/committee is pushed to Higher Logic, Higher Logic will automatically create the community, however it will be hidden. These communities will require further configuration in Higher Logic for the correct use, but they will not need to be created. A Higher Logic user with administrative rights would need to access the communities area, configure the community appropriately and un-hide it. Click Here for Higher Logic documentation on managing communities.
Set Up Higher Logic Integration
- Select Setup in the Navigation Panel.
- Select Higher Logic in the Integrations section. This will open the Higher Logic Integration dialog box.
- Click Enabled.
- Enter the Tenant Code provided by Higher Logic.
- Enter the Tenant API Key from Higher Logic
- Click Save.
- Once the integration settings have been saved, click the Sync button. This will synchronize all of the lists/committees for which you have enabled Synchronize Contacts with authorized third party newsletter solution to Higher Logic. If you plan on using Single Sign-on, it is important that you do this initial synchronization prior to enabling single sign-on. This ensures that Higher Logic has a record of the users who are attempting to access Higher Logic from the Info Hub.

After initial synchronization, the system will look for additions, changes, and deletions from list/committees that are set to synchronize with Higher Logic and push these changes to Higher Logic within 30 minutes. As access to Higher Logic is intended to be a member benefit, only Active members in the lists/committees will be pushed over to Higher Logic. The List/Committee Setting Do Not Contact has no impact on synchronization for Higher Logic. Higher Logic is used as a community forum, not for email purposes.
Higher Logic Single Sign-on
GrowthZone AMS’s API provides a seamless Web experience across the GrowthZone AMS and other third-party systems. It allows users to login to your Info Hub (Members Only Area) and gain secure access to all related Web sites, including your Higher Logic Community using the same login credentials they would use with the GrowthZone AMS Info Hub. Single Sign-On (SSO) is accomplished by using GrowthZone’s implementation of OAuth 2.0, an industry-standard protocol for authorization.
Only Active members, assigned to lists/committees that are synchronized to Higher Logic will be able to access Higher Logic. If a member is dropped, or removed from a list/committee they will no longer be able to access Higher Logic. Your active staff members will also have access via single sign-on to Higher Logic.
Setting Up Single Sign-on
|
|
NOTE: You must complete the Higher Logic Integration setup prior to setting up Single Sign On. Your members will not be able to sign in if the integration has not been setup. |
- Select Setup in the Navigation Panel.
- Select Higher Logic in the Integrations section. This will open the Higher Logic Integration dialog box.
- Click the Show Single Sign-On link in the Info Hub check-box.
- Link to HigherLogic Community Site: This is automatically populated and should be the URL for your Higher Logic site. Best practice is to verify that this link is correct.
- Optional Custom Term for Community Link: You can customize the Info Hub link, by default the link is named Community.
- Optional Custom Icon for Community Link: (Optional) You may enter a a Font Awesome icon to be displayed on the navigation panel for this item in the Info Hub. Visit the Font Awesome website. The icons you choose must be for supported FREE icons version 5.0.12 or less.
- Click Save.

The first time a member clicks the Community (or the terminology you have configured) link in the Info Hub, an authorization page will be displayed. The member must click the Grant button to access Higher Logic. The next time the member accesses Higher Logic, the member will automatically be logged in.

|
|
NOTE: Within Higher Logic there is an Edit Profile option. When this option is selected, the member is re-directed to the GrowthZone Info Hub to update information. This ensures that GrowthZone, the system of record, is accurately updated. |
Voter Voice
Voter Voice is a third-party advocacy and lobbying platform. When enabled and linked, Growthzone provides a nightly sync of contact information to Voter Voice, updating records in Voter Voice to reflect changes made in Growthzone. The sync in GrowthZone will batch Active and Courtesy Member contact records and send them to the Voter Voice customer tenant nightly at 00:00 UTC; This is also a one-way sync/push, you should update the contact record in GrowthZone and let it push to Voter Voice.
Use the following steps to enable Voter Voice:
- Select Setup in the Navigation Panel.
- Select Voter Voice in the Integrations section.
- Click the Is Enabled check-box.
- Enter the Voter Voice API Key. You must contact Voter Voice to receive this key.
- Enter the Voter Voice List Name. . The default list name is “Default List”. The can find this in the Voter Voice admin panel.
- Click Save.

Builder Edition Integrations
WMS Export
To simplify the process of uploading member changes to the National Association of Home Builders (NAHB) through WMS, we have integrated the required fields into various areas within the GrowthZone system and provided an export tool will allow you to pull monthly data quickly and easily. This process is only for HBAs that import monthly updates into NAHB.
|
|
As of 12/2018 - this feature is in BETA. Please report bugs promptly and share feedback on how to improve the export process. |
- Click Setup in the left-hand navigation panel.
- Click WMS in the Integrations section.
- Select the desired Month and Year. NOTE: The exports are not batches so previously exported record from the same month will not be excluded.
- Click Run. A green success notification will be displayed in the upper right-hand corner of the screen.

- The generated file will be available in the Cloud.
- Click Cloud in the left-hand navigation panel.


You can download the file from the cloud to make it available for import into WMS. See Downloading Documents from the Cloud for instructions.
|
|
NOTE: While the export file may be edited, it is recommended that, if incorrect or missing data is identified in the file, that the staff user edit the contact record and re-export after the changes are saved. A Validation Errors column will be displayed in the output file, as shown in the image below. Most errors you may encounter are missing or incomplete data.
 |
WMS Mapping NAHB to GrowthZone
* Required field
** Only one address is needed,  (Person or Company)
| HBA Field | GrowthZone Field |
|---|---|
| HBA Number | Account Number for your organization. Displayed beneath the name of your organization on your contact page. |
| MSN* | Membership Number. This number is provided by NAHB and may be populated on the contact profile tab, when clicking the membership displayed in the Membership section. |
| Local Member Type | Membership Status |
| NAHB Member Type* | Membership Type. NAHB Membership Types are: Builder, Associate, Affiliate |
| Anniversary Date* | Expiration Date. This field may be viewed/edited when clicking into the Membership on the profile tab, then clicking into the Membership Type in Membership History. |
| Company ID* | Organization Account Number. This field may be populated/viewed under the name of the organization on the contact page. The company ID is provided by NAHB/WMS for this member after they sign up for membership. |
| Company Name* | Organization Name |
| Company Address Line 1** | Org primary address line 1 |
| Company Address Line 2** | Org primary address line 2 |
| Company City** | Org primary city |
| Company State** | Org primary state |
| Company Zip Code** | Org primary zip code |
| Company Phone | Org primary phone |
| Company Fax | Org phone of type fax |
| Company Website | Org primary website |
| Primary Activity Code | Custom field. Custom fields are located on the contacts More Info tab. |
| Primary Activity Other Description | Custom field. Custom fields are located on the contacts More Info tab. These codes are defined by NAHB. |
| Secondary Activity Code | Custom field. Custom fields are located on the contacts More Info tab. These codes are defined by NAHB. |
| Tertiary Activity Code | Custom field. Custom fields are located on the contacts More Info tab. These codes are defined by NAHB. |
| Number of Employees | Custom field. Custom fields are located on the contacts More Info tab. |
| Dollar Volume | Custom field. Custom fields are located on the contacts More Info tab. |
| Number of Units Started | Custom field. Custom fields are located on the contacts More Info tab. |
| PIN* | Individual Account Number. This field may be populated/viewed under the name of the individual on the contact’s page. This is an NAHB/WMS generated representative ID. |
| First Name* | Individual Contact’s first name. |
| Middle Name | Individual Contact’s middle name |
| Last Name* | Individual Contact’s last name |
| Suffix | Individual Contact’s suffix |
| Title | Individual Contact’s title |
| Contact Address 1** | Individual Contact’s primary address line 1 |
| Contact Address 2** | Individual Contact’s primary address line 2 |
| Contact City** | Individual Contact’s primary city |
| Contact State** | Individual Contact’s primary state |
| Contact Phone | Individual Contact’s primary phone |
| Contact Fax | Individual Contact’s phone of type fax |
| Contact Cell | Individual Contact’s phone of type cell |
| Contact Email | Individual Contact’s primary email address |
REALTOR Edition Integrations
GrowthZone's Realtor Edition of the software provides features required by most National Association of REALTORs Associations for managing their real estate data. The features include an additional tab on contact records to store real estate data, data sync management, and other necessary resources. The software supports integration to NRDS, various MLS, and lock-box solutions.
Upon installation of the software, you will work with your on-boarding project manager to configure the settings necessary to seamlessly integrate to the various solutions.
NRDS Integration
The GrowthZone integration with the National Association or REALTORS’ NRDS database provides association staff an easy way to manage their contacts’ NRDS data. The current integration (April 2019) pushes data entered or changed in GrowthZone to NRDS, thereby updating agent and office records in NRDS within minutes of saving the changes in GrowthZone. The initial integration setup will be handled by your project manager.
Data Synchronized with NRDS
Data Mapping - Agents
Both the adding of an agent, or any changes to an existing agent's data will be synchronized to NRDS. ALL data described in the table below will be sent to NRDS during the synchronization.
| Field Name | Description | Data Format |
|---|---|---|
| NRDS ID* | The unique, 9-digit NRDS ID that identifies each agent. The NRDS ID is assigned by the POE when adding a record and once added cannot be changed. The NRDS ID stays with the member for life even as they leave and come back to the Realtor organization. All the member’s history is attached to that NRDS ID so when a member comes to join your board always do a search on NRDS first of all statuses to see if the member already has a NRDS ID. That way you will not try to add a new member record when one already exists. | 9 Numeric |
| Last Name | Agent's last name. This is required only when adding the agent as Primary to NRDS | 30 Alpha |
| First Name | Agent's first name. This is required only when adding the agent as Primary to NRDS | 12 Alpha |
| Middle | Agent's middle name | 12 Alpha |
| Suffix | Agent's suffix | 3 Alpha |
| Common Name | Agent’s nickname | 12 Alpha |
| Prefix | Formal title which precedes member’s name Mr. Ms. Mrs. etc, | 4 Alpha |
| Gender | Male/Female | 1 Alpha |
| Agent Address Information | ||
| Address 1 (first record that is marked as Home) | Street name and address number of agent’s home address. This field is required if record is R or RA. To identify an address as Home select this as the Usage type when entering the address. | 30 Alpha |
| Address 2 (see above) | This is a second line of address to be used for additional address information (building number, etc.) | 30 Alpha |
| City | Name of city. This field is required if record is R or RA. | 21 Alpha |
| State | State abbreviation. This field is required if record is R or RA. | 2 Alpha |
| Postal Code | The 5-digit US Postal zip code. This field is required if record is R or RA. | 5 Alpha |
| Postal Code +4 (see above) | Standard 4-digit ZIP extension plus 2-digit carrier route. | 6 Alpha |
| Address 1 (Primary Marked as Default) | Street name and address number of agent’s mailing address. | 30 Alpha |
| Address 2 (see above) | This is a second line of address to be used for additional mailing address information (building number, etc.) | 30 Alpha |
| City | Name of mailing address city | 21 Alpha |
| State | State abbreviation for mailing address. | 2 Alpha |
| Postal Code | The 5-digit US Postal zip code. | 5 Alpha |
| Postal Code +4 (see above) | Standard 4-digit ZIP extension plus 2-digit carrier route. | 6 Alpha |
| MemberPreferredMail | Where the member would prefer to receive mail. This is required only when adding the agent as Primary to NRDS | 1 Alpha |
| MemberPreferredPublication | Where the member would prefer to receive their publication(s). This is required only when adding the agent as Primary to NRDS | 1 Alpha |
| Phone (First one marked as usage as Home) | 3-digit area code for Member’s home phone number and the 7-digit number for the member’s home phone. There is no need to type in the dash ( -) when entering numbers. | 10 Numeric |
| Fax (First one marked as usage as Home) | 3-digit area code for agent’s primary fax number and the 7-digit number for the agent's primary fax number. There is no need to type in the dash ( -) when entering numbers. | 10 Numeric |
| Email (Primary/Default) | Required if Member Type is R or RA. Email address for the agent. | 80 Alpha |
| Web Address (Primary/Default) | Internet address for member’s web page, if any. | 80 Alpha |
| NRDS Information | ||
| NRDS Office ID | The unique 9-digit Office ID where this member is located. This ID must be valid in the office database. | 10 Numeric |
| Member Type | NRDS Member Type:
|
4 Alpha |
| NRDS Join Date | The date the member joined the association. | 8 Date |
| NRDS Status | Member status:
|
Drop down choice |
| Waive Dues Local | Indicates if local dues should be waived for the agent | Y/N |
| Waive Dues State | Indicates if state dues should be waived for the agent | Y/N |
| Waive Dues NAR | Indicates if NAR dues should be waived for the agent | Y/N |
| License | Required if Member Type is R or RA. Member’s real estate license number. This must match the format set by the state associations | 11 Alpha |
| Primary Field of Business | Numeric code that indicates member’s primary field of business | Drop-down choice |
| Secondary Field of Business | Numeric code that indicates member’s primary field of business | Drop-down choice |
| Occupation Name | Agent’s occupation. This is used for reporting RPAC contributions on various state and federal election reports. | 20 Alpha |
| Association ID | This field will automatically fill in with Association’s Point of Entry ID | 9 Numeric |
| MLS Association ID | The 4-digit association ID of the member’s primary regional MLS. ONLY used with associations that are full owners of their MLS. In general never put data in this unless absolutely sure or contact NAR for guidance | 4 Numeric |
| Stop Fax | Indicates if fax number is usable for fax mailings | Y/N |
| Member Subclass | Used by States and Boards to exchange additional billing types for members. This field is sent with supplemental agent records only | Drop-down choice |
Data Mapping - Agents (Secondary)
Both the adding of a secondary (supplemental) agent, or any change to an existing secondary agent's data will be synchronized to NRDS. ALL data described in the table below will be sent to NRDS during the synchronization, not just data that has changed.
| Field Name | Description | Data format | Required |
| NRDS ID | Agent’s 9-Digit NRDS ID. The agent must exist in NRDS and be an active member in order to add a supplemental record. | 9 Numeric | X |
| Office Number | The Supplemental record is used to indicate any other Offices where an agent works in addition to the ‘core’ Office in the Member record. If you are using this Supplemental record to indicate a member’s Secondary association, additional License, etc. and the Office is still the same as the one in their core Member record, then enter that same Office ID in this field. If you are using this Supplemental record to indicate another Office where this member is affiliated, enter that other Office ID in this field. |
9 Numeric | X |
| Member Type | Required. Use this Supplemental record to indicate that the member has a different Member Type (usually in another Office or another Association). |
4 Alpha | X |
| License (the first license entered in the Professional section of the Profile tab) | Use this Supplemental record to indicate that the member has a different License Number (usually in another Office or another Association). |
11 Alpha | |
| NRDS Status | Required. Use this field to indicate the Status of the SUPPLEMENTAL RECORD. For example, you set up a supplemental record to indicate the member worked at another Office. When that is no longer true, you would set the Status of this record to I (Inactive). Again, this Status relates ONLY to this particular supplemental record. |
1 Alpha | X |
| Member Subclass | Used in conjunction with Member Type by many associations. Again, you would use this in the same manner as Member Type to indicate supplemental information. | 4 Alpha | |
| Local Join Date | If using this record to add on a Secondary Association to the member, enter the date that the member joined this secondary association. | 8 Date |
NRDS - Working with Agents
The Agent record in NRDS is the "foundation" of the association. Only the POE for the Primary association of the agent can Add an agent to that association or change the agent record. If you are not the POE for the agent, this will be indicated as a Supplemental (secondary) record.
NRDS - Add an Agent (Primary)
- If the agent does not already exist in your database, click the Quick Actions button, in the header bar, and click Contacts - Add Agent. If the agent already exists in your database, verify that you have have all the required information for the agent, as described in step 2 below, then proceed to step 4.
- Complete all necessary fields. The fields described below are required:
- First Name
- Last Name
- Address: Line 1, City, State, Zip: You may enter multiple address, however, one address associated to the agent MUST be designated as Home. This selection is made from the Usage drop-down list.
- You must also identify both a Member Preferred Mail (where the member would prefer to receive mail) and Member Preferred Publications (Where the member would prefer to receive their publication(s) ) address. The address that you set as primary will be used, with type and usage settings determining how it will be identified in NRDS.
- Click Done.
- If the agent's NAR member type is R (Realtor) or RA (Realtor-Assciate), the agent's license is required:
- On the agent's Profile tab, enter the agent's License, click the
 in the Professional section.
 - Select License from the Category list.
- Enter the License number. This must match the format set by the state associations.
- On the agent's Profile tab, enter the agent's License, click the
- All other fields are optional.
- Click Done.
- Select the agent's Real Estate tab.
- Click the Sync With NRDS check-box. NOTE: Immediately after you save the NRDS settings, within 10 minutes, the agent information will be sent to NRDS.
- Populate the following fields. All data entered will be sent to NRDS, however, only those marked with an asterisk are required:
- NRDS Status*: Select Active from the list.
- NRDS ID*: Enter the agent's 9 digit NRDS ID. If the agent does not have an ID, click the Get NRDS Number button. NOTE: NRDS starting numbers are configured under Setup > NRDS Id and Membership Numbers. The Account Number for the agent will automatically be updated to the NRDS ID if Tie Account Number To NRDS Number is enabled under integration settings.
- NRDS Office ID*: Enter the NRDS Office ID for this agent. The Office must exist in NRDS. If the office does not exist, the record will not be processed.
- NRDS Join Date*: Enter the date the agent joined the association.
- Local Join Date: The date the member transferred or reinstated into this current Primary association. NOTE: The field Join Date should not change when members move from association to association. Use this field to indicate that move.
- MLS Association Id: The 4-digit association ID of the member’s primary regional MLS. ONLY used with associations that are full owners of their MLS. In general never put data in this unless absolutely sure or contact NAR for guidance.
- Primary Field of Business*: Select the Numeric code that indicates the agent's primary field of business.
- Secondary Fields of Business: The numeric code that indicates member’s secondary field of business.
- Occupation Name: The agent’s occupation. This is used for reporting RPAC contributions on various state and federal election reports.
- Licensing State: The state in which the agent is licensed.
- Primary State*: Select the state where this member has primary membership.
- Member Type*: Select this agent's member type.
- Member Subclass: Used by States and Boards to exchange additional billing types for agents.
- Waive Dues Local: Check this box to indicate that local dues should be waived for the agent.
- Waive Dues State: Check this box to indicate that state dues should be waived for the agent.
- Waive Dues NAR: Check this box to indicate that NAR dues should be waived for this agent.
- Stop Mail: Indicates whether or not to exclude active members from mailings, including the Realtor Magazine. Check the box to exclude the agent.
- Stop Fax: Indicates whether the agent wants the fax number to be used. Check this box to indicate that the fax should not be used.
- Stop Junk Mail: Only the member themselves can update this field. This setting indicates whether the agent wishes to be on NAR's Direct Mail mailing list.
- Click Done.


The new agent will be synched to NRDS within 10 minutes. Review the Event Log to ensure that there were no validation errors.
NRDS - Working with Offices
Although Offices are not "members" of the Realtor organization (the Realtor association is an individual member organization), the Office record must exist because each member must be linked to an office. The data described in the table below is synchronized to NRDS (an asterisk denotes a required field).
| Field | Description | Format |
|---|---|---|
| NRDS ID* | Required. The unique 9-digit ID assigned to this office location. | 9 Numeric |
| Name* | Office Business Name | 30 Alpha |
| Address 1* | Street name and address number of office | 30 Alpha |
| Address 2 | This is a second line of address to be used for additional address information (building number, etc.) | 30 Alpha |
| City* | Address city | 21 Alpha |
| State* | State Abbreviation | 2 Alpha |
| Postal Code* | The 5-digit US Postal zip code | 5 Alpha |
| Postal Code | Standard 4-digit ZIP extension plus 2-digit carrier route | 6 Alpha |
| Address 1 | Mailing Address - The mailing address where mail should be sent, if different from Street Address | 30 Alpha |
| Address 2 | Mailing Address 2 - The mailing address where mail should be sent, if different from Street Address | 30 Alpha |
| City | Mailing Address City | 21 Alpha |
| State | Mailing Address State Abbreviation | 2 Alpha |
| Postal Code | The Mailing address 5-digit US Postal zip code | 5 Alpha |
| Postal Code | 4-digit Zip extension plus 2-digit carrier route for mailing address | 6 Alpha |
| Phone (Main)* | 3-digit area code for office’s phone number, marked as Main. Area code is a required field. It should be included when entering phone numbers. If no Main phone is indicated, the system will use the phone number marked as Work | 3 Alpha |
| Phone (Main)* | 7-digit office phone number, marked as Main. If no Main phone is indicated, the system will use the phone number marked as Work | 7 Alpha |
| Phone (Fax) - First phone number marked Fax | Office Fax Area Code - 3-digit area code for office’s fax number. Include the area code when entering the number in the Phone field | 3 Alpha |
| Phone (Fax) | Office Fax Number - 7-digit office phone number, marked as Fax. There is no need to type in the dash ( -) when entering numbers | 7 Alpha |
| Office Type | Used by association to track office type such as Residential, Commercial, Affiliate, etc. | 4 Alpha |
| Office DR NRDS ID* | The DR (Designated Realtor) of this company, whether or not they are at this location. This must be a valid 9-digit member ID. | 9 Numeric |
| NRDS Join Date | The date the office joined the association | 8 Date |
| NRDS Status* | Status of the Office Record | Active, Inactive, Terminated |
| Office Non-member Salespersons* | The number of non-member salespersons affiliated with this office. If the POE has verified there are no non member salespersons in this office, then a zero '0' must be sent. | 5 Numeric |
| Office Primary Indicator | This setting indicates whether the office is primary or secondary to your association. By default offices are set to primary, and you will select the Secondary option when necessary | 1 Alpha |
| Primary Web URL Address | Web Page Address - Internet address for office’s web page, if any | 80 Alpha |
| E-Mail Address | E-Mail Address for this office | 80 Alpha |
| Primary State* | The 4-digit State association ID where this office has primary membership. | 4 Numeric |
| Stop Junk Mail | Flag indicating to NRA to stop sending Junk Mail to the office. This setting does NOT impact the ability to send emails to this office from the GrowthZone software | N/A |
| Office Manager NRDS ID* | This field is to track the contact person at this office location when it is not the same as the DR. When adding an Office, if this location's Office Contact Manager is the same as the Member entered for Office Contact DR, this field may be null. If Null, upon the Add, this field shall default to the same Member ID as was entered in Office Contact DR | 4 Numeric |
| Office Formal Name | This field can be used to enter the full name of the Office, up to 60 characters. Because the Office Business Name is limited to 30 characters due to mailing restrictions, use this field to fully describe the office name for your own use. | 100 Alpha |
NRDS - Add a Primary Office
Adding a new office with NRDS is performed on the Real Estate tab. Offices are not members of NAR, but need to exist in the NRDS database.
|
|
NOTE: If NRDS finds an office record already exists with the same Office ID it will process the Add as a Change without the necessity of sending the record again. There is one exception to this rule: if the Office Name in the Add is different than the Office Name in the existing record then NRDS will reject the record and require that the record be sent as a Change rather than an Add. |
- If the office does not already exist in your database, add the office as described in Add a New Organization Contact. Ensure to populate all required fields, as described in the table above. If required fields are missing, the record will be rejected.
- After adding the office, click the Real Estate tab.
- Tick Enable sync. Once this record is saved, all data will be sent to NRDS.
- Complete the following fields, and asterisk denotes a required field. If the field is not populated the sync of this record to NRDS will fail.
- NRDS Status*: Select the appropriate status for this office. For a new office, to be activated in NRDS, select Active.
- NRDS ID*: Enter the NRDS ID for this office. If your system has been configured to auto-generate NRDS ID's click the Get NRDS Number button. NOTE: If Tie Account Number To NRDS Number the account number for this office will be automatically updated with the NRDS ID.
- Office DR NRDS ID*: Enter the NRDS ID of the The Designated REALTOR for this office. This must be a valid 9-digit member ID. See notes below.
- NRDS Join Date*: The date this office joined NRDS.
- Secondary Record: Enable this check-box if your association is NOT the primary for this office.
- Local Join Date: The date this office joined your association.
- MLS Association Id: The MLS ID for this office.
- Occupation Name:
- Non-Member Salespersons*: NM is Non-member licensees who work in this Realtor office but choose not to join the association. Because of this, the DR will be assessed national dues (and also most often state and local dues as well) times the number of non-member licensees in his/her office. It is important that the POE keep this field up to date, especially at the dues deadline. Because it is a required field, if this office does not have any NM Salespersons, you must at least enter a zero in this field.
- Primary State: The 4-digit State association ID where this office has primary membership.
- Office Manager NRDS ID: This field is to track the contact person at this office location when it is not the same as the DR. When adding an Office, if this location's Office Contact Manager is the same as the Member entered for Office Contact DR, this field may be null. If Null, upon the Add, this field shall default to the same Member ID as was entered in Office Contact DR.
- Additional Office Information :
- Office Type: This field can be used to track office type such as Residential, Commercial, Affiliate, etc.
- Office Formal Name: This field can be used to enter the full name of the Office, up to 60 characters. Because the Office Business Name is limited to 30 characters due to mailing restrictions, use this field to fully describe the office name for your own use.
- Click Save.

|
|
NOTE: NRDS requires that the Office DR NRDS ID be sent when you are adding a new office. This requires that the DR exist in your database as an Agent. However, when adding agents to your database, the agent's Office NRDS is required.
NRDS recommends the following process for handling this situation: Enter the NRDS ID of one of your staff members when initially adding the office. After the office has been added, you will then be able to add the DR as an agent associated to the office and update the Office DR NRDS ID for the office. |
NRDS - Update a Primary Office Record
Changes to an office record are sent to NRDS. A change transaction will be sent anytime an update is made to the data listed in the table below. With Enable Sync to NRDS checked, on the Real Estate tab, the changes will automatically be pushed to NRDS. Data is sent every 10 minutes, and all fields are sent, not just those that have changed.
|
|
NOTE: If NRDS finds that an office record does not already exist by checking the Office ID it will process the Change as an Add without the necessity of sending another record. |
NRDS - De-activate/Suspend/Terminate a Primary Office
- Click the Real Estate tab.
- Select the appropriate status from the NRDS Status* list.
- Click Save.
NRDS - Activate a Secondary Office
Offices are not members of the association but the Primary association fields indicate which association first added this office into NRDS. If your association also needs to be associated with this office because you have members linked there, be sure to click the Add Secondary Association on the Real Estate tab. NOTE: You can only add an Office Supplemental record if the Office itself exists on NRDS and is Active. If the office does not exist, NRDS will reject the transaction.
- If the office does not already exist in your database, add the Office by clicking the Quick Actions button in the header bar, and clicking Contacts - Add Office.
- For the desired office, click the Realtor tab.
- Click Sync with NRDS.
- Click Secondary Record.
- The following fields are required when adding a secondary (supplemental) office:
- Office ID: The unique 9-digit NRDS ID assigned to the office
- Status: Select Active from the drop-down list.
- NM Salesperson Count: If the Broker of this office is using Board of Choice to report his non-member licensees, in the main Office record enter the number of non-member salespersons that will be paid for through the broker's Primary Association.
- Click Save. The new supplemental office will immediately be sent to the NRDS processing queue, no further action is required. NOTE: The Save button will not be enabled if any of the required fields are missing.

NRDS Education Records
Every 4 years, in a set cycle, every Realtor and Realtor Associate must take the NAR Code of Ethics course. This Education record can be added by any POE. They do not have to have a primary or secondary relationship with the member. Because members could take an education course at any association, this is the one record that can be added by any POE to any member.
GrowthZone currently provides the ability to track agent's Code of Ethics (COE) training. Synchronization of the education records is made to NRDS within 10 minutes of the addition or update of the records.
Code of Ethics Data Mapping
The fields described below are sent to NRDS.
| Field Name | Description | Data Format | Required |
| NRDS ID | Required. The 9-digit unique member ID of the member. Note: The Member must be active (A or P) or Suspended (S). | 9 Numeric | X |
| Education Course Code | Required. Unique course code assigned by the sponsoring or licensing association. Once the Group Code has been selected, use this field to enter the specific course code. |
Drop-down choice | X |
| Education Course Number | Required. Assigned by the sponsoring or licensing Association. |
15 Alpha | X |
| Ethics Training Date | Date course was completed. For one day courses, use this field for the course date. COE Course: For the COE course, this should be the date they completed the course. | 8 Date | X |
Add/Update Code of Ethics Training
|
|
NOTE: The agent must have an NRDS ID and Sync to NRDS must be enabled. NRDS will not allow you to add an Education record for a member who is not active (or Suspended) in NRDS (Status A, P or S). |
- For the desired agent, click the Realtor's tab.
- Enter Code of Ethics details in the Additional Info section.
- Ethics Training Date*
- Education Course Code*: Select the course from the list.
- Education Course Number*
- COE Year*
- Additional Designations
- Click Save.

Your additions/updates to Code of Ethics training will be sent to NRDS within 10 minutes.
NAR ECommerce
ECommerce supports the processing of membership dues splits automatically. When a member pays their dues, GrowthZone will sync with ECommerce to divide the amount according to predefined settings and passes the correct share to each of the local, state, and national associations.
The setup of the ECommerce payment processing account in the GrowthZone software is done by support or an onboarding project manager. The following pieces of information will be needed for setup:
- Association ID
- User ID
- Password
Important Notes
- GrowthZone only supports splits at the time of payment. For example: You are unable to use ECommerce to process monthly membership payments and then send a lump sum annually to state and national.
- ECommerce will support up to 6 destination bank accounts, if just one account is being used, the splits will not need to be configured.
- There are many specific rules & regulations for ECommerce. Please contact NAR with questions.
- GrowthZone supports creating refunds for memberships that include splits. However, the refund will autodebit ALL of the refunded amount from the local association. This is because NAR does not support autodebitting other associations; it will be up to the local association to contact the others (e.g. State and Nat’l) to recoup those funds. Questions/Concerns should be directed to NAR.
- For questions about rates and fees, please contact NAR. GrowthZone does not charge additional transaction fees on top of NAR’s fees.
MLS Integration
GrowthZone offers a data integration with various MLS Solutions. This is a push-type integration which sends changes to contact information from GrowthZone to MRED’s MLS vendor, DynaConnections. The sync happens (when there are contact info changes) around 4 times hourly between the hours of 8 am (CST) and 8pm (CST), seven days a week. The purpose of the integration to an MLS is to establish an account for the member, to establish the member's access level within the MLS (defined by the agent's Member Type, and to track the member's status.
Currently, GrowthZone integrates to MRED and Corelogic.
MRED Integration
On initial installation of your software, GrowthZone will configure the initial connection to MRED. You will then be able to manage your agent's participation in MLS from the agent's Real Estate tab. GrowthZone will sync to MRED any additions or changes made to the MLS information on this tab. Records are synchronized every hour.
The table below describes the fields and requirements for synchronizing agents to MRED. An asterisk (*) denotes it being a required field; if a required field is not entered/missing in GrowthZone, the sync will fail and information will not be sent to MRED for that contact. Specific formatting is required for some of the fields as described.
Data Fields - Agents
The table below describes the fields that are sent to MRED.
| Individuals (Agents) | Description |
|---|---|
| NRDS ID | The agent NRDS ID |
| Last Name* | |
| First Name* | |
| Middle Initial | |
| Suffix | |
| Common Name | |
| Title | |
| Address | |
| City | |
| State | |
| Zip/Postal | |
| Home Zip Code | |
| Home Zip +6 | |
| Phone (default) | |
| Fax | |
| Cell Phone | |
| MLS Office ID* | |
| Status* | |
| License No | |
| Website | |
| MLS ID* | |
| Agent Type |
Data Fields - Offices
The table below describes the fields that are sent to MRED for offices
Activate an MRED Agent Account
- Select the member's Real Estate tab.
- Click Enable MLS Sync.
- In the MLS section, enter the following information:
- MLS Office ID: If the contact is an agent, this field should be the MLS ID for the agent's office. If the contact is an office, this field should be the MLS ID of the office, or can be the MLS Id of a parent branch.
- MLS ID: The MLS ID for this contact (agent or office).
- MLS Join Date: The date this agent or office became active with MRED.
- MLS Status: Select Active from the drop-down list. NOTE: The MLS Status is NOT tied to the agent's GrowthZone membership status. Changing membership status will NOT automatically updated the MLS Status.
- Agent Type: Select the appropriate agent type for this agent. The agent type drives the permissions the agent will have within the MLS. Agent Type is sometimes referred to as "class." When pushed to MLS, this acts as a security role giving/restricting access. Designated Realtors/Broker (DR) are the boss and there can be only 1 per office. Sometimes retired DRS kept in other systems but GZ doesn't support this. Other options are Assocation Staff (AST). Association Admin (ASA), MLS Staff (ST), Personal Assistant (PA), Other Assistant (OS), Office Manager (OM), Licensee, Designated Appraiser (DA), Appraiser (AP), Assistant Appraiser (RAA), Leasing Agent (LA), or Leasing Agent Licensee (LAL).
- Click Save.
Below are the fields that are synced with MLS. An asterisk (*) denotes it being a required field; if a required field is not entered/missing in GrowthZone, the sync will fail and information will not be sent to MRED for that contact.
| Individuals (Agents) | Organizations (Offices) |
|---|---|
| NRDS ID | NRDS ID |
| Last Name* | Office Business Name* |
| First Name* | Address* |
| Middle Initial | City* |
| Suffix | State* |
| Common Name | Zip* |
| Title | Phone (default) |
| Address | Fax |
| City | Type |
| State | Branch Type* |
| Zip/Postal | Status* |
| Home Zip Code | Website |
| Home Zip +6 | Email* |
| Phone (default) | MLD ID* |
| Fax | Status |
| Cell Phone | |
| MLS Office ID* | |
| Status* | |
| License No | |
| Website | |
| MLS ID* | |
| Agent Type |
Important Notes
- The status field for a contact (office or agent) includes options for Active, Inactive, Terminated and Suspended. From MRED’s point of view, there is no functional difference between Inactive, Terminated and Suspended; the member is denied access. So, you can use these options as appropriate.
- New MLS IDs must use MRED’s rules for creation. Please contact MRED if you need assistance.
- Additional status or informational fields may exist in the "More Info" tab, these custom fields are not related to the sync and will not have any effect on the information shared with MLS.
- MRED only accepts a single phone and a single email address. GrowthZone will synch the email/phone that are indicated as the default.
- If creating new agents AND a new office, the office must be created first and then the agents assigned to the office.
- Please contact GrowthZone if you have Commercial MLS members.
'Corelogic Matrix Integration
CoreLogic's MATRIX MLS is an MLS system that is a leader in this space. GrowthZone is responsible for setting up members/agents in the MLS along with their security level. From that point, we would send updated information on their member profile. CoreLogic REQUIRES testing with each new customer before we go live.
Lockbox
Sentrilock
GrowthZone offers a data integration with SentriLock’s lockbox solution. The purpose of the synchronization to Sentri-lock is to activate an account for an office or agent, and define the security level afforded that office or agent.
The sync happens in real time with updates appearing SentriLock in a matter of minutes. On the Real Estate tab of a contact, there is a "Sync with Lockbox" checkbox that needs to be ticked in order for the system to recognize the sync option. Unticking the box will not remove the contact's data from SentriLock but will stop the updates from being sent. When enabled, GrowthZone will send updates to SentriLock whenever contact information is updated or entered new. There is logic in place in GrowthZone to automatically update a contact's status with SentriLock based on the status of their membership; memberships that are dropped or suspended (for non-payment) will automatically trigger an update to the SentriLock status accordingly.
You will be able to synchronize both agents and offices to Sentrilock.
Sentrilock - Agent Data
Sentrilock - Office Data
Below are the fields that are synced with SentriLock. An asterisk (*) denotes it being a required field; if a required field is not entered/missing in GrowthZone, the sync will fail and information will not be sent to SentriLock for that contact.
| SentriLock Data Sync Fields |
|---|
| First Name* |
| Last Name* |
| Address |
| City |
| State |
| Zip/Postal |
| Email* |
| Phone |
| MLS ID* |
| MLS Office ID* |
| NRDS ID* (required as of January, 2019) |
| Related Org* |
| Password |
| Status* |
Important Notes
- SentriLock only accepts a single phone and a single email address. GrowthZone will send the email/phone marked as default.
- Additional status or informational fields may exist in the "More Info" tab, these custom fields are not related to the sync and will not have any effect on the information shared with SentriLock.
- The Password field should be used only when creating a new user. This is meant to make it easier to create a new SentriLock account by entering a temporary “starter” password for the new member. The new agent should be advised to login to SentriLock and change this to a personal password. After the password is saved, it will be encrypted for security purposes. This will display in the password field, however, it will be a random strings of characters, it may be ignored as the password has then been encrypted.
Supra
Supra has provided keyboxes to the real estate industry since 1955, bringing efficiency to real estate professionals and peace of mind to home sellers. By integration with GrowthZone, you are able to setup accounts for your agents/office each has to access a lock-box. In addition to activating new accounts with Supra, you will also be able to change the account, and importantly terminate accounts when needed.
Data Synchronized to Supra
The table below describes the data that is synchronized with Supra. Hourly, your GrowthZone system will look for additions or changes to Supra Data. If there have been any, all of the information in the table below is sent.
| Field Name | Description | Data format | Required |
| Profile Tab | |||
| Last Name | Last name of agent | 21 Alpha | X |
| First Name | First name of agent | 17 Alpha | X |
| Middle | Middle initial of the agent | 3 Alpha | |
| City (primary) | City | 31 Alpha | X |
| State (primary) | State | 2 Alpha | X |
| Phone (primary) | Area code of & phone number of agent's phone number | 23 Numeric | |
| Address 1 (primary) | First line of agent's address line | 35 Alpha | |
| Address 2 (primary) | Second office address line | 35 Alpha | |
| Zip (primary) | Zip code of agent address | 11 Alpha | |
| Country (primary) | Country | 4 Alpha | |
| Fax Number (primary) | Area code & Phone number of agent's fax number marked as primary | 23 Alpha | |
| Email (primary) | Email marked as primary | 64 Alpha | |
| Real Estate Tab | |||
| Lock Box Agent ID | Unique Agent ID During initial setup with GrowthZone you may chose this to be one of the following:
|
15 Alpha | X |
| Lock Box Member Status | Agent Status – Active, Hold, Inactive | Drop-down choice | X |
| LockBox Listing Agent ID | Listing Agent ID During initial setup with GrowthZone you may chose this to be one of the following:
|
32 Alpha | X |
| LockBox Office ID | Office ID During initial setup with GrowthZone you may chose this to be one of the following:
|
||
Initial Integration Setup for Supra LockBox
GrowthZone will perform the initial setup for your Supra Integration. During this process you will have defined, the following:
- What to use for the Lock Box Agent ID: You will choose NRDS ID, MLS ID or Custom. If NRDS or MLS are selected, the system will automatically use these ID’s and prompt you if these ID’s are not set. If you select Custom, you will populate your own unique ID each time you activate an agent or office with Supra.
- What to use for the Lock Box Office ID: You will choose NRDS ID, MLS ID or Custom. If NRDS or MLS are selected, the system will automatically use these ID’s and prompt you if these ID’s are not set. If you select Custom, you will populate your own unique ID each time you activate an agent or office with Supra.
- What to use for the Lockbox Listing Agent ID: You will choose NRDS ID, MLS ID or Custom. If NRDS or MLS are selected, the system will automatically use these ID’s and prompt you if these ID’s are not set. If you select Custom, you will populate your own unique ID each time you activate an agent or office with Supra.
- Whether you will enable “Use Membership Status To Determine Lockbox Status”: If you choose this option, LockBox Member Status will automatically be updated, based on the status of the membership with your association. For example, if an agent has an active membership with your association, and a valid LockBox status, when you drop that member, the LockBox status will automatically be updated to Terminated. Conversely, if you re-activate an agent, the LockBox status will be updated to Valid. NOTE: This functionality will only work if there is only one membership associated to the agent.
Supra LockBox - Working with Agents
Activate an Agent’s Supra Account
- On the Agent’s Profile tab, ensure that all required information, defined in the table above has been populated.
- Click the Real Estate tab.
- Click Sync With LockBox
- In the LockBox section, select Valid from the LockBox Member Status list.
- Additional fields that will need to be populated in the LockBox section will vary dependent on your integration settings.
- If you have selected Custom for the Lock Box Office ID, Lock Box Agent ID and Lock Box Listing ID, enter your custom identifiers.
- If you have selected NRDS ID or MLS ID, ensure these fields are populated on the Real Estate tab. You will not be able to save the record, and therefore synchronize to Supra if they are not.
- Click Save.


Change an Agent’s Supra Account Record
Any changes made the fields described in the table above will result in a change record being sent to Supra. As long a Sync to LockBox is enabled, the system will “notice” these changes and send them within the hour, with no interaction on your part.
Terminate an Agent’s Supra Account Record
- On the Agent’s Profile tab, ensure that all required information, defined in the table above, has been populated.
- Click the Real Estate tab.
- Ensure that Sync With LockBox is checked.
- In the LockBox section, select Terminated from the LockBox Member Status list.
- Click Save.

|
|
NOTE: If your system is configure to Use Membership Status To Determine Lockbox Status, dropping an agent's membership to your association, will also result in the LockBox Member Status being set to Terminated. This option is only available if you have one and only one association membership type per agent. |
Suspend an Agent’s Supra Account Record
- On the Agent’s Profile tab, ensure that all required information, defined in the table above, has been populated.
- Click the Real Estate tab.
- Ensure that Sync With LockBox is checked.
- In the LockBox section, select Terminated from the LockBox Member Status list.
- Click Save.

GrowthZone APIs
Using the GrowthZone APIs is a way to easily integrate your GrowthZone data into other systems. Examples may include incorporating content like directories, events, etc. into a CMS, creating an SSO with your website or another application, or tying a mobile app to your GrowthZonedatabase. The API is a standard REST-based API with the ability to access many areas of the software.
Click Here to view a full list of available GrowthZone APIs. GrowthZone's APIs are under active development and changes or additions can occur. This documentation is updated regularly and always represents the current state. APIs in GrowthZone are broadly organized by areas of use (i.e. modules).
|
|
NOTE: In order to begin making calls to GrowthZone, you will need to first have API access enabled in your tenant and obtain an API Client ID and Secret. For authentication options, we currently support standard oAuth2 flows and SAML. If you have questions or need help regarding API authentication, integration or support, please call 800.825.9171 or email support@growthzone.com. |