Member Recruitment
Contents
- 1 Member Recruitment Overview
- 2 Member Recruitment Initial Setup
- 2.1 Setup Member Recruitment Categories
- 2.2 Setup Sales Sources
- 2.3 Setup Sales Stages
- 2.4 Setup Timeline Items
- 2.5 Automating Timeline Items
- 2.6 Configure Sales Opportunity Status Reasons
- 2.7 Configure Sales Opportunity Auto-Reminder Rules
- 2.8 Sales Proposal Settings
- 2.9 Create a Sales Proposal Template
- 3 Create a Sales Opportunity
- 4 Member Recruitment Reports
Member Recruitment Overview
The Member Recruitment module (formerly called Sales Funnel) is used to track opportunities through sales stages, provide them with proposals that contain acceptance details. Types of Opportunities may include:
- New membership prospects
- Upgrade opportunities with existing contacts
- Volunteers or prospective board members you’d like to work with
|
|
NOTE: You can change the terminology for this module to best meet your business needs. See Setup Your Terminology for instructions. |
Member Recruitment Initial Setup
Setup Member Recruitment Categories
Member Recruitment Categories are used to further organize your Member Recruitment opportunities. For Example, you may have a category called Membership which could be over-arching of the types of membership opportunities you offer (i.e. new memberships, upgrades, etc.). You can create your categories on the fly when creating an opportunity, you you may create them ahead of time under the Setup functions.
- Click Setup in the navigation panel.
- Click Category Lists in the Categories section.
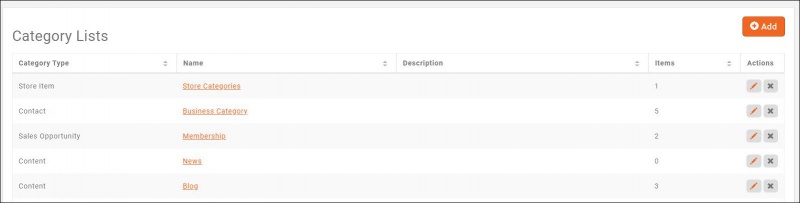
- Setting up your categories is a two part process. First you will create the list, then you will add the categories to the list.
- Click the Add button to create the list.
- Select Sales Opportunity from the Category Type drop-down list.
- Enter a name for the Category list.
- Can Be Used Publicly?: N/A for Sales Opportunity lists. This option is intended for such things as job postings, hot deals, etc.
- Is Active?: This option is enabled by default, and ensures the list is available for use in the software. If you no longer wish to use this list, best practice is to clear the Is Active? check-box.
- Description: Optional, allows you to enter a description of the list for internal use.
- Click Done.
- The next step is to add the categories to your list. Click the hyper-linked name of your list.
- Click the Add button to add an individual category, or click the Add Multiple to add a list of categories.
- Enter your list of categories.
- (Optional): Clicked Advanced Option and select a Parent category. This option allows you to further organize your categories.
- Click Done.


Setup Sales Sources
Sales Sources are used to track how you learned of the opportunity. Examples of Sales Sources might include referral, trade-show, walk-in and so on.
- Click Setup in the Navigation Panel
- Click Sales Sources in the Sales section.
- Click Add Sales Source.
- On the Add/Edit Sales Source screen, enter a name and description of the sales source.
- Click the Active check-box.
- Click Done.
Setup Sales Stages
Sales stages allow you to identify the level of engagement a prospect has had with your sales team. You may define sales stages that match your business processes. Examples of stage may include hot, warm, cold and so on. You may customize these to meet your needs.
- Click Setup in the Navigation Panel.
- Click Sales Stages in the Sales section.
- Click the Add button.
- On the Add/Edit Sales Stage screen, enter a Name and Description for the sales stage.
- Click Done.


|
|
NOTE: Sales stages may also be added "on the fly" when creating a sales opportunity. |
Setup Timeline Items
Your sales opportunity milestones can be tracked with timeline items. Examples of milestones may include when this first became an opportunity, or when you sent the proposal. You can customize standard timeline items on the Setup page.
- Click Setup in the Navigation panel.
- Click Timeline Items in the Sales section. A list of the timeline items you have already setup in your system will be displayed.
- Click the Add button.
- Configure the following:
- Enter a Name for the timeline item.
- Enter a Description of the timeline item.
- (Optional) - Select a Communication Category. This can be used for filtering and reporting.
- Click Done.


Automating Timeline Items
You can automatically update your timeline with a timeline item for new opportunities and when a proposal is accepted.
Timeline Item Applied To New Opportunities
A timeline item can be automatically assigned when you first create an opportunity.
- Click Setup in the Navigation panel.
- Click General Settings in the Sales section.
- From the Timeline Item Applied to New Opportunties select the item you want to place on your timeline when a new opportunity is created.
- Click Save.

Timeline Item Applied To Signups
- Click Setup
- Click Sales Proposal Settings in the Sales section.
- Select the Timeline Item Applied To Signups from the drop-down list.
- Click Done to save your changes.

Configure Sales Opportunity Status Reasons
Sales Opportunity Status Reasons provide you with a way to categorize why a sales opportunity may be in a certain stage. For example, if a sales stage is "on-hold", you may use the sales opportunity status reason to provide further clarification on why the opportunity was put on-hold. Sales Opportunity Status Reasons are also used for reporting purposes that will allow you to further analyze.
- Click Setup
- Click Sales Opportunity Status Reasons in the Sales section. A list of the Sales Opportunity Status Reasons already configured in your system will be displayed (none will be configured by default).
- Click the Add button.
- On the Add/Edit Sales Opportunity Reason screen, enter a Name for the reason.
- Click Done to save the new reason.
|
|
NOTE: You may also add new reasons dynamically when creating a new opportunity in the Member Recruitment module.. |
Configure Sales Opportunity Auto-Reminder Rules
You can setup auto-reminders to ensure that you are maintaining communication with your sales opportunities. The Sales Opportunity Auto-Reminder Rules settings allow you to configure when a reminder will be generated.
- Click Setup
- Click Sales Opportunity Auto-Reminder Rules in the Sales section. A list of the Sales Opportunity Auto-Reminder Rules already configured in your system will be displayed (none will be configured by default).
- Click the Add button.
- In the When I have a Sales Opportunity with all the following conditions section, select the combination of Sales Stage and Sales Opportunity Status conditions that will be used as a factor in triggering a reminder. These settings, along with the Days, described below, will be the triggers for creating the reminder.
- In the That hasn't been communicated to in more than X days section, enter the number of days without communication to your sales opportunities in the Sales Stage and Sales Opportunity Status configured above that will trigger a reminder.
- In the Create a Reminder Task with the following settings configure:
- Description - This description will be displayed on the task tab for the sales opportunity.
- Days Until Overdue After Reminder - This is the number of days after the first reminder that the task will become over-due.
- Task Priority - Select a task priority from the list.
- Click Done to save the new reminder.

Sales Proposal Settings
The Sales Proposal Settings allow you to define the confirmation URL and the Confirmation Message displayed for your sales opportunities after they have accepted a proposal. Additionally, you will be able to select the timeline item that will automatically appear on your timeline when an opportunity accepts a proposal.
- Click Setup
- Click Sales Proposal Settings in the Sales section.
- Configure the following settings:
- Confirmation Url - enter the URL to which you want an opportunity to be directed after they have accepted your proposal. You may enter a URL, OR, you may display a Confirmation Message as described below.
- Confirmation Message - enter the confirmation message that you would like to include after an opportunity has accepted your proposal. You may display a confirmation message OR, you may include a Confirmation URL as described above.
- Timeline Item Applied To Signups - select the timeline item that you would like automatically added to your timeline when a sales opportunity accepts your proposal. Click here for further details on setting up timeline items.
- Click Done to save your changes.
Create a Sales Proposal Template
If your sales proposals follow a similar pattern, you may create a template where the standard items are already filled in, and customize it when needed. A sales proposal template is included in your database. It is formatted to pull in key information, such as the logo information, contact information and so on. for the sales opportunity. If needed, you can customize this template to meet your needs.
- Click Setup.
- Click Document Generation Templates in the Document Generation section.
- Click the copy icon to the far right under "Actions" for the Sales Proposal template.
Scroll to the bottom of the document list to view your copy. To change the file name or file type, choose the copied file name and complete your changes. Select the "edit" icon under actions to launch the template to view and edit. You will be taken to the document editor login. Enter your MemberZone user name and password to launch the document. Enable editing of the document, complete your changes, select save and close the document. Your changes will be saved. You can now choose this template where applicable.
Click here to view the Sales Proposal default template
Create a Sales Opportunity
- Click Member Recruitment in the Navigation Panel.
- Click the Add Button.
- On the Add/Edit Sales Opportunity screen, configure the following:
- Organization - Enter the name of the organization. If the organization already exist as a contact, the associated information will be populate. If this organization does not currently exist, it will be added to your contacts.
- Source - To track how/where your opportunities are generated from, select a source from the drop-down list. The list will display sources that you have previously set up, and you may add a new source by clicking the + button. Click Here for more information on Sales Sources.
- Sales Person - Select a sales person from the drop-down list. Your current staff members will automatically be populated in the list. Click Here to learn how to add staff users. NOTE: If you are using outside sales consultants, they will need to be added to your database as staff users, be assigned an Access Level and have created their log-in credentials in order for them to be displayed in the drop-down list. You may wish to setup an access level with Overall System set to none. This will allow the sales consultant to login to the system, with no access to your database, but you will then be able to select them as the sales person when creating your sales opportunity. Click Here for information on setting up access levels.
- Sales Category - Select a sales category from the drop-down list. The list will display sales categories that you have previously used, and you may add a new sales category by clicking the + button. See Setup Sales Funnel Categories for further instructions.
- One-Time Revenue - Enter the expected one time revenue (dollar) for this sales opportunity. You will be able to monitor expected one time revenue on the Sales Funnel Report.
- Recurring Revenue - Enter the expected recurring revenue (dollar) for this sales opportunity. You will be able to monitor expected recurring revenue on the Sales Funnel Report.
- Estimated Close Date - Enter the date that you expect to close this sale.
- Probability - Enter the probability that you will close this sale.
- Stage - Select the current stage of the sale. You may define various stages (i.e. cold, warm, hot) as part of the initial setup. If needed, click the + button to add additional sales stages. Click Here for more information on setting up sales stages.
- Status - Enter the current status of the sale. The status list will display the statuses currently configured in your database.
- NOTE: Status is not a configurable field. Many reports in your software are based off of these, as well as various automated actions. For Example: When a proposal is accepted, the status of the opportunity will automatically be changed to Won.
- Won/Lost Date - Leave this field blank. You will update this when the opportunity is either won or lost.
- NOTE: When a proposal is accepted, this date will automatically be populated with the date.
- Click Done to save the new opportunity.
Create a Sales Proposal
The sales proposal is a key step in your sales process. For example, For a new membership opportunity you may create a proposal for each membership type they could select. When you create a sales proposal in the database, you are also creating an on-line sign up page. You prospect will be able to view and accept the proposal directly from the on-line page. Setting up a proposal is a two step process.
Step One
- Select Member Recruitment in the Navigation Panel.
- Click the contact for which you wish to create a proposal(s).
- Click the Proposals tab.
- Click the Add button.
- On the Add/Edit Sales Proposal screen, configure the following:
- Name - Name this proposal.
- Valid Until - Enter the date when the offer in your proposal will expire. When you create a proposal, you are also creating an on-line sign up page. Once the proposal expires, the prospect would still be able to view the proposal on-line, but would no longer be able to accept.
- NOTE: - you would be able to come back to this setting and change this date, if needed, to re-activate the form.
- Sales Proposal Template - Select a template. Prior to setting up a proposal, you will create proposal templates in Setup. The list will be populated with any sales proposals you have used previously.
- Terms/Conditions - Select the terms and conditions that they will need to agree to to accept this sales proposal. For example, if this is a membership opportunity, you may have a list of terms that they must agree to to be an active member of your organization. The list will be populated with previously configured terms and conditions. Additional terms and conditions may be created under Setup.
- Message Template - The message template would include the information that you want to display on the sign-up page. If you have a common set of instructions that you use frequently, you can create a standard message template on the Setup page; or you can enter text into the Message On Sign Up Page.
- Click Done to save the new proposal.
Step Two
Step Two of the Sales Proposal process is setting up the pricing details.
- On the Proposals tab, click the pencil icon in the actions column for your proposal.
- Select the Membership Type. The list will include all membership types configured in your system. The fee items associated with the type will automatically be populated. This pricing may be over-ridden if you are customizing this quote. Click Here for further information on setting up Membership Types.
- Click Done to save the new settings.

Once you have completed the proposal, you provide the proposal to your prospect in several ways:
Download Sales Proposal
On the proposal tab, click the download icon in the Actions column.
Send Proposal URL
On the proposal tab, click the hyper-link for the proposal, and copy the URL displayed. You can then paste the URL into an email. Your prospect will be able to view the proposal on-line.

When the sales proposal link is sent in an email, your prospect will have the ability to accept the proposal on-line. The following will occur when a proposal is accepted via the on-line option:
- The timeline will automatically be updated with the timeline item you selected as Timeline Item Applied To Signups in the Sales Proposal settings. Click Here for instructions on setting up automated timeline items.
- The Status of the opportunity will be automatically changed to Won.
- The Won/Lost Date of the opportunity will be automatically updated to the date the proposal was accepted.
- An email notification will be sent to those who have subscribed to the Sales Proposal Accepted notification. Click Here for details on setting up notifications.
You will manually wish to change the Sales Stage, and if necessary the Status Reason. The actual setup of membership, and the associated fees will also need to be performed.
|
|
NOTE: When the proposal is accepted via the link, or the back-office, a PDF snapshot is taken of the proposal as it currently is and a copy of it is stored in the Cloud Drive and appears in the contacts' Files tab. |

When the proposal is accepted, you will manually wish to change the Sales Stage, and if necessary the Status Reason. The actual setup of membership, and the associated fees will also need to be performed.
Sales Proposal Timeline
The Sales Proposal Timeline is used to track the milestones of a sales opportunity. You can setup standard milestone, for example, "Initial Contact", "Sales Proposal Sent", "Sales Proposal Accepted", and so on. Click Here to learn more about setting up timeline items. You can also create timeline items "on the fly" on the timeline tab.

Clicking into a timeline item will display additional notes (if entered) about the timeline activity.
|
|
NOTE: Two timeline items can be automatically assigned to your timeline: Timeline Item Applied To New Opportunities and Timeline Item Applied To Signups. Click Here to learn more about setting up your automated timeline items. |
Add an item to the Sales Proposal Timeline
- On the Timeline tab, click the Add button.

- Select a Timeline Item from the list OR click the + to create a new item. Timeline items displayed in the list are those that you have previously created.
- Enter the Timeline Date. This is the date this timeline activity was performed.
- Enter a Summary of the timeline activity (optional). The summary will be displayed on the timeline tab, to give you an at a glance understanding of the activity performed.
- Enter a Description of the timeline activity (optional).
- Click Done.
Member Recruitment Reports
Several reports are available for management and analysis of your Member Recruitment opportunities. See Sales Funnel Reports.