Membership Management
Contents
- 1 Understanding Membership Types
- 2 View/Create your Membership Application Form
- 3 Approving On-line Membership Applications
- 4 Configuring Membership Join/Drop Reasons
- 5 Adding a Membership to a Contact
- 6 Manage Member Recurring Fee Schedule
- 7 Viewing/Updating Member Information
- 7.1 Viewing/Editing Membership Details
- 7.2 Update Contacts Related to a Membership
- 7.3 Manage Membership Change
- 7.4 Membership Reports
- 8 FAQ's
Understanding Membership Types
Membership Types allow you to define the membership packages and fee items you wish to provide to your members. Membership Types encompass the following:
- Membership Policies: Membership Policies allow you to define whether you want to allow on-line sign-up, allow invoicing, the required fields, what fields you want to display, and so on, on your Membership Application form. A default Standard Membership Policy is defined when the database is installed. This policy may be used as designed, customized, or you may create new policies to meet your business needs. The standard membership policy default is described below:
- Allow On-line Payment is enabled
- Allow Invoicing is enabled
- Required fields on the Membership Application form are: Membership Type, First and Last Name, Email Address. All other fields are displayed as optional.

Adding a New Membership Type
- Click Membership in the Navigation panel.
- Click the Membership Types tab. A list of membership types currently setup in your system will be displayed.
- Click the Add button.
- On the Add/Edit Membership Type screen, configure the following:
- Name - Enter a name for the new membership type. This is the name that will appear on you member application, as well as within in the database where you may choose a membership type, filter by membership type, report on membership type, etc.
- Membership Term (Months) - Enter the duration of this membership, in months.
- Owned By - This setting allows you to set this membership type as either organization or individual level. If Business is selected, invoices will billed to the organization; if Individual is selected; invoices will be billed to the individual.
- NAHB Membership Type: The selection is available when you have enabled a Billhighway Gateway. If you are integrating to Billhigway, select the NAHB membership type. NOTE: Owned by should be set to organization for Builder or Associate NAHB Membership Type. Owned By should be set to Individual when selecting Affiliate NAHB Membership Type.
- Description - Provide description of the membership type. This description may be displayed on your web-site. You may use the standard word processing icons (i.e. bolding, italicizing, etc.) to format the text. You may also add images and/or links to the description.
- Display Only These Memberships: This option allows you to select the specific membership types you wish to display on your membership application form.
- Email to Send on Completion: Select the email that you wish to automatically send to the applicant after they have submitted the application. The default is Membership Application Confirmation Email. You may select from any of the templates you have created.
- Recurring Fees - Recurring fees would include, for example, the annual membership fee. Click the + button to add a recurring fee to this membership type. You may add as many recurring fees as needed.
- Require Acceptance of Privacy Policy: Select this check-box if you will require the applicant to accept your terms/policies before they can submit the application. If this option is selected the Select Terms/Acceptance drop-down box is displayed. Select your terms/conditions from the list. Terms/Conditions are setup under Setup > Services, Products and Commerce.

- Select a good/service from the Item drop-down list. NOTE: The "Chapter" column will be displayed if the selected Membership Policy has "Allow Chapter Selection" enabled. Select the desired chapter from the drop-down list.

- Enter a Description of the item.
- Enter the Default Price.
- Select the Billing Schedule for this item. You may choose annually, semi-annually, quarterly or monthly. A Custom option is also available. This may be useful if you wish to define what the price would be for each frequency option. See
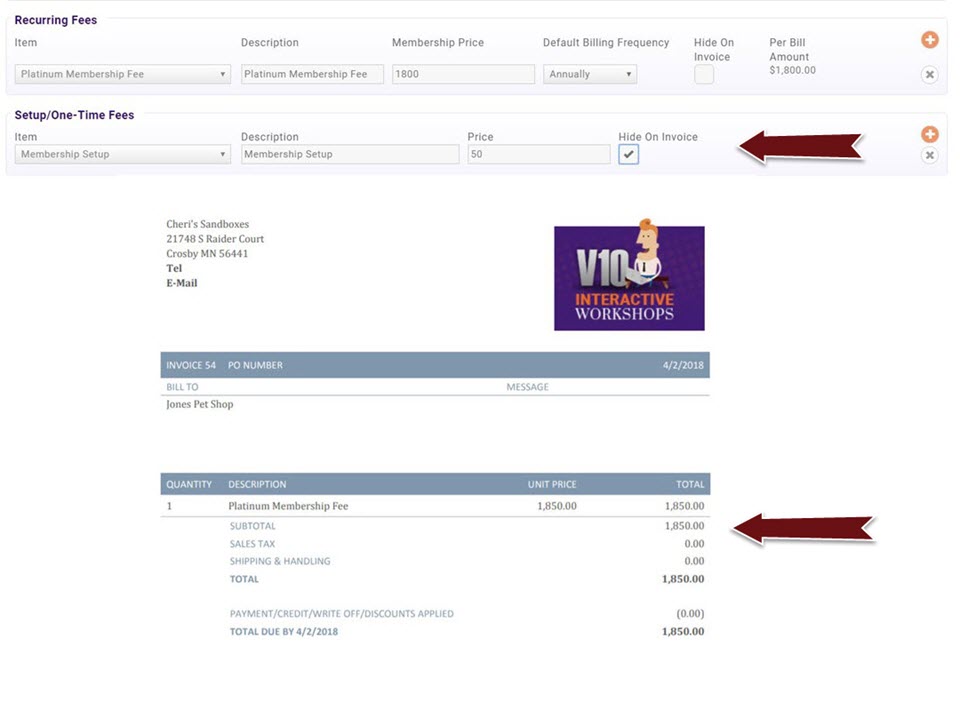
- Select the Hide on Invoice check-box if you do not wish to display this item on the invoice. If this option is selected, the amount of the item will be added to the first visible line item on the invoice. NOTE: If viewing the invoice in the back office, staff will see all line items regardless of whether the "Hide on Invoice" was selected on the Membership.
- Setup/One Time Fees - If there are one time fees, such as a setup fee, associated with this membership, you may add them by clicking the + button.
- Select a good/service from the Item drop-down list.
- Enter a Description of the item.
- Enter the Default Price.
- Select the Hide on Invoice check-box if you do not wish to display this item on the invoice. If this option is selected, the amount of the item will be added to the first visible line item on the invoice. NOTE: If viewing the invoice in the back office, staff will see all line items regardless of whether the "Hide on Invoice" was selected on the Membership.
- Click Done to save the new Membership Type.


Setting up a Custom Billing Frequency
Custom billing frequency allows you to charge a different membership rate based upon the frequency that your members wish to pay dues. For example, you may charge $1200/annually, however you may wish to charge $175/month if the member chooses to pay monthly.
To setup a custom frequency:
- Create a Membership Type as described in Adding a New Membership Type.
- In the Recurring Fees section, select the fee item to associate to the membership type.
- Select Custom in the Default Billing Frequency drop-down list.
- Click the
 icon, the Edit Fee Item Frequency Prices dialog box will be displayed.
- Click the
 icon to add a billing frequency.
- Select a Billing Schedule from the drop-down list. Options include annually, monthly, quarterly and semi-annually.
- Enter the Per Bill Amount for the selected billing schedule.
- Click the to add another billing frequency and price. Repeat this step to add additional billing frequencies.
- Click Done when completed.
- Complete the setup of your membership type as described in Adding a New Membership Type.


When this membership type is presented on your Membership Application, the applicant will be able to choose the billing schedule they would prefer. Scheduled billing will automatically be setup to reflect the billing schedule selected.

Membership Type Setup Advanced Options
When you create membership types, additional information about the membership type may be setup by clicking the Advanced Options check-box.
|
|
NOTE: If the Advanced Options are left un-configured, the system defaults will be used. System defaults are noted for all settings below. |
- Duration (Months) - this field allows you to define the renewal frequency for the membership. The default is 12 months, however if you have renewals that occur more than or less than 12 months, you may change the duration.
- Active Until - This field dictates when a membership ends. Manually Ended results in the membership ending when you actually drop the member.
- Invoice Template - You may select an invoice template. If no invoice template is selected, the invoice template associated to the fee items will be used.
- Payment Terms - The default payment terms are selected, and you may select alternate payment terms. You can add new payment terms by clicking the
 icon.
icon. - Terms/Conditions - The default payment terms are selected, and you may select alternate payment terms. You can add new terms and conditions by clicking the icon.
- Membership Policies - Membership policies allow you to define what information you will gather on the Membership Application form. Select the membership policies to associate to this Membership Type. Click the
 to view and/or edit an existing policy, or click the icon to add a new Membership Policy set. Standard Membership Policies is the default.
 - Directory Listing - The Directory Listing option allows you to assign the directory and directory display settings to be assigned to this membership type. Click the icon to configure the directory and type. Click Here for further information on Directory Display Settings. NO Directory Listing is configured by default.
- (Optional) Calendar Year Renewal - These options allow you to manage when your renewals will occur and manage prorating your fees.
- Renew Everyone In - This setting allows you to establish the renewal month to be applied to all members.
- Prorate Partial Years - Selecting this check-box will automate the process of adjusting the membership fees, based on the month that the member joined. NOTE: When applicants are presented with the amount that they are paying on the membership application it will correctly represent the amount that they will pay now as the prorated amount (if applicable) and the amount they will be billed in the future.
- Individual Limit (0 for unlimited): This setting allows you to limit the number of individuals that can be active with an organization membership. If set to zero, there will be no limit to the number of contacts that can be associated to a membership. If a value is set, and the number of contacts associated to a membership has been reached, a new contact may not be added to the membership. The limit set will be visible on the Add Related Contacts screen.

- (Optional) Membership Categories: Membership Categories provide a way to further filter and report on your membership types. Select a Membership Category from the drop-down list, or click the plus sign to add a new membership category.
Understanding Membership Policies
Membership policies allow you to define what information you will gather on the Membership Application form. Standard Membership Policies are setup by default on installation of the GrowthZone database. You may use the default as it is designed, modify the default, or create a new set of membership policies.

The following settings may be configured for your membership policies:
- Name - The name of the policy is displayed internally only, and is available for selection when creating membership types.
- Allow On-line Payment - Select this option to allow applicants to pay for their membership application by credit card on-line. NOTE: The system will validate that all fields are filled out correctly BEFORE submitting/charging credit cards. Once validation is successful, the system will then proceed with charging the card and submitting/creating the membership.
- Allow Invoicing - Select this option to allow an applicant to request to be billed for their membership application.
- Chapter Options - If using the Chapters module, configure the following as necessary:
- Allow Multiple Chapter Selection - If you allow applicants to choose more than one chapter when filling out the Membership Application Form, enable this setting. Click Here for further details on setting up membership policies for multiple chapter selection.
- Customize Standard Questions - Click the Customize Standard Questions link to select which questions you wish to display (either required or optional) on the membership application.

- Custom Fields - You may add additional fields to your application by clicking the icon. Click Here for further information on configuring custom fields. NOTE: Custom Fields will be displayed on the Membership Details screen, accessible from the Membership section on a contact's Profile tab, as well as on the contacts More Info tab.

- Category List - the Minimum and Maximum fields allow you to set the number of categories allowed for this membership policy. Click the icon to configure the minimum and maximum values.
- Category List - the Minimum and Maximum fields allow you to set the number of categories allowed for this membership policy. Click the
|
|
NOTE: In addition to the fields you have selected to display on your application form, lists/committees for which you have enabled Users Can Join and/or Public Can Join will be included on your application form. Click Here for information on creating/configuring your lists/committees. |

Understanding Directory Display Settings
Directory Display Settings control what information about a business or individual is displayed if you choose to publish a directory of members to your website. You may, perhaps, have different levels of listings based on membership type. A basic level might include just a business name and a logo, where as an enhanced listing may include photo galleries, videos, maps, etc.
To Add a new Directory Display Settings:
- Click Setup in the left-hand navigation panel.
- Click Directory Display Settings in the Website section.
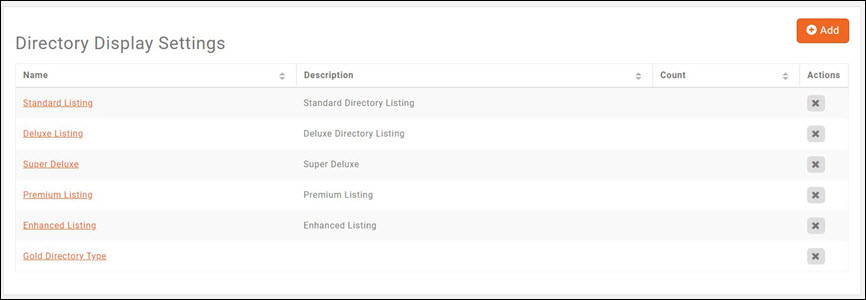
- You system will be populated with the Standard Listing and the Deluxe Listing listing types. You may use these as designed or click the hyper-linked name of a listing to edit.
- Click the Add button.
- Configure the following:
- Name - Provide a name for the Directory Display Settings.
- Description - Provide a description of the Directory Display Settings.
- Show Individual Details - Select which details for your individuals will be displayed when this directory display setting is used.
- NOTE: When address, email and phone are selected, you can then choose which address type (i.e. mailing, physical, etc.), which email type (work, personal, etc.) and which phone type (main, toll, etc.) you will display with this listing type.
- Show Custom Fields - Select the custom fields you want to display in the directory.
- Options - select the additional options to display in the directory:
- Show Membership Type - If selected the member's membership type will be displayed in the directory.
- Show Search Logo - If selected the member's primary image will be displayed when the directory is searched.
- Show Highlights If selected, a highlights section will be displayed on the web-page.
- Show Related Contacts - If selected, all of the individual associated to the member will be displayed on in the directory. NOTE: If an individual does not wish to be displayed in the directory, you may disable the Show as Related or Primary Contact in directory (if applicable) setting for that contact.
- Show Search Description - If selected, you will be able to add a short description to be displayed on the directory search page.
- Show Gallery - If selected, the member may display a gallery of photos on the web-page.
- Show Video - if selected, the member may display a video on the web-page.
- Show Map - if selected, the location of the organization will be displayed on map on the web-page.
- Show Primary Contact - if selected, the name of the primary contact will be displayed on the web-page.
- Use Contacts Website for Listing page - If selected, clicking on the member on your public web-page will lead to the contacts website, instead of your page. Applicable only when assigned to a public directory (not available in the Hub).
- Retargeting
- Google Tag Manager Container ID - Enter the Container Id you were provided on installation of Google Tag Manager. Google Tag Manager is a free tool that makes it easy for marketers to add and update website tags -- including conversion tracking, site analytics, re-marketing, and more—with just a few clicks, and without needing to edit your website code.


Understanding Directories
You system will contain a default directory, Active Member Directory. This directory is tied to your Business Category and may contain all of your valued members. It also is configured with the Standard Listing directory listing type. Advanced options, including searching by custom field may be configured for the default. If needed, you may create additional directories. Click Here for information on creating a new directory
Modifying a Membership Type
- Click Membership in the Navigation panel.
- Click the Membership Types tab. A list of membership types currently setup in your system will be displayed.
- Click the link for the Membership Type you wish to modify.
- On the Add/Edit Membership Type screen, make the desired modifications.
- Click Done to save your changes.
View/Create your Membership Application Form
A default application form is setup in your system. You may use it as it is configured, or you may customize to better meet your needs.
|
|
NOTE: The questions included on your membership application form are driven by the Membership Policies you have associated to your membership types. See Understanding Membership Policies for further information. |
- Click Membership in the Navigation panel.
- Click the Membership Application Forms tab. A list of Membership Application Forms currently setup in your system will be displayed.
- Click the link for the default application form
- On the Add/Edit Membership Application Form screen, you may choose to customize the following:
- Name - Provide a name for the application form. This name is used internally.
- Description - Provide a description of the application form. This description is used internally.
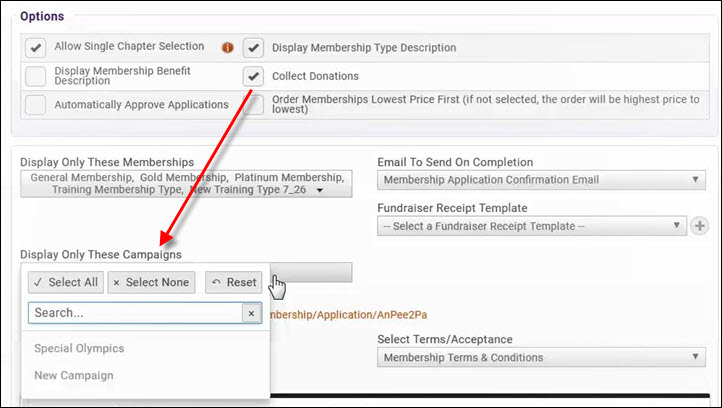
- Options - Select the desired options for this application form:
- Allow Invoicing - Select this check-box to allow applicants to request to be invoiced for their membership fee/one time setup fees.
- Collect Donations - Select this check-box if you would like to collect donations to your fundraisers from the individuals completing the application form. If selected, you will have the option to select the campaigns you wish to display on your application from the Display Only These Campaigns drop-down list.
- Display Membership Type Description - Select this check-box if you would like the membership type description to be displayed on the application form.
- Allow Online Payment - Select this check-box to allow for credit card payment when an applicant is completing the application form.
- Allow Single Chapter Selection - If you are using Chapters, select this check-box to allow applicants to select their chapter when filling in the application form. This option should only be selected if you allow for selection of only one chapter during the application process.
- NOTE: Selecting this option allows for ONE chapter selection only. If multiple chapter selection is needed, you must enable Allow Multiple Chapter Selections within Membership Policies. Click Here for instructions on setting up Membership Policies. If you enable chapter selection within the membership policies, the Allow Single Chapter Selection should NOT be enabled on the Membership Application Form.
- Display Membership Benefit Description - Select this check-box is you would like to display benefit package information on the application.
- Automatically Approve Applications - Select this check-box if you want to automatically approve on-line applications. If this is not selected, the new applicant will be available in your database, but their membership status will be listed as Pending Approval until a staff member has approved.
- Order Memberships Lowest Price First (if not selected, the order will be highest price to lowest) - Select this option if you wish to order your memberships from lowest price to highest price when displayed on your web-site. If not selected, the order will be highest to lowest.
- Hide Pricing on Membership Selection: Enable this option if you do not wish to show membership prices on the first page of your application form. If enabled, pricing will only be displayed once a member reaches the payment page.
- Collect Lists/Committees Subscriptions: If selected, the lists/committees that you have configured as Public Can Join will be displayed on the application form. Applicants would then be able to select the groups they wish to join.
- Display Only These Memberships - This option allows you to select which memberships to display on-line. By default, all memberships will be displayed, but you may change this if you wish to not display only certain memberships on your application form.
- Email To Send On Completion - An email will be automatically sent to the applicant when the complete the application. Select the email you wish to send from the drop-down list. A default Membership Application Confirmation Email template is selected, however, you may select a different template. Click here Communications Basics - Create and Manage Email Templates for further details on working with email templates.
- Instructions - Enter the instructions that you would like to display on the application form. You may use the standard word processing icons (i.e. bolding, italicizing, etc.) to format the text. You may also add images and/or links to the instructions.
- Completion Message - Enter the message you would like to appear when the applicant completes the application. You may use the standard word processing icons (i.e. bolding, italicizing, etc.) to format the text. You may also add images and/or links to the message.
- Additional settings for the Member Application Form may be displayed by clicking the Advanced Options check-box.
- Payment Gateway - Select the appropriate payment gateway from the drop-down list to be used for on-line payments.
- Completion Page Url (Ex: http://www.msn.com) - Enter the URL of the page you would like the applicant to be sent to after completing the application.
- OR
- After Completion, Create a new Hub account - Select this checkbox if you would like the applicant to create their log-in to the Info Hub after submitting the application. A Create an Account in the Hub button will be included on the application submitted confirmation page.
- Destination Url within Hub (empty if Home) - You may enter a page specific URL for the Info Hub. For example, if you would like them to land on the account tab. If this is left blank, the page will open on the home page.
- URL - The URL for the membership application form is displayed. You make click on it to preview our application form.
- Click Done to save the application form.


|
|
NOTE: In addition to the fields you have selected to display on your application form, lists/committees for which you have enabled Users Can Join and/or Public Can Join will be included on your application form. Click Here for information on creating/configuring your groups. |
On-line Membership Application Process Flow
When an applicant submits an on-line application the following will occur:
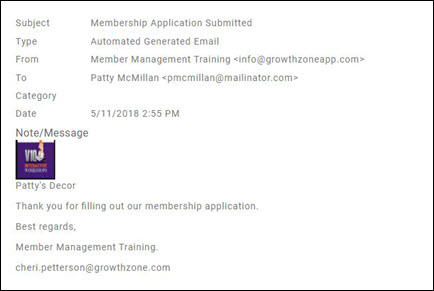
- The applicant will receive an email confirmation. The email sent will either be the email you have selected in the advanced options of your membership application form, or the default you set in Automated Messaging. Email is sent to address associated with the person who submitted the application.
- Those staff members who have subscribed to Membership Application Submitted notification will receive an email.

Approving On-line Membership Applications
Once a membership application form is submitted on-line, an automated email will be sent to those who have subscribed to the Membership Application Submitted notification. The default email notification is shown below.

Click Here to learn how to setup your Membership Applications for automated approval.
If you have chosen to not automatically approve on-line membership applications, you will need to approve the applications when they are submitted. You can approve the new membership application on the contact's Profile tab. The status of the application will be displayed as Pending Approval in the Membership section.
- Click the down arrow on the Actions button in the Membership section.
- Click Approve Membership

The status of the membership on the profile tab will change to Active. The active date will reflect the day the application was submitted.
View all Membership Applications Awaiting Approval
On the Membership tab, in the Membership module, filter results on Waiting for Approval, as shown below:

By clicking on the member name, you can view further details of the member, and approve the membership application by clicking the Actions button and selecting Approve Membership.

Configuring Membership Join/Drop Reasons
Configuring Join Reasons
- Click Setup in the left-hand navigation panel.
- Click Membership Join Reasons in the Services, Products and Commerce section. A list of currently configured join reasons will be displayed.
- Click the
 button.
- Configure the following:
- Reason: Enter your customized join reason.
- Description: (Optional) Enter a description of the join reason.
- Standard Join Reason: Select a standard join reason. Standard join reasons are those populated to the database by default and allow for better reporting and filtering.
- Click Done.


Configuring Drop Reasons
Add Drop Reasons
- Click Setup in the left-hand navigation panel.
- Click Membership Drop Reasons in the Services, Products and Commerce section. A list of currently configured drop reasons will be displayed. NOTE: The system is populated with several standard drop reasons (Financial/Economic Reasons - Cannot Afford, Closed/Death/Moved - No Longer in Business, Not Using Benefits - Not Using Benefits, Other).
- Click the button.
- Configure the following:
- Reason: Enter your custom drop reason.
- Description: (Optional) Enter further description of this drop reason.
- Standard Drop Reason: Select a standard drop reason. The standard drop reasons are pre-populated in your system and allow for better reporting on why your members may have dropped.
- Available to Public: Enable the available to public if you wish this drop reason to be displayed when a member chooses not to renew their membership . This is applicable when you are using Renewal Notifications for your membership renewals. This setting will NOT display if the Standard Drop Reason selected above is set to Expired.
- Click 'Done.


Update a Drop Reasons
- Click Setup in the left-hand navigation panel.
- Click Membership Drop Reasons in the Services, Products and Commerce section. A list of currently configured drop reasons will be displayed.
- Click the hyper-link for the drop reason you wish to update.
- Make desired changes, and click Done

Adding a Membership to a Contact
While most of your prospective members may apply on-line, you can also add memberships to your contacts directly in the database. NOTE: For organization based memberships, ensure that you have individual contacts assigned to the organization prior to adding memberships.
The steps below may be followed whether you are adding a membership to an organization or an individual.
- On a Contact's Profile tab.
- Click the icon in the Memberships section.
- Configure the following:
- Membership Type - Select the desired membership type from the drop-down list. The list will be populated with the membership types you have configured for your system. See Adding a Membership Type for instruction on configuring your membership types.
- Start Date - Select the start date for this new membership. The date will default to the current date, and the system will automatically generate an invoice. You may start the membership on a future date if needed.
- Billing Start Date - Select the first billing date for the new membership. The date will default to the current date. The system will create a recurring schedule base on the billing start date.
- Is Courtesy - Select this check-box if this is a courtesy membership. The status of the membership will be Courtesy instead of Active.
- Sales Rep - (Optional) Select the Sales Rep for this new member. This will allow you to track whom on your staff was responsible for this sale.
- Join Reason (Optional) Select a Join Reason from the drop-down list. You can add a new Join reason by clicking the + button. Reports can be generated based on Join Reason, to help you in understanding what you new members are looking for from your organization.
- Chapter - If you organization uses chapters, select the chapter of the new member from the drop-down list.
- Referred By - If this new member was referred by an existing contact, you can enter the contact's name here. The referral will be noted on the members profile, as well as listed on the Activity tab of the person who referred. NOTE: You can use the Membership Referral Report to view and analyze all referrals. Click Here for information on generating this report.
- Fees - The fees section will be automatically populated with the fees that you have associated to the Membership Type. You may over-ride the fees as necessary, for example, if you wish to change the billing frequency from Annually to Monthly. NOTE: Fee and frequency selection will automatically set up the Billing Fees and Schedule on the members Billing tab. The Per Bill Amount and the Per Bill Discount fields will automatically be populated based on the membership price you have entered and the default billing frequency.
- Invoice Options
- Print - Email - Select how the new member wishes to be invoiced. You may select one or both options. The option selected will be the default used when invoices are delivered.
- Billing Address - Select a billing address. The drop-down list will be populated with addresses associated to the new member, or you may enter a new address by clicking the + button. Addresses displayed will be those associated to the Contact selected.
- Billing Email - Select a billing email. The drop-down list will be populated with emails associated to the new members, or you may enter a new email address by clicking the + button. Emails displayed will be those associated to the Contact selected.
- Contact - Select a contact from the drop-down list. The Contact selection sets the the billing contact for Scheduled Billing, as well as the membership billing contact. Contacts displayed will include the current organization and individuals, as well as parent organization and individuals if applicable. NOTE: If no selection is made, the Primary Contact for the organization will default, if no primary contact is assigned for the organization, the organization itself will be selected as the contact.
- Invoice Terms - The Invoice Terms associated to the membership type will populate by default. You may select different terms from the drop-down list if needed.
- Invoice Message - (Optional) Enter the message you would like included on the invoice.
- Click the Advanced Options check-box to add Actions (Optional). If you are using the project management module, you can associate a previously defined project template:
- Click the Create New Member Project check-box.
- Select a Project Template.
- Click Done to save the new membership.


Manage Member Recurring Fee Schedule
A billing fees schedule will automatically be created on the contact's Billing tab when a new membership is added.

To view the details of the the fee items, click the hyper-link in the Description column.

The Edit Recurring Billing Item screen will display all settings configured when you setup the membership, but all changes to this recurring membership billing should be performed on the Profile tab, in the Memberships section.
Viewing/Updating Member Information
The easiest way to view a member's profile is to type the member name in the Search box in the header, and selecting the desired member. A membership profile is made up of the following:
- Profile
- More Info
- Individuals
- Activity
- Communication
- Billing
- Web Content
- Files
- Tasks
See Managing Contacts for details on updating member information.
Viewing/Editing Membership Details
Membership details such as the primary and billing contact may change over time.
Change Organization Membership Primary Contact
- On the organization's Profile tab
- In the Memberships section, click the hyper-link for the desired membership.
- Select the new Primary contact from the drop-down list. You will be able to pick from the current organization, all contacts of the current organization, parent organization, and contacts of a parent organization (if applicable). Note: an email address may not be selected, it is derived from the selected contact's primary email address.
- Click Done.


NOTE: If you are working with an individual membership, you can select any related organization contacts, or their contacts in addition to the individual who owns the membership.
Change Organization Membership Billing Contact
When a membership is first added to an organization, you will assign a billing contact. If it is necessary to change the billing contact:
- On the Organization's Profile tab
- In the Memberships section, click the hyper-link of the appropriate membership.
- Select the desired Billing Contact from the drop-down list. Contacts' email addresses cannot be selected but are derived from the selected contact's default/primary email address.
- Click Done.
NOTE: When the Membership Billing Contact is modified, the related scheduled/recurring billings that are tied to that membership will also be updated with the new Billing Contact information.
Update Renewal Month
- On the member's Profile tab, in the Memberships section, click the hyper-link for the membership type.
- Select the desired Renewal Month from the drop-down list.
- Click Done.

Update Contacts Related to a Membership
When new individuals are added to a contact, they are not automatically added to the membership. To add the individuals to the membership:
- On the Profile tab, click the Actions button in the Memberships section.
- Click Related Contacts.
- Click the and select the desired contact from the drop-down list.
- Click Done.


|
|
NOTE: If limits have been set on the number of contacts that may be associated to a membership, the limit will be displayed. If the limit has been reached, the |
Manage Membership Change
You can easily upgrade, downgrade, drop memberships, etc. from the member's Profile tab. Click the Actions button in the Memberships section.

Upgrade a Membership
- On the member's Profile tab, click the Actions button in the Memberships section.
- Click Upgrade Membership. The Membership screen will be displayed.
- Configure the following as needed:
- Membership Type - Select the membership type to which the member is upgrading.
- Change Date - Enter the date the upgrade will take effect.
- Staff - Optional, select the staff member handling this upgrade.
- Next Bill Date - If needed update the next bill date.
- Fees - The fee items associated with the new membership will automatically be populated. You may update these as needed.
- Invoice Options - The invoice options will automatically be populated based on this members history. You may update as needed.
- Click Done. Evaluate what billing adjustments may be necessary, and adjust those on the member's account tab. If a date in the future is selected, the Fees scheduled on the Account tab will be updated accordingly.

A note indicating that the membership was upgraded will automatically be logged on the Communication tab.
The following changes will occur when you updgrade a membership:
- An end date will be added to the scheduled billing tied to the old membership
- A new scheduled billing with the correct start dates (and no end date) is created.
|
|
Did you know... The Membership Change Report may be used to view and analyze all membership changes. Click Here for instructions on running the report.. |
Downgrade a Membership
- On the member's Profile tab, click the actions button in the Memberships section.
- Click Downgrade Membership. The Membership screen will be displayed.
- Configure the following as needed:
- Membership Type - Select the membership type to which the member is downgrading.
- Change Date - Enter the date the upgrade will take effect.
- Staff - Optional, select the staff member handling this downgrade.
- Next Bill Date - If needed update the next bill date.
- Fees - The fee items associated with the new membership type will automatically be populated. You may update these as needed.
- Invoice Options - The invoice options will automatically be populated based on this members history. You may update as needed.
- Click Done.
A note indicating that the membership was downgraded will automatically be logged on the Communication tab.
|
|
Did you know... The Membership Change Report may be used to view and analyze all membership changes. Click Here for instructions on running the report.. |
Drop Membership
- On the member's Profile tab, click the actions button in the Memberships section.
- Click Drop Membership.
- Configure the following as needed:
- End Date - Enter the date the drop will take effect.
- Drop Reason - Select a drop reason. You may select a drop reason from the list, or you may dynamically add a drop reason by clicking the + button.
- Notes - These notes are for internal use. This field is required.
- Invoices to Write Off - Any outstanding invoices for this member will be displayed. You may choose to write-off all, some or none of the invoices based on your business processes.
- Update Access Level for all Contacts - This setting allows you to define what access to the Info Hub ALL contacts of this membership will retain after the drop. Alternately, a list of all contacts is displayed, and you may define for each individual what access they will retain.
- Remove From Lists/Committees: Enable this check-box is you would like to remove the individual(s) from lists/committees. If de-selected, the membership will be dropped, however individuals will remain in lists/committees.
- Click Done.

A note indicating that the membership was dropped will automatically be logged on the Communication tab.
|
|
Did you know... The Dropped Membership Report may be used to view and analyze all membership changes. Click Here for instructions on running the report.. |
Adjust Membership
The Adjust Membership action allows you to adjust the membership fees associated to a member.
- On the member's Profile tab, click the actions button in the Memberships section.
- Click Adjust Membership. The Membership screen will be displayed.
- Update the fees as needed. The changes made here will only impact billing on a go forward, any fees that have already been invoices will not be changed.
- Click Done.
A note indicating that the membership was adjusted will automatically be logged on the Communication tab. Additionally,when an adjustment is made the old billing scheduled will be ended, and a new billing schedule started. This is visible on the contact's Billing tab.
A note indicating that the membership was adjusted will automatically be logged on the Communication tab.
|
|
Did you know... The Membership Change Report may be used to view and analyze all membership changes. Click Here for instructions on running the report.. |
Delete Membership
While it is possible, it is NOT recommended to delete a membership. When deleting a member, you will delete all historical data associated to that membership. Additionally, all associated contacts will also be disassociated from this membership and the membership will be deleted.
- On the member's Profile tab, click the actions button in the Memberships section.
- Click Delete Membership.
Reactivate Membership
If a membership expired and was deactivated, or if a member dropped, the membership be easily reactivated on the members profile tab.
- On the member's Profile tab, click the actions button in the Memberships section.
- Click Re-activate Membership.
- The Membership page will be displayed to select membership type and associate fees.

A note indicating that the membership was re-activated will automatically be logged on the Communication tab.
|
|
Did you know... The Membership Change Report may be used to view and analyze all membership changes. Click Here for instructions on running the report.. |
Membership Reports
Common Membership Calculations
Does the thought of having to calculate retention, churn, or the cost of acquiring a new member make your head hurt? For many association pros, crunching numbers is (unfortunately) a part of their daily grind. You don’t have to be a math person to use these seven common calculations to determine everything from renewal rates to average length of membership.
Retention Rate
Retention Rate is the percentage of members retained over a given period of time. This metric can be calculated if you know how many members you had at the beginning of a period, and many you had at the end of a period.
| CALCULATION: (End Count - New Members) ÷ Start Count = Retention Rate |
The Dashboard will provide the Start Count and the End Count needed for this calculation.
- Click Dashboard in the left-hand navigation.
- Click the Metrics tab.
- Click the
 icon next to Total Memberships. NOTE: if you have removed this widget from your dashboard, click the Add Widget button to place it on your dashboard.
- Click Edit Widget.
- Select Custom from the Duration drop-down list.
- Enter the desired dates in the Duration Date Range.
- Click Done. The Total Memberships widget will refresh displaying metrics for the desired date range.


Start Count = 2331 End Count = 2914
Generate the New Membership report to find New Members. Generate the report for the same date range used above.

See New Membership Report for further instructions on generating the New Membership Report.
New Members = 848
CALCULATION: (End Count - New Members) ÷ Start Count = Retention Rate
(2914 - 848) ÷ 2331 = .88 88% Retention Rate
Lapse Rate (Churn)
The Lapse Rate (Churn) is the percentage of members that discontinue their membership over a given period of time.
| CALCULATION: Dropped Members ÷ Start Count = Lapse Rate |
The Start Count is calculated as described in Retention Rate above.

Start Count = 2331
The Dropped Membership Report may be used to calculate Dropped Members. Generate the report using the same date range used to find the Start Count. See Dropped Membership Report for instructions on generating the report.

Dropped Count = 241
CALCULATION: Dropped Members ÷ Start Count = Lapse Rate
241 ÷ 2331 = .10 Lapse Rate = 10%
Renewal Rate
Renewal Rate is the percentage of members that renew their membership over a given time period.
| CALCULATION: # of Renewals ÷ Eligible Members = Renewal Rate |
|
|
NOTE: Using the criteria described below will get an overall Renewal Rate, not specific to a certain year - but for all time. You could use this to judge if you are moving the right direction each time to run this stat. |
The Membership Report will provide you with the information to calculate the Renewal Rate. You will generate the report twice, each with different filtering options.
First: Generate the Membership Report with the following filtering criteria to find the # of Renewals:
- Set Membership Status set to Active and Courtesy.
- Add a Criteria / Filters for Membership Start Date Before and set the date to the first date of your search criteria. For example if you are looking for your renewal rate for up until 1-1-2017, you would set the before date to 1/1/2017.

In the example above, # of Renewals = 2560.
Second: Generate the Membership Report with the following filtering criteria to find Eligible Members"
- Set Membership Status set to Active, Courtesy, Dropped, Expired. Do not include Non-Member or other statuses since these were never up for renewal and thus not part of your eligible members.
- Add a Criteria / Filters for Membership Start Date Before and set the date to the first date of your search criteria. For example if you are looking for your renewal rate for 2017, you would set the before date to 1/1/2017.

In the example above, Eligible Members = 3180.
CALCULATION: # of Renewals ÷ Eligible Members = Renewal Rate
2560 ÷ 3180 = .80 80% Renewal Rate
See Membership Report for further instructions on generating the report.
Average Membership Tenure (AMT)
Average Membership Tenure is the average length of time a member stays with the organization. This can be useful in projecting expected membership tenure for new members
| CALCULATION: 1 ÷ Lapse Rate = AMT |
Lapse Rate is calculated as described above in Lapse Rate (Churn).
- 1 ÷ .10 = 10
- Average Membership Tenure in Years is 10 years
Member Lifetime Value (MLV)
Member Lifetime Value (MLV) is the measure of monetary value of member based on projected length of membership.
| Calculation: Net member-paid revenue ÷ # of members x AMT = MLV |
The Total Spending by Contact Report can be used to calculate the MLV. Set the Membership Status criteria to Active and Courtesy to see all dues and non-dues generated by your members.

To get the Net value, you need to subtract your operating costs from that total. You can get your operating costs from your accountant. This will give you your Net Member-paid revenue.
The End Count can be obtained from the Retention Rate calculation, described above.
AMT can be obtained from the Average Membership Tenure (AMT) calculation, described above.
Example:
- In 2017, there were 3,000 total members who collectively invested $550,000 in dues and contributed $325,000 in non-dues revenue. The operating costs were $650,000 and the organization’s AMT (average membership tenure) was 17 years.
- $550,000 + $325,000 = $875,000 (dues revenue plus member-generated nondues revenue)
- $875,000 – $650,000 = $225,000 (total member-generated revenue minus total operating costs)
- $225,000 ÷ 3,000 = $75 (net member-generated revenue divided by number of members)
- $75 x 17 = $1,275 (average member contributed revenue x AMT)
- MEMBER LIFETIME VALUE = $1,275
Member Acquisition Cost (MAC)
Member Acquisition Cost (MAC) is the total monetary cost associated with recruiting a new member. To effectively maintain and/or grow an organization, it is necessary to assign an average monetary value to potential membership sales.
| Total recruitment cost ÷ # of new members = MAC |
- Calculate the # of new members as described in Retention Rate above.
- The Total Recruitment cost would be available from your accountant.
Example:
- At the end of 2017, 75 new members had joined and $28,875 was spent on new member recruitment.
- $28875 ÷ 75 = $385
- MEMBER ACQUISITION COST = $385
MLV to MAC ratio
The MLV to MAC ratio is the measurement of the relationship between the lifetime value of a member and the cost of acquiring that member. Best Practice: Aim for 3:1 as the target ratio.
| CALCULATION: MLV : MAC |
Calculate your Member Lifetime Value (MLV) and Member Acquisition Cost (MAC) as described above.
- Example: In 2017, the average lifetime value per member was $1,275. $32,000 was budgeted for member recruitment and $28,875 was spent. Breaking down those numbers further means the budgeted recruitment cost was $425/ new member and the actual recruitment spend was $385/ new member.
- Goal ratio = 3 : 1 ($1,275 : $425)
- Actual ratio = 3.3 : 1 ($1,275 : $385)
Membership Change Report
The Membership Chamber Report provides you with a way to view and analyze membership type changes, as well a fee changes. For example, if you have had a major marketing campaign to upgrade members to a higher membership level, you can generate this report based on the Membership Purchase Type and a specified change date range. You could also include Sales contact in your report, if you want to see which sales person was responsible for the upgrade.
The report may be filtered on the following standard criteria:
- Sales Contact
- Membership Purchase Type (New, Upgrade, Downgrade, Renewal, Adjustment, Re-activated)
- Membership Type
- Change Date Range
- Click Reports in the Navigation Panel
- Select Membership Change Report.
- Select your search filtering criteria.
- Click Run Report.

See Common Report Functions for performing the following:
- Export as PDF
- Export as Excel.
- Export Summary as PDF
- Export Summary as Excel
- Email Report
- Add to List
- Save as New Report
- Add as Favorite Report
Membership Referral Report
The Membership Referral Report allows you to generate a list of members, and the contact who referred them to your organization.
- Click Reports in the Navigation Panel
- Select Membership Referral Report.
- Select your search filtering criteria.
- Select desired display options. The system is setup with default display options. Click the drop down arrow on Fields to Display to add or removed display options.
- Select Summarize By. This is an optional setting that will allow you to group the results of your report. For example, if you wish to group the report by the contact who referred a member, you would select Contact Name.
- Click Run Report.

In the example above, the report is filtered on contacts who referred members, i.e. Edibles referred Antiques on Main.
See Common Report Functions for performing the following:
- Export as PDF
- Export as Excel.
- Export Summary as PDF
- Export Summary as Excel
- Email Report
- Add to List
- Save as New Report
- Add as Favorite Report
Membership Report
The Membership Report allows you to generate a list of all of your members based on membership type. You can filter this report to a specific membership type and membership status, or by custom filter criteria. For example, if you want to generate a list of members renewing in a specific month, you can select Renewal Month as Criteria/Filters.
- Click Reports in the Navigation Panel
- Select Membership Report.
- Select your search filtering criteria.
- Add additional Criteria/Filters - optional.
- Select desired display options. The system is setup with default display options. Click the drop down arrow on Fields to Display to add or removed display options.
- Select Summarize By. This is an optional setting that will allow you to group the results of your report. For example, if you wish to group the report by membership, you would select Membership.
- Click Run Report.


The report shown above is filtered on all memberships, renewing in February. The report is summarized by membership type.
See Common Report Functions for performing the following:
- Export as PDF
- Export as Excel.
- Export Summary as PDF
- Export Summary as Excel
- Email Report
- Add to List
- Save as New Report
- Add as Favorite Report
New Membership Report
The New Membership Report allows you to generate a list of all new memberships based on membership type, membership status, specified date range, and custom search criteria. This report can be useful to provide annual statistics on new memberships.
- Click Reports in the Navigation Panel
- Select New Membership Report.
- Select your search filtering criteria. For example, if you want to see year to date statistics, select This Year from the Start Date' drop-down list.
- Optional - Enter a Search/Filter query. For example, if you would like to view new membership sales by a specific sales person select Sales Rep.
- Select Display Options. They system is setup with default fields to display in your report. You may add or remove fields by clicking on the Fields to Display drop-down arrow.
- Select Summarize by criteria. This optional field allows you to select how you wish report results grouped. For example, you may choose to group results by membership type.
- Click Run Report.


See Common Report Functions for performing the following:
- Export as PDF
- Export as Excel.
- Export Summary as PDF
- Export Summary as Excel
- Email Report
- Add to List
- Save as New Report
- Add as Favorite Report
Renewal Membership Report
The Renewal Membership Report allows you to generate a list of all members, with the associated renewal month. You may choose specific renewal months to narrow report results.
- Click Reports in the Navigation Panel
- Select Renewal Membership Report.
- Select your search filtering criteria.
- Click Run Report.

See Common Report Functions for performing the following:
- Export as PDF
- Export as Excel.
- Export Summary as PDF
- Export Summary as Excel
- Email Report
- Add to List
- Save as New Report
- Add as Favorite Report
Dropped Membership Report
The Dropped Membership Report allows you to generate a report of dropped members based on date range, membership type and sales person. The report can help you in identifying the reason members drop, as well as view the annualized revenue loss due to the drop.
- Click Reports in the Navigation Panel
- Select Dropped Membership Report.
- Select your search filtering criteria.
- Optional - enter additional Criteria/Filters. For example, if you have a drop reason called Too Expensive, you could filter on that specific Drop Reason to analyze the number of members who have dropped due to cost.
- Select Display Options. They system is setup with default fields to display in your report. You may add or remove fields by clicking on the Fields to Display drop-down arrow.
- Select Summarize By criteria. This optional field allows you to select how you wish report results grouped. For example, you may choose to group results by drop reason.
- Click the Run Report button.


See Common Report Functions for performing the following:
- Export as PDF
- Export as Excel.
- Export Summary as PDF
- Export Summary as Excel
- Email Report
- Add to List
- Save as New Report
- Add as Favorite Report
Sales by Member Report
The Sales by Member Report provides a way to analyze sales generated by all or specific members. The report may be filtered by member, specific date range, and custom search criteria. NOTE: This will display sales totals, whether the sale has been paid for or not.
- Click Reports in the Navigation Panel
- Select Sales by Member Report.
- Select your search filtering criteria. For example, you may wish to generate the report for a specific date range.
- Optional - enter additional Criteria/Filters. For example, if you wish to generate the report based on membership type, select Membership Type.
- Select Display Options. They system is setup with default fields to display in your report. You may add or remove fields by clicking on the Fields to Display drop-down arrow.
- Select Summarize By criteria. This optional field allows you to select how you wish report results grouped. For example, you may choose to group results by contact name.
- Click the Run Report button.


See Common Report Functions for performing the following:
- Export as PDF
- Export as Excel.
- Export Summary as PDF
- Export Summary as Excel
- Email Report
- Add to List
- Save as New Report
- Add as Favorite Report
Total Spending by Contact Report
The Total Spending by Contact Report allows you to view total spending for the contacts in your database. The report may be filtered on specific types of goods and services to help you to understand how various goods are being utilized.
- Click Reports in the Navigation Panel
- Select Total Spending by Contact Report.
- Select your search filtering criteria. For example, you may wish to generate the report for a specific Good/Service Type to view spending for just that type.
- Optional - enter additional Criteria/Filters.
- Select Display Options. They system is setup with default fields to display in your report. You may add or remove fields by clicking on the Fields to Display drop-down arrow.
- Select Summarize By criteria. This optional field allows you to select how you wish report results grouped. For example, you may choose to group results by contact name.
- Click the Run Report button.


See Common Report Functions for performing the following:
- Export as PDF
- Export as Excel.
- Export Summary as PDF
- Export Summary as Excel
- Email Report
- Add to List
- Save as New Report
- Add as Favorite Report
FAQ's
Where can I change the questions that are asked on my Membership Application form?
- The questions included on your membership application form are driven by the Membership Policies you have associated to your membership types. See Understanding Membership Policies for further information.