Reports
Your GrowthZone software provides a variety of reports which will help you to analyze all aspects of your business.
Contents
- 1 Common Report Functions
- 2 Report Filtering Options
- 3 Membership Reports
- 4 Communications Reports
Common Report Functions
Export Reports
All Reports may be exported to Excel or PDF. The reports may be exported in detail or summary format (Detail vs. Summary results will vary dependent on the report you are working with)
- Define the desired filters for your report.
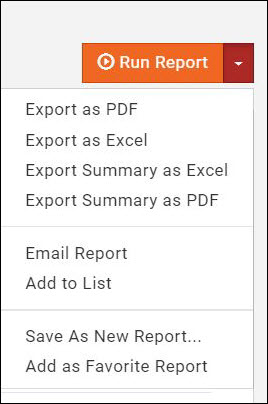
- Click the down arrow on the Run Report button.
- Click the desired export format:
- Export as Excel
- Export Summary as Excel
- Export as PDF
- Export Summary as PDF
Email Reports
You can easily send report results via email. Perhaps the board would like a report of all Dropped Members, generate the report and email the results.
- Define the desired filters for your report.
- Click the down arrow on the Run Report button.
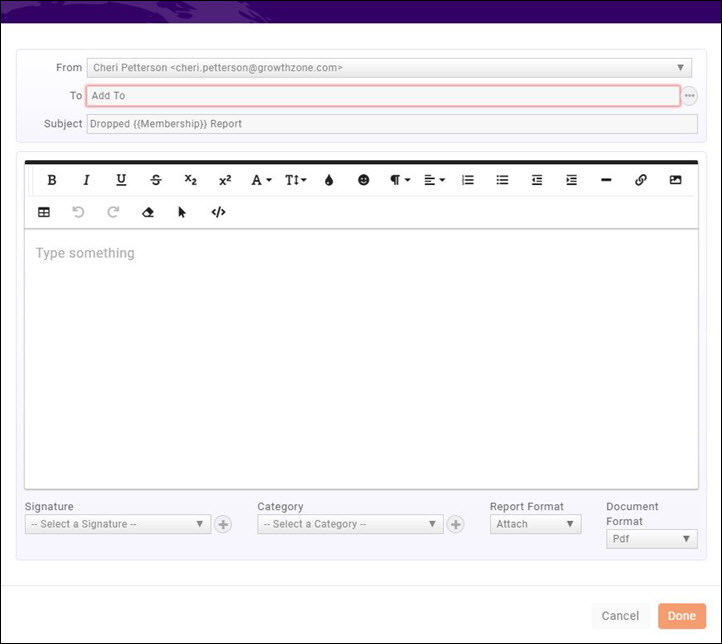
- Click Email Report.
- Enter the To email address.
- The Subject' will default to the name of the report. You may change this as needed.
- Enter your message.
- (Optional) Select a signature from the drop-down list.
- (Optional) Select a communication Category.
- Select how you would like to attach the file from the Report Format, Attach or In-line. Best Practice is to attach Inline as email messages with attachment are more prone to going to SPAM.
- Select whether you wish PDF, Excel or CSV as the Document Format.
- Click Send.
Add Report Contacts to a List/Committee
You can easily create a list from a report. For Example: If you wish to communicate with your dropped members, you can generated the Dropped Membership Report, and create a list. You can then easily communicate with these contacts.
- Define the desired filters for your report.
- Click the down arrow on the Run Report button.
- Click Add to List.
- From the List/Committees drop-down, select the name of the list to which you wish to add members (this option will allow you to add the members to an existing list) OR click the
 to create a new list. See Working with Lists/Committees for further instruction on creating the list.
 - Select the Replace existing contacts if you wish to replace all of the contacts in an existing list with the results of your report.
- Click Done.
Save a Report as a New Report
With all of the reports, you have the ability to apply custom filters. After customizing the report to suit your needs, you may save the report as a New Report. This will make it easy for you to run the report again in the future as your custom settings and filters will be saved.
To Save a Report as a New Report:
- Define the desired filters for your report.
- Click the down arrow on the Run Report button.
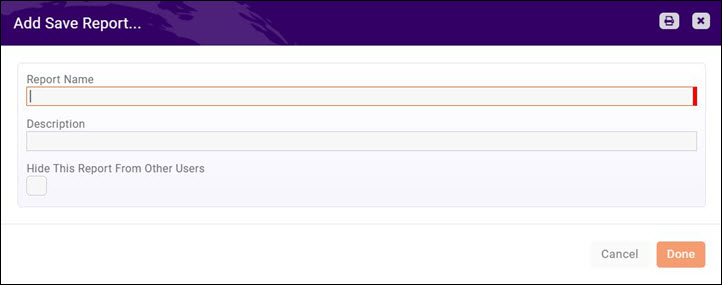
- Select Save As New Report.
- Enter a Report Name.
- Enter a Description.
- Hide This Report From Other Users: Select this option if the report is only to be used by you. It will not be available for other users.
- Click Done.
Save a report as a Favorite Report
If you frequently use the same report, you can save it as a favorite.
- For the desired report, click the down arrow on the Run Report button.
- Click Add as Favorite Report.
When you access the Reports module, in the Show Only drop-down list, select Favorites.
Report Filtering Options
Reports are built to include recommended fields, however, you may customize the report to get more granular in the information that you are looking to analyze. For Example: When working with the Dropped Membership Report, if you wish to view a list of the members that have dropped for a certain reason, you can generate the report by setting the Criteria / Filters.
Use the following procedure on all reports, to set filtering criteria.
- In the Criteria / Filters section, click the
 icon.
icon. - Select the field on which you wish to filter from the drop-down list. The fields available will vary based on the report you are working with.
- Select the desired Operator. Operators will vary dependent on the field you have chosen. The operators is used to specify the condition that must be met to be included in your report. See Report Filtering Operators for further information.
Report Filtering Operators
Operator Description Is Equal Use this operator to look for results that are exactly equal what you input into the text box. For example, if running the drop report searching for members who have dropped because membership was too expensive, you would select Is Equal and type Too Expensive in the text box. Is Not Equal Use this operator to exclude from your report results what you have input into the text box. For example, if running the drop report, and you would like to see all of the members who dropped, except those who dropped because membership was too expensive, you would select Is Not Equal and type Too Expensive in the text box. Starts With Use this operator to look for results where the beginning of the field begins with the letters that you have input into the text box. For Example, if running the Event Discount Activity Report, and you are Contains Use this operator to include in your results, fields that match a letter, word or phrase that you enter. Not Contains Use this operator to exclude from your results, fields that match a letter, word or phrase that you enter. Ends With Use this operator to include in your results fields that end with the letter or word you enter. Is Empty Use this operator to include in your results, fields that are NOT populated. For Example: When if you wish to run a report to identify primary contacts that do not have an email address, you can generate the Contact's Report, and set filtering, as shown below. Is Not Empty Use this operator to include in your results, fields that are populated. Before Generally used for dates, this option would be used when looking for dates that are "before" a certain date. For example, you could use this when looking for Membership Start Dates that are earlier than a certain date. If I wish to find all memberships started prior to 1/1/2018, using the Membership Report, my filter option would display as shown below. After Generally used for dates, this option would be used when looking for dates that are "after" a certain date. For example, you could use this when looking for Membership Start Dates that are later than a certain date. If I wish to find all memberships started after 12/31/2017, using the Membership Report, the filter would be as shown below: Between Generally used for dates, this option would be used when looking for dates that are "between" two dates. For Example:If I wish to find all memberships started after 12/31/2017 and before 1/1/2019, using the Membership Report, the filter would be as shown below: Greater Than Generally used for numeric or monetary values, this option would be used when you wish to find results that are more than (but not equal to) the value you specify. For Example: If you wish to find all contacts who owe you more than $500.00, using the Accounts Receivable Detail Report, the filter would be as shown below. Greater Than or Equal Example Less Than Generally used for numeric or monetary values, this option would be used when you wish to find results that are less than (but not equal to) the value you specify. For Example: If you wish to find all contacts where accounts receivable aging is less than 30 days, using the Accounts Receivable Detail Report, the filter would be as shown below. Less Than or Equal Generally used for numeric or monetary values, this option would be used when you wish to find results that are less than or equal to the value you specify.
You can include multiple search/filter criteria using the And or Or function.
- The AND operator displays a record if All of your filter criteria are met.
- The OR operator displays a record if any of the conditions are met.
For Example: Using the Contacts Report, I wish to find primary contacts where both the default email address AND the default phone are not populated in the database. My filtering criteria would be as shown below.
For Example: Using the New Membership Report, I wish to find those members who joined either for Educational Purposes OR for Networking Purposes. My filtering criteria would be as shown below.
Membership Reports
Common Membership Calculations
Does the thought of having to calculate retention, churn, or the cost of acquiring a new member make your head hurt? For many association pros, crunching numbers is (unfortunately) a part of their daily grind. You don’t have to be a math person to use these seven common calculations to determine everything from renewal rates to average length of membership.
Retention Rate
Retention Rate is the percentage of members retained over a given period of time. This metric can be calculated if you know how many members you had at the beginning of a period, and many you had at the end of a period.
| CALCULATION: (End Count - New Members) ÷ Start Count = Retention Rate |
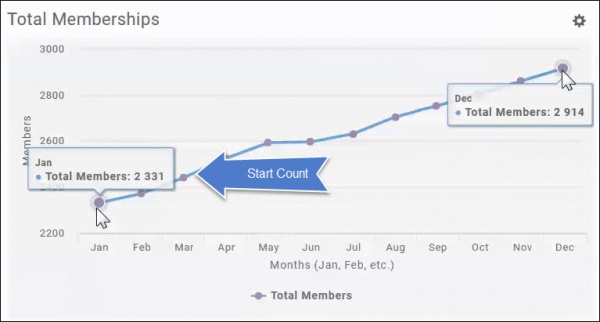
The Dashboard will provide the Start Count and the End Count needed for this calculation.
- Click Dashboard in the left-hand navigation.
- Click the Metrics tab.
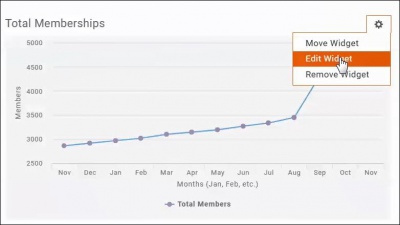
- Click the
 icon next to Total Memberships. NOTE: if you have removed this widget from your dashboard, click the Add Widget button to place it on your dashboard.
- Click Edit Widget.
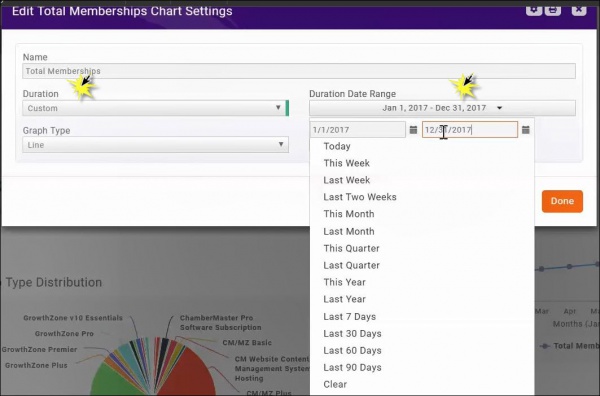
- Select Custom from the Duration drop-down list.
- Enter the desired dates in the Duration Date Range.
- Click Done. The Total Memberships widget will refresh displaying metrics for the desired date range.
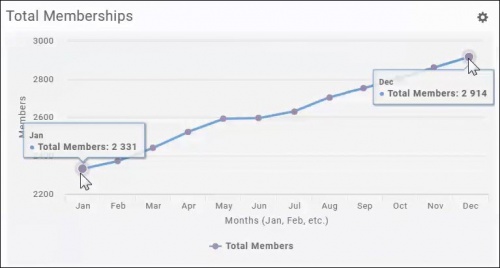
Start Count = 2331 End Count = 2914
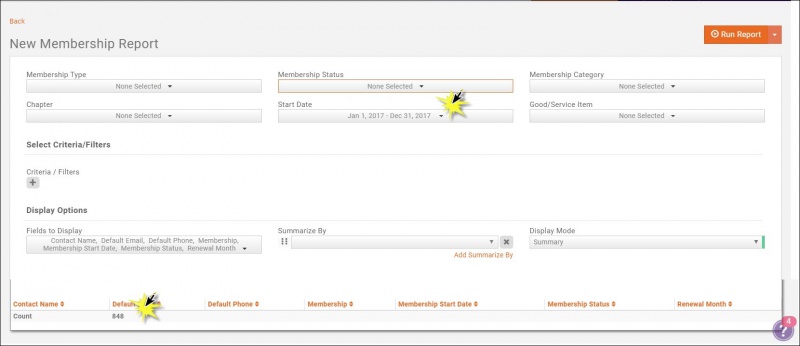
Generate the New Membership report to find New Members. Generate the report for the same date range used above.
See New Membership Report for further instructions on generating the New Membership Report.
New Members = 848
CALCULATION: (End Count - New Members) ÷ Start Count = Retention Rate
(2914 - 848) ÷ 2331 = .88 88% Retention Rate
Lapse Rate (Churn)
The Lapse Rate (Churn) is the percentage of members that discontinue their membership over a given period of time.
| CALCULATION: Dropped Members ÷ Start Count = Lapse Rate |
The Start Count is calculated as described in Retention Rate above.
Start Count = 2331
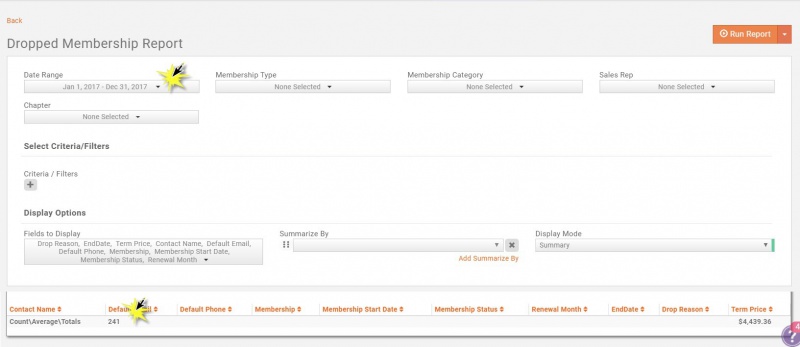
The Dropped Membership Report may be used to calculate Dropped Members. Generate the report using the same date range used to find the Start Count. See Dropped Membership Report for instructions on generating the report.
Dropped Count = 241
CALCULATION: Dropped Members ÷ Start Count = Lapse Rate
241 ÷ 2331 = .10 Lapse Rate = 10%
Renewal Rate
Renewal Rate is the percentage of members that renew their membership over a given time period.
| CALCULATION: # of Renewals ÷ Eligible Members = Renewal Rate |
| NOTE: Using the criteria described below will get an overall Renewal Rate, not specific to a certain year - but for all time. You could use this to judge if you are moving the right direction each time to run this stat. |
The Membership Report will provide you with the information to calculate the Renewal Rate. You will generate the report twice, each with different filtering options.
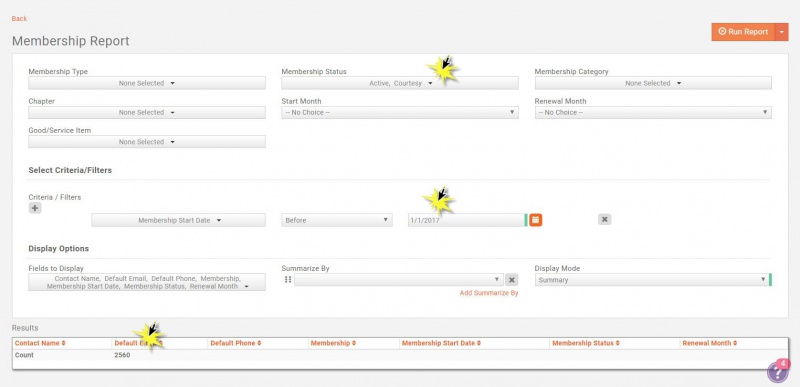
First: Generate the Membership Report with the following filtering criteria to find the # of Renewals:
- Set Membership Status set to Active and Courtesy.
- Add a Criteria / Filters for Membership Start Date Before and set the date to the first date of your search criteria. For example if you are looking for your renewal rate for up until 1-1-2017, you would set the before date to 1/1/2017.
In the example above, # of Renewals = 2560.
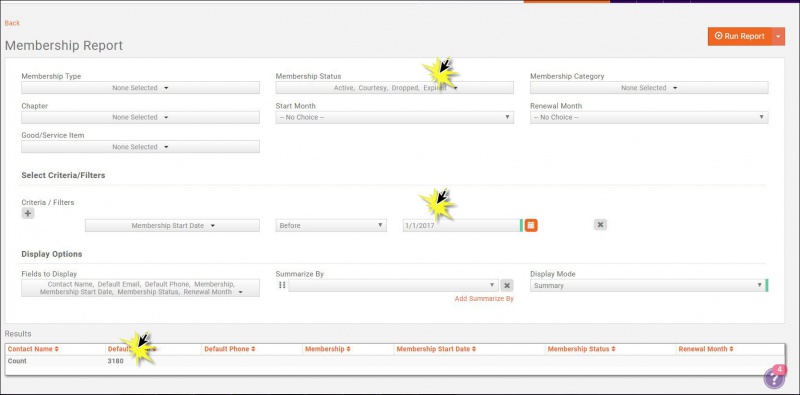
Second: Generate the Membership Report with the following filtering criteria to find Eligible Members"
- Set Membership Status set to Active, Courtesy, Dropped, Expired. Do not include Non-Member or other statuses since these were never up for renewal and thus not part of your eligible members.
- Add a Criteria / Filters for Membership Start Date Before and set the date to the first date of your search criteria. For example if you are looking for your renewal rate for 2017, you would set the before date to 1/1/2017.
In the example above, Eligible Members = 3180.
CALCULATION: # of Renewals ÷ Eligible Members = Renewal Rate
2560 ÷ 3180 = .80 80% Renewal Rate
See Membership Report for further instructions on generating the report.
Average Membership Tenure (AMT)
Average Membership Tenure is the average length of time a member stays with the organization. This can be useful in projecting expected membership tenure for new members
| CALCULATION: 1 ÷ Lapse Rate = AMT |
Lapse Rate is calculated as described above in Lapse Rate (Churn).
- 1 ÷ .10 = 10
- Average Membership Tenure in Years is 10 years
Member Lifetime Value (MLV)
Member Lifetime Value (MLV) is the measure of monetary value of member based on projected length of membership.
| Calculation: Net member-paid revenue ÷ # of members x AMT = MLV |
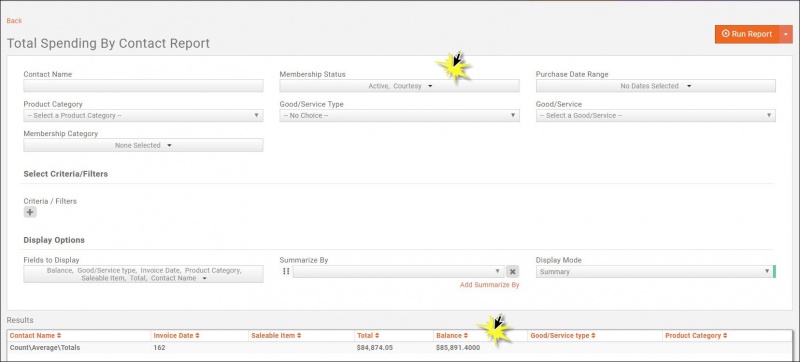
The Total Spending by Contact Report can be used to calculate the MLV. Set the Membership Status criteria to Active and Courtesy to see all dues and non-dues generated by your members.
To get the Net value, you need to subtract your operating costs from that total. You can get your operating costs from your accountant. This will give you your Net Member-paid revenue.
The End Count can be obtained from the Retention Rate calculation, described above.
AMT can be obtained from the Average Membership Tenure (AMT) calculation, described above.
Example:
- In 2017, there were 3,000 total members who collectively invested $550,000 in dues and contributed $325,000 in non-dues revenue. The operating costs were $650,000 and the organization’s AMT (average membership tenure) was 17 years.
- $550,000 + $325,000 = $875,000 (dues revenue plus member-generated nondues revenue)
- $875,000 – $650,000 = $225,000 (total member-generated revenue minus total operating costs)
- $225,000 ÷ 3,000 = $75 (net member-generated revenue divided by number of members)
- $75 x 17 = $1,275 (average member contributed revenue x AMT)
- MEMBER LIFETIME VALUE = $1,275
Member Acquisition Cost (MAC)
Member Acquisition Cost (MAC) is the total monetary cost associated with recruiting a new member. To effectively maintain and/or grow an organization, it is necessary to assign an average monetary value to potential membership sales.
| Total recruitment cost ÷ # of new members = MAC |
- Calculate the # of new members as described in Retention Rate above.
- The Total Recruitment cost would be available from your accountant.
Example:
- At the end of 2017, 75 new members had joined and $28,875 was spent on new member recruitment.
- $28875 ÷ 75 = $385
- MEMBER ACQUISITION COST = $385
MLV to MAC ratio
The MLV to MAC ratio is the measurement of the relationship between the lifetime value of a member and the cost of acquiring that member. Best Practice: Aim for 3:1 as the target ratio.
| CALCULATION: MLV : MAC |
Calculate your Member Lifetime Value (MLV) and Member Acquisition Cost (MAC) as described above.
- Example: In 2017, the average lifetime value per member was $1,275. $32,000 was budgeted for member recruitment and $28,875 was spent. Breaking down those numbers further means the budgeted recruitment cost was $425/ new member and the actual recruitment spend was $385/ new member.
- Goal ratio = 3 : 1 ($1,275 : $425)
- Actual ratio = 3.3 : 1 ($1,275 : $385)
Membership Change Report
The Membership Chamber Report provides you with a way to view and analyze membership type changes, as well a fee changes. For example, if you have had a major marketing campaign to upgrade members to a higher membership level, you can generate this report based on the Membership Purchase Type and a specified change date range. You could also include Sales contact in your report, if you want to see which sales person was responsible for the upgrade.
The report may be filtered on the following standard criteria:
- Sales Contact
- Membership Purchase Type (New, Upgrade, Downgrade, Renewal, Adjustment, Re-activated)
- Membership Type
- Change Date Range
- Click Reports in the Navigation Panel
- Select Membership Change Report.
- Select your search filtering criteria.
- Click Run Report.
See Common Report Functions for performing the following:
- Export as PDF
- Export as Excel.
- Export Summary as PDF
- Export Summary as Excel
- Email Report
- Add to List
- Save as New Report
- Add as Favorite Report
Membership Referral Report
The Membership Referral Report allows you to generate a list of members, and the contact who referred them to your organization.
- Click Reports in the Navigation Panel
- Select Membership Referral Report.
- Select your search filtering criteria.
- Select desired display options. The system is setup with default display options. Click the drop down arrow on Fields to Display to add or removed display options.
- Select Summarize By. This is an optional setting that will allow you to group the results of your report. For example, if you wish to group the report by the contact who referred a member, you would select Contact Name.
- Click Run Report.
In the example above, the report is filtered on contacts who referred members, i.e. Edibles referred Antiques on Main.
See Common Report Functions for performing the following:
- Export as PDF
- Export as Excel.
- Export Summary as PDF
- Export Summary as Excel
- Email Report
- Add to List
- Save as New Report
- Add as Favorite Report
Membership Report
The Membership Report allows you to generate a list of all of your members based on membership type. You can filter this report to a specific membership type and membership status, or by custom filter criteria. For example, if you want to generate a list of members renewing in a specific month, you can select Renewal Month as Criteria/Filters.
- Click Reports in the Navigation Panel
- Select Membership Report.
- Select your search filtering criteria.
- Add additional Criteria/Filters - optional.
- Select desired display options. The system is setup with default display options. Click the drop down arrow on Fields to Display to add or removed display options.
- Select Summarize By. This is an optional setting that will allow you to group the results of your report. For example, if you wish to group the report by membership, you would select Membership.
- Click Run Report.
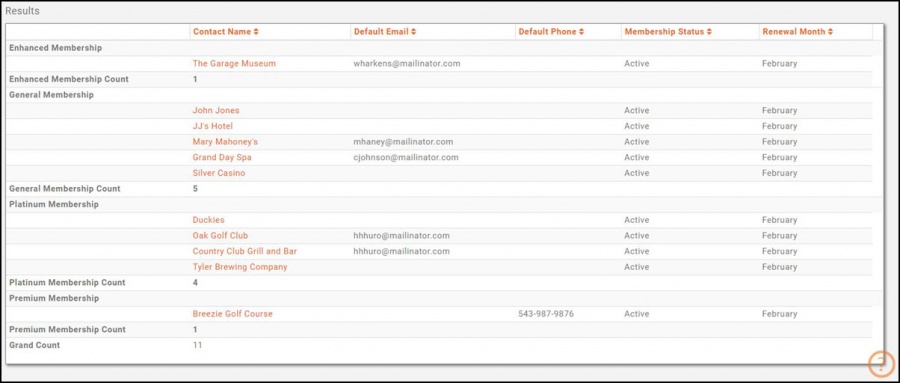
The report shown above is filtered on all memberships, renewing in February. The report is summarized by membership type.
See Common Report Functions for performing the following:
- Export as PDF
- Export as Excel.
- Export Summary as PDF
- Export Summary as Excel
- Email Report
- Add to List
- Save as New Report
- Add as Favorite Report
Create Membership Card via Membership Report Mail Merge
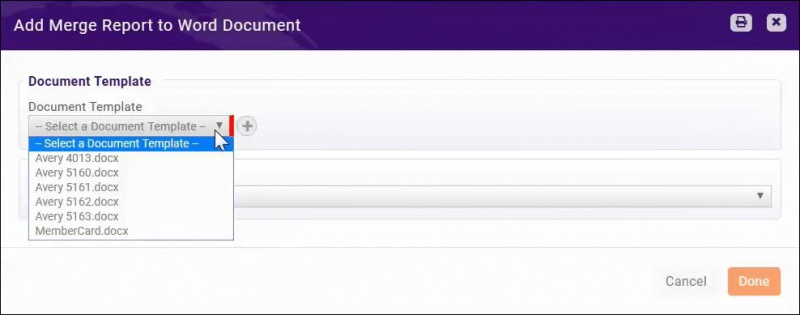
The Mail Merge feature allows you to take the results from your Member report and perform a mail merge via MS Word. Several templates are setup by default, including a Member Card template.
- Define the desired filters for your report. NOTE: The report Display Options must include the field you wish to include in your MailMerge.
- Click the down arrow on the Run Report button.
- Click Mail Merge.
- Select the desired template from the list. NOTE: Only templates designed as Member type will be available for selection. If needed, click the
 to upload a new template. See Setting Up Document Templates for further information on configuring and uploading templates.
 - Select the desired output format: PDF or Word Document.
- Click Done.
The file will download, and you can make any necessary changes prior to printing out your badges.
New Membership Report
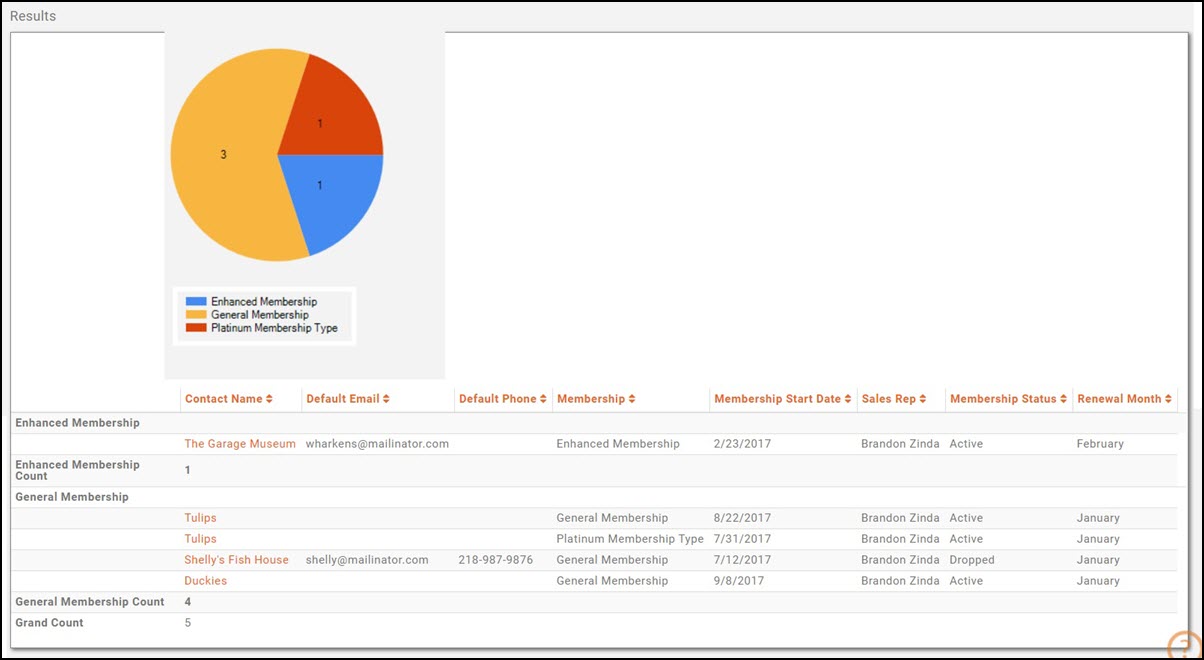
The New Membership Report allows you to generate a list of all new memberships based on membership type, membership status, specified date range, and custom search criteria. This report can be useful to provide annual statistics on new memberships.
- Click Reports in the Navigation Panel
- Select New Membership Report.
- Select your search filtering criteria. For example, if you want to see year to date statistics, select This Year from the Start Date' drop-down list.
- Optional - Enter a Search/Filter query. For example, if you would like to view new membership sales by a specific sales person select Sales Rep.
- Select Display Options. They system is setup with default fields to display in your report. You may add or remove fields by clicking on the Fields to Display drop-down arrow.
- Select Summarize by criteria. This optional field allows you to select how you wish report results grouped. For example, you may choose to group results by membership type.
- Click Run Report.
See Common Report Functions for performing the following:
- Export as PDF
- Export as Excel.
- Export Summary as PDF
- Export Summary as Excel
- Email Report
- Add to List
- Save as New Report
- Add as Favorite Report
Renewal Membership Report
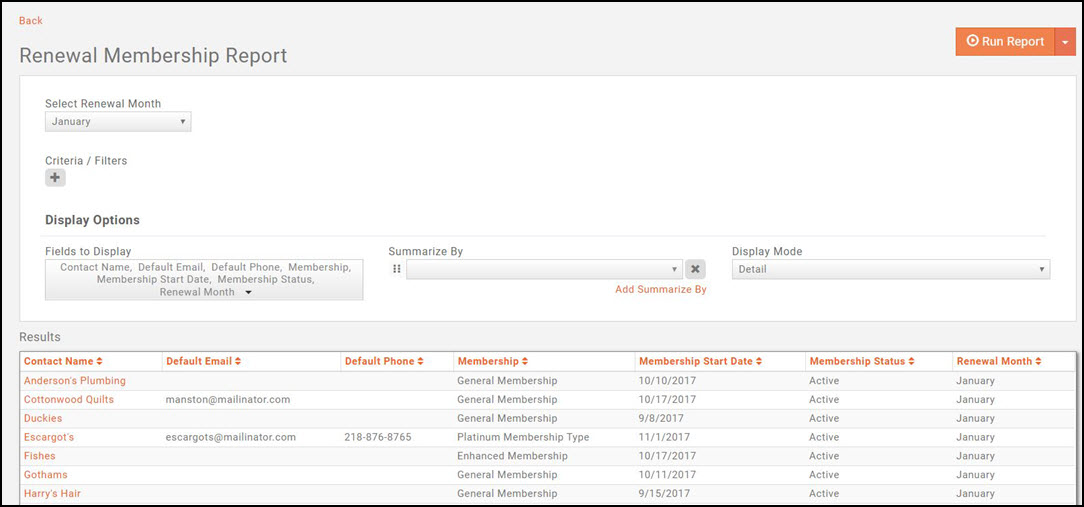
The Renewal Membership Report allows you to generate a list of all members, with the associated renewal month. You may choose specific renewal months to narrow report results.
- Click Reports in the Navigation Panel
- Select Renewal Membership Report.
- Select your search filtering criteria.
- Click Run Report.
See Common Report Functions for performing the following:
- Export as PDF
- Export as Excel.
- Export Summary as PDF
- Export Summary as Excel
- Email Report
- Add to List
- Save as New Report
- Add as Favorite Report
Dropped Membership Report
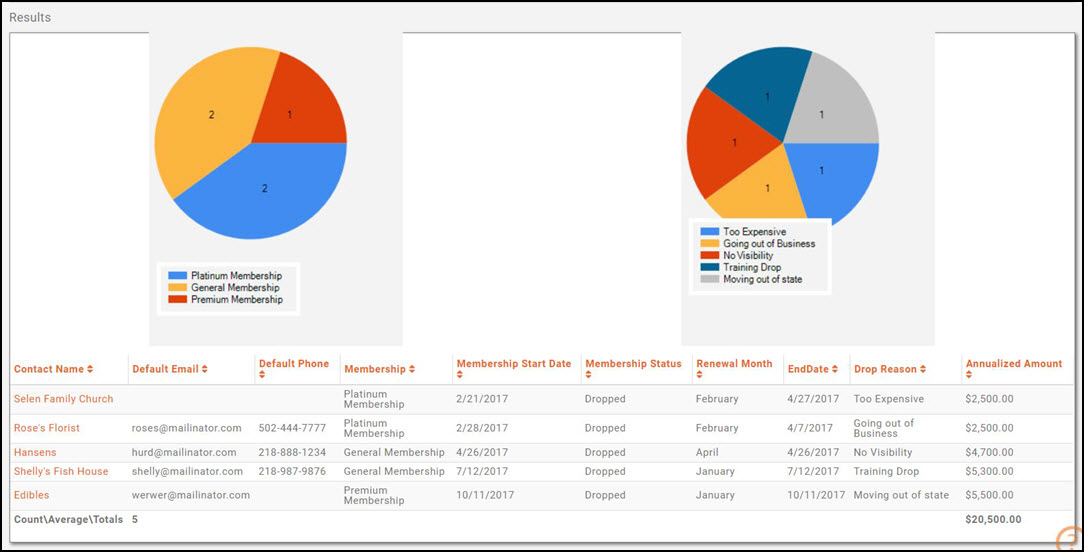
The Dropped Membership Report allows you to generate a report of dropped members based on date range, membership type and sales person. The report can help you in identifying the reason members drop, as well as view the annualized revenue loss due to the drop.
- Click Reports in the Navigation Panel
- Select Dropped Membership Report.
- Select your search filtering criteria.
- Optional - enter additional Criteria/Filters. For example, if you have a drop reason called Too Expensive, you could filter on that specific Drop Reason to analyze the number of members who have dropped due to cost.
- Select Display Options. They system is setup with default fields to display in your report. You may add or remove fields by clicking on the Fields to Display drop-down arrow.
- Select Summarize By criteria. This optional field allows you to select how you wish report results grouped. For example, you may choose to group results by drop reason.
- Click the Run Report button.
See Common Report Functions for performing the following:
- Export as PDF
- Export as Excel.
- Export Summary as PDF
- Export Summary as Excel
- Email Report
- Add to List
- Save as New Report
- Add as Favorite Report
Sales by Member Report
The Sales by Member Report provides a way to analyze sales generated by all or specific members. The report may be filtered by member, specific date range, and custom search criteria. NOTE: This will display sales totals, whether the sale has been paid for or not.
- Click Reports in the Navigation Panel
- Select Sales by Member Report.
- Select your search filtering criteria. For example, you may wish to generate the report for a specific date range.
- Optional - enter additional Criteria/Filters. For example, if you wish to generate the report based on membership type, select Membership Type.
- Select Display Options. They system is setup with default fields to display in your report. You may add or remove fields by clicking on the Fields to Display drop-down arrow.
- Select Summarize By criteria. This optional field allows you to select how you wish report results grouped. For example, you may choose to group results by contact name.
- Click the Run Report button.
See Common Report Functions for performing the following:
- Export as PDF
- Export as Excel.
- Export Summary as PDF
- Export Summary as Excel
- Email Report
- Add to List
- Save as New Report
- Add as Favorite Report
Total Spending by Contact Report
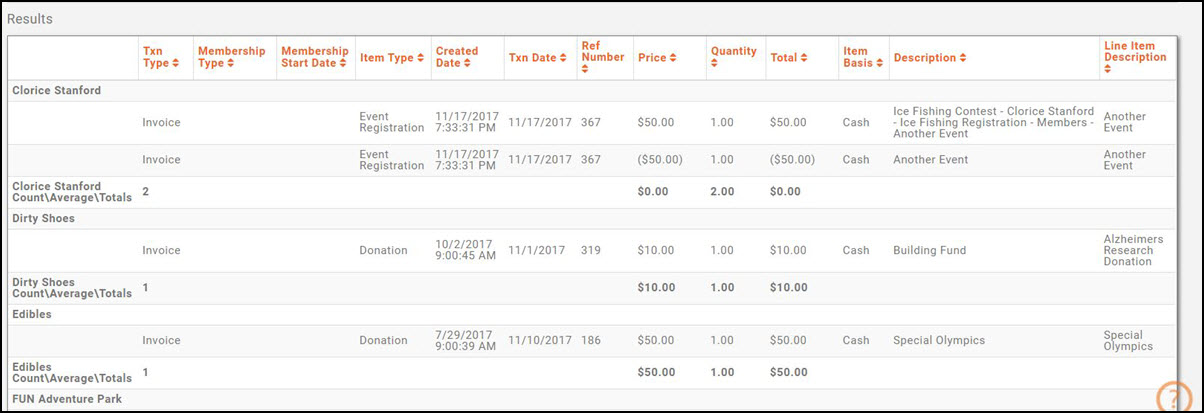
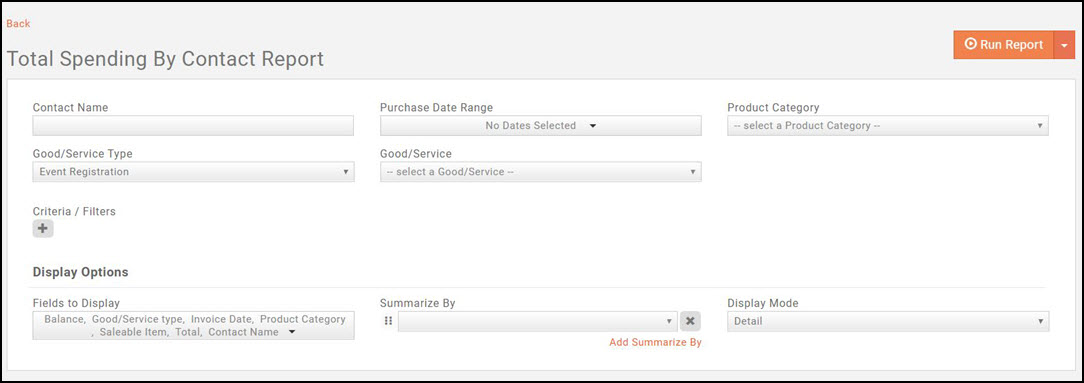
The Total Spending by Contact Report allows you to view total spending for the contacts in your database. The report may be filtered on specific types of goods and services to help you to understand how various goods are being utilized.
- Click Reports in the Navigation Panel
- Select Total Spending by Contact Report.
- Select your search filtering criteria. For example, you may wish to generate the report for a specific Good/Service Type to view spending for just that type.
- Optional - enter additional Criteria/Filters.
- Select Display Options. They system is setup with default fields to display in your report. You may add or remove fields by clicking on the Fields to Display drop-down arrow.
- Select Summarize By criteria. This optional field allows you to select how you wish report results grouped. For example, you may choose to group results by contact name.
- Click the Run Report button.
See Common Report Functions for performing the following:
- Export as PDF
- Export as Excel.
- Export Summary as PDF
- Export Summary as Excel
- Email Report
- Add to List
- Save as New Report
- Add as Favorite Report
Communications Reports
Communication Report
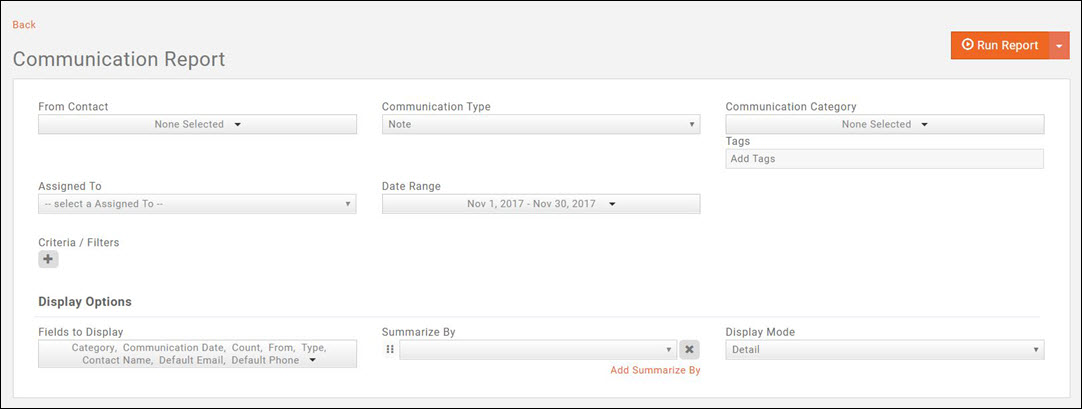
The Communication Report allows you to generate a list of all communications (regardless of type). The report may be filtered to a specific From Contact, specific type of communication, communication category, assigned to, date range, category, or your own custom filters.
- Click Reports in the Navigation Panel
- Select Communication Report.
- Select your search filtering criteria.
- Optional - Enter a Search/Filter query. For example, if you want to filter the report results to just a specific business category you would select Business Category as filtering criteria.
- Select Display Options. They system is setup with default fields to display in your report. You may add or remove fields by clicking on the Fields to Display drop-down arrow.
- Select Summarize by criteria. This optional field allows you to select how you wish report results grouped. For example, you may choose to group results by type of communication.
- Click Run Report.
See Common Report Functions for performing the following:
- Export as PDF
- Export as Excel.
- Export Summary as PDF
- Export Summary as Excel
- Email Report
- Add to List
- Save as New Report
- Add as Favorite Report
Failed/Invalid Email Communications Report
The Failed/Invalid Email Communications Report generates a list of all emails that have failed in a specific date range. This report may be useful in identifying emails that have not successfully reached the recipient (and the reason), as well as provide information for cleaning up your emails within the database.
- Click Reports in the Navigation Panel
- Select Failed/Invalid Email Report.
- Select your search filtering criteria.
- Optional - Enter a Search/Filter query. For example, if you wish to view failed emails that contained the word invoice in the subject line, you would select Communication Subject Contains Invoice.
- Select Display Options. They system is setup with default fields to display in your report. You may add or remove fields by clicking on the Fields to Display drop-down arrow.
- Select Summarize by criteria. This optional field allows you to select how you wish report results grouped. For example, you may choose to group results by communication subject.
- Click Run Report.
From the report, you can click on the invalid email address to navigate to the location in the software where the email address is used. This allow you to easily update the email address.
See Common Report Functions for performing the following:
- Export as PDF
- Export as Excel.
- Export Summary as PDF
- Export Summary as Excel
- Email Report
- Add to List
- Save as New Report
- Add as Favorite Report
Unsubscribed Contacts Report
The Unsubscribed Contacts Report provides a list of contacts who have unsubscribed from emails. The report can be filtered to all contacts, or a specific contact, specific list/committee, date range or custom filter criteria.
- Click Reports in the Navigation Panel
- Select Unsubscribed Contacts Report.
- Select your search filtering criteria. For example, you may wish to search for unsubscribed contact that are members of a specific list/committee.
- Optional - Enter a Search/Filter query.
- Select Display Options. They system is setup with default fields to display in your report. You may add or remove fields by clicking on the Fields to Display drop-down arrow.
- Select Summarize by criteria. This optional field allows you to select how you wish report results grouped. For example, you may choose to group results by committees.
- Click Run Report.
See Common Report Functions for performing the following:
- Export as PDF
- Export as Excel.
- Export Summary as PDF
- Export Summary as Excel
- Email Report
- Add to List
- Save as New Report
- Add as Favorite Report
