Sponsors/Ads
Contents
Working with Banner Ads
The Sponsors/Ads module provides options for offering advertising opportunities to your members. This will give them additional exposure, as well as bring in additional revenue to your association. Through the back office you can upload and manage member advertisements. This includes the ability to select which module page the ads should appear on, which member the ad runs for, and what size of ad should display (the software provides you with a list of common advertising sizes, so you can easily place these on your web-site).
Setting up Banner Ad sizes
When preparing to sell/display ads on your web-site, you must specify the ad sizes you wish to use. You can create specific advertising types, and select from a pre-populated list of common ad sizes. This will give you a starting point that will help in easily working with advertisers.
- Select Sponsors/Ads in the left hand navigation panel.
- Click the Advertising Types tab. A list of available advertising types is displayed.
- Click the Add Type button.
- Select the Ad Style from the drop-down list. The list is pre-populated with industry standard styles (Click Here for further information on industry standard ad styles). Once you have selected an ad size, the system will automatically populate the name and size (height and width) of the ad.
- The name of the ad will default to the type. It's a good idea to give it a name based on where you are going to place it--this will help you keep things straight as you add ads later.
- If you choose to you can resize the ad by editing the width and height fields
- Checking the Active box will make this Type available for use.
- Click Done


Placing Ads on your Web Pages
- On the Advertisement Types tab, click the Enable/Disable on Pages button. A list of pages on which your advertisements can be included will be displayed.

- To change the placement of an ad, click the drop down arrow for the Top of Page and Bottom of Page options.
- Click Done.
The module pages currently supported are:
- Directory
- Event Calendar
- Application to Join
- Contact Us
- Content
- Map
- List/Committees
- Form
- Chapter Home Page
Adding Advertisements
- Select Sponsors/Ads in the left hand navigation panel.
- Click the Advertisements tab. A list of all previously added advertisements will be displayed.
- Click the Add button.
- Configure the following settings:
- Contact: Enter the name of the contact for this advertisement. This field will not be displayed on your web-site.
- Description: Enter a description of the advertisement. This field will not be displayed on your web-site.
- Start Date: Select the date this advertisement will begin to display on your web-site. Today's date will be the default,
- End Date: Select the date this advertisement will no longer be displayed on your website--this will default to one year from today
- Advertisement Url: Enter the url to which you want to direct the user from the ad.
- Open In New Window: Select the check-box if you want the the ad to open in a new window (best practice).
- Advertisement List: Click the
 icon to configure the new advertisement.

- Select an Advertisement Type from the drop-down list (Click Here for information on setting up your advertisement types). The Image Manager dialog box will be displayed.
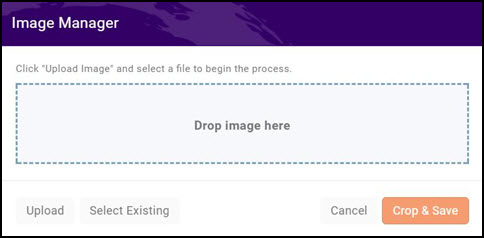
- Click the Upload button to upload the advertisement.
- Click Crop & Save.
- NOTE: You can add additional advertisement by clicking the icon, and repeating the steps above.
- Once you have added all the advertisements you wish, click Done


Working with Sponsorships
While you need to have the Sponsors/Ads module activated in order to manage sponsors within GrowthZone, you will actually do all of the setup and management within Setup and the Event module. [Add Link to Sponsorships in Events]
Using the Sponsors/Ads module in conjunction with your events allows you to generate additional revenue and have GrowthZone do a lot of the work for you—-win win!
Setting up Sponsorship Benefits
Benefits consist of any combination of the Sponsor Name, Logo, and/or URL appearing on the Event Page, Emails, and/or Registration page. For example, perhaps a Bronze sponsor has only their Name on the Event Page, the Event Emails, and the Registration Page, The Silver sponsor has their Name AND Logo on all three, and the Gold sponsor gets their Name, Logo, AND url on all three. You can create any combination; the only caveat is that if you want to display the url you must also display the name and logo.
- Go to Setup in the left navigation, then Event > Event Sponsorship Benefits. Any existing benefits will be displayed.

- Click the Orange Add button
 to add a benefit

- Name the new Benefit
- Determine the benefit (combination of Name/Logo/url on Event Page/Emails/Registration Page)
- Determine the Display Order of this Benefit (Assuming Gold sponsors are displayed before Silver, and Silver before Bronze, Gold would have a Display Order of 1, Silver would be 2 and Bronze would be 3.
- Click Done
- Repeat to add additional benefits.
Adding Sponsors to an Event
- Go to the Events module and open the event to which you want to add sponsors
- Click on the Sponsor Setup Tab. Any existing Sponsor Registration Types will be displayed.
- Click the Orange Add button to add a Sponsor Registration Type
- On the Add Sponsorship Type screen, configure the following:
- Sponsorship Type-Enter a name for the new sponsorship type. (Gold, Silver, Bronze...)
- Description-Description of the Sponsorship Type, this in internal only
- Position-Confirm the Order this sponsorship will be (Should be the same as the Sponsor Benefit it will be associated with in a later step)
- Sales Goal Quantity-Optional and internal. If you have a goal of X number of sponsorships of this type, enter that number here and the system will help keep track for you.
- Maximum Quantity-Optional and internal. If you are limiting the number of this sponsorship type for this event, enter that number here.

- Fees
- Item Select the Goods & Service Item this Sponsorship Type will be using
- Quantity Enter the default quantity for this item. (Probably "1")
- Price Enter the price for this Sponsorship Type
- Hide on Invoice Check this box if you do not want this item to appear on the invoice. The amount will still be included in the total of the invoice, but this item will not appear in a line item.
- Click on the orange plus sign to add another fee item to this sponsorship type
- Sponsor Benefits
- Select the Sponsor Benefits this sponsorship type is related too.
- Click Done
- Fees
Registering Event Sponsors
Currently sponsors can only be registered through the back office by a staff member.
- Go to the Sponsors tab of the Event. Any sponsors already registered will appear here.

To add a new sponsor, click on the orange Actions button and select Add Sponsor,  (You could also select New Sponsor from the Actions Ribbon on the right side of the screen)
On the Add Sponsor window, fill in the fields with the relevant information:
(You could also select New Sponsor from the Actions Ribbon on the right side of the screen)
On the Add Sponsor window, fill in the fields with the relevant information:
- Sponsor Name The name of the sponsor--this contact must already be in your database.
- Select the Address and Email if it does not populate automatically
- Registration Date Enter the date the sponsor registered. (can be backdated)
- Sponsorship Level Select the Sponsorship Type they are purchasing
- Description This will default to the description you entered when you created the Sponsorship Type. It can be edited
- Qty This will default to the quantity you entered when you created the Sponsorship Type. It can be edited.
- Price and Total are populated automatically based on the Qty and the Price you entered when you created the Sponsorship Type. They cannot be overridden.
- Message This message will appear on the invoice
- Internal Memo This is a note to yourself or your staff regarding this sponsor. It is not required and not public.
- Sponsor Url Enter the url you want users to go to IF the url is displayed and they click on it.
- Click Done
- Assuming you want a logo added,
- Click on the # (number) of the Sponsorship (the first column on the Sponsors tab)

- The Edit Sponsor window now has a place to upload an image,
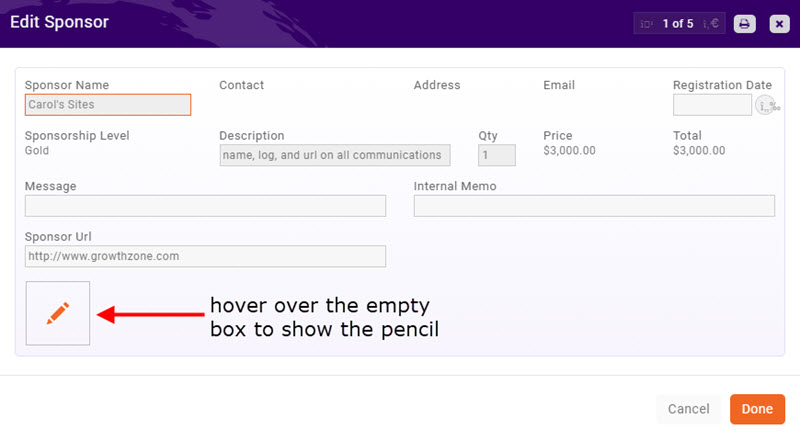
- Click on the Pencil Icon to bring up the Image Manager


- Click the Upload button to upload the image.
- Click Crop & Save.
- Click Done