Web Content
Contents
Overview
Web Content provides you with the ability to create pages on your website with templates for Blog, Coupon/Deals, Job Postings, News and other ideas you create. You may add additional content types as needed to your database, then include them on your web-site, or the Info Hub or both.
Ideas for Web Content Types:
- Job Postings – list of employment opportunities in your area. You may create separate content types, for instance, you may wish to showcase just your association postings on one page and have a separate type for your member postings.
- Coupons/Deals – list of specials or online coupons. You may have one type for members only and another page listing deals available to any website viewer.
- News – list of announcements, articles, newsletters or any other type of post. Create a news type for your association newsletters and create another for membership announcements.
- Blog – a simple posting feature for creating blog posts. (note: does not currently contain ability to comment)
- Testimonials – share your membership stories. Include their logo/photo. Or use as a member of the month posting.
Content Types
On installation of the software, standard content types (Job Postings, Coupons/Deals, News, Blog and Testimonial) are in your database. Content Types are used to organize your content on the web, as well as report and filter within the software. To begin using these, you will need to enable their use.
Enabling Common Content Types
- Click Web Content in the Navigation Panel.
- Click the Add Common Lists button.
- Select the content types that you wish to enable on the Setup Common Content screen. NOTE: You may rename the lists to meet your business process. For Example: if you prefer you may change "Job Postings" to be listed as "Careers" instead of Jobs.
- Click Done.

Once you refresh/reload the Web Content page, you will see that a new tab is created for each content type you add. NOTE: - If you have changed the name of the content lists, for example you have renamed Jobs to Careers, the tabs will reflect your customization.
Add A New Content Type List
You may associate a new content type to existing content lists. For example, you may wish to have multiple News content lists, perhaps one for members and one for the public.
- Click Web Content in the Navigation Panel.
- Select the Setup tab.
- Click the Add button.
- Configure the following settings:
- Content Type - Select the common content type to which you want to associate this list.
- Name - Enter a name for this list. This name will be displayed on the web-site and Info Hub.
- Plural Name - Enter the name for this list that will be used when it is to be plural.
- Description - Enter a description of this list. This may be displayed on your web-site.
- Subscription Notification Frequency - For those subscribed to this list, select when they will be notified of additions to the list. As It Happens provides an instant alert to the subscriber.
- Category List - Select the category to which this list belongs. The category will be used for display on your web-page (For example, you could create a cateory for restaurants for Hot Deals; or a category called full-time for Job Postings), reporting and filtering. A new category may be created dynamically by clicking the + button.
- Options - the options allow you to define whether members, public or both may view/add to this list.
- Allow Public Access - Select this option of the general public is allowed to access this list.
- Allow Public To Submit - Select this option if you want to allow the general public to submit to this list.
- Allow Public Subscribers - Select this option if you wish to allow the general public to subscribe to this list.
- Allow Member Access - Select this option if you wish to display this list on Info Hub. If you are setting up Member to Member content, you would select this option and not selecting Allow Public Access option.
- Allow Members To Submit - Select this option if you wish to allow your members to submit content for this list. If selected, a button will be displayed on Info Hub to allow them to do so. Dependent on the access level granted to the member, the content may be automatically approved or require approval from the back office.
- Allow Member Subscribers - Select this option to allow your members to subscribe (receive notification) to this list.
- Click Done to save the new content list type.

Customizing Content List Types
When you have created a content list type, default custom fields are included based on the type of content list you have created. For Example, the News content list type includes fields for Media Contact, Related Links, and Source. You may add additional custom field to meet your business needs.
- Click Web Content in the Navigation Panel.
- Click the Setup tab.
- Click the hyper-link for the list you wish to customize. The Add/Edit Content List screen will display.
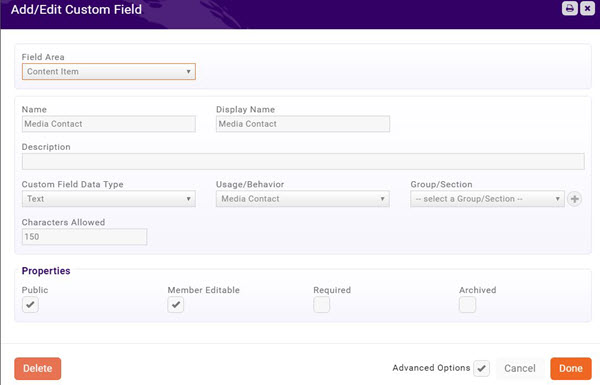
- A list of the custom fields that have already been included by default is displayed. If you will not be using the default custom fields, you can click the X button adjacent to the field to delete it. Alternately, if you would like to see how a default custom field is configured, click its hyper-link. And example of the Media Contact custom field is shown below.
- Add additional custom fields by clicking the Add Custom Field button. The Add/Edit Custom Fields screen will display.
- Configure the following as needed:
- Field Area - Field Area will default to Content Item. Do not change this as your goal is to display this field in your content list.
- Name - Enter a name for this field. This is the database name.
- Display Name - This is the name that will display on the web-site/Info Hub.
- Custom Field Data Type - Select the type of data this field will hold.
- Description - Optional, provide a description of this field. This is for informational purposes.
- Group/Section - Select the group/section to which you wish to associate the custom field. This will be used for reporting and filtering purposes. You can dynamically add a new group/section by clicking the + button.
- Characters Allowed - This option will be displayed if you have selected Text or Multi-line Text as the Custom Field Data Type and allows you to set the number of characters that may be entered.
- Properties - Click the Required check-box if this custom field must be filled in.
- Advanced Options - Additional settings for this custom field may be configured by clicking the Advanced Options check-box.
- Member Editable - If you wish to allow members to edit the custom field in Info Hub, select this check-box.
- Public - Select this check-box if this field is to be displayed publicly.
- Archived - If you no longer wish to use this field, you may archive the field. This should be the option if you have previously used the field, and wish to maintain the historical data, rather than simply deleting the field.
- Click Done once you have completed the custom field.


You may add additional custom fields as needed by repeating the steps above.
Add Web Content from the Back Office
New web content may be added from the back-office, as well as in Info Hub. The following section describes how to add content from the back-office.
Add a News Item
News Items allow you to keep your members and the public up to date on the latest news and information about your members, community and association. News may be a list of announcements, articles, newsletters or any other type of post.
- Click Web Content in the Navigation Panel.
- Click the News Items tab. NOTE: - If the News tab is not displayed, you will need to enable it as a content type. Refer to: Enabling Common Content Types.
- Click Add.
- On the General Tab, configure the following:
- Contact - Enter a Contact's name. The software's type ahead functionality will display options as you type.
- Content Status - Select status of this content. The content will not display on your web-sites until status is marked as Approved.
- Title/Subtitle - Enter a title and subtitle. Both of these will be displayed on your website.
- Tags - Add tags to enable filtering and searching.
- Description - Provide a description. This is the content of your news item.
- Search Description / Teaser Text
- Content Date - Enter the date the content was created.
- Publish Start - Enter the date the content should be published to your sites.
- Publish End - Enter the end date for the publication of this content.
- Require Approval After Edit - if your designated staff must approve the content prior to publication, click this check-box.
- Category - Select a category(s) from the list.
- Media Contact - This is an optional custom field.
- Related Links - This is an optional custom field.
- Source - This is an optional custom field.
- Click the Images tab to add images to your news item.
- Click Done when you have completed configuration.
NOTE: If you have added custom fields to your content lists, these will also be displayed for you to configure. Refer to Customizing Content List Types for details on adding custom fields.
Add a Blog
Blogs are a great way of engaging your members, and allowing them to have a voice. Additionally, blogs allow for immediate delivery of information.
- Click Web Content in the Navigation Panel.
- Click the Blog tab. NOTE: - If the Blog tab is not displayed, you will need to enable it as a content type. Refer to: Enabling Common Content Types.
- Click the Add button.
- On the General Tab, configure the following:
- Contact - Enter a Contact's name. The software's type ahead functionality will display options as you type.
- Content Status - Select status of this blog. The content will not display on your web-sites until status is marked as Approved.
- Title/Subtitle - Enter a title and subtitle. Both of these will be displayed on your website.
- Tags - Add tags to enable filtering and searching.
- Description - Provide a description. This describes the purpose of the blog and will be published to your site.
- Search Description / Teaser Text
- Content Date - Enter the date the blog was created.
- Publish Start - Enter the date the blog should start to be published to your sites.
- Publish End - Enter the end date for the publication of this content.
- Require Approval After Edit - if your designated staff must approve the content prior to publication, click this check-box.
- Category - Select a category(s) from the list.
- Click the Images tab to add images to your blog
- Click Done when you have completed configuration.
NOTE: If you have added custom fields to your content lists, these will also be displayed for you to configure. Refer to Customizing Content List Types for details on adding custom fields.
Add a Hot Deals/Coupons
- Click Web Content in the Navigation Panel.
- Click the Coupons tab. NOTE: - If the Coupons tab is not displayed, you will need to enable it as a content type. Refer to: Enabling Common Content Types.
- Click the Add button.
- On the General Tab, configure the following:
- Contact - Enter a Contact's name. The software's type ahead functionality will display options as you type.
- Content Status - Select status of this deal. The content will not display on your web-sites until status is marked as Approved.
- Title/Subtitle - Enter a title and subtitle. Both of these will be displayed on your website.
- Tags - Add tags to enable filtering and searching.
- Description - Provide a description. This will be published to your site.
- Search Description / Teaser Text
- Content Date - Enter the date the hot deal was created.
- Publish Start - Enter the date the hot deal should start to be published to your sites.
- Publish End - Enter the end date for the publication of this hot deal.
- Require Approval After Edit - if your designated staff must approve the content prior to publication, click this check-box.
- Category - Select a category(s) from the list.
- Expire Date - This is an optional custom field. If you have removed the field from your Content List custom fields, it will not display for configuration.
- Promo Code - This is an optional custom field. If you have removed the field from your Content List custom fields, it will not display for configuration.
- Click the Images tab to add images to your blog
- Click Done when you have completed configuration.
NOTE: If you have added custom fields to your content lists, these will also be displayed for you to configure. Refer to Customizing Content List Types for details on adding custom fields.
Add a Testimonial
Testimonials are a great way to attract new members, and retain existing members.
- Click Web Content in the Navigation Panel.
- Click the Testimonials tab. NOTE: - If the Testimonials tab is not displayed, you will need to enable it as a content type. Refer to: Enabling Common Content Types.
- Click the Add button.
- On the General Tab, configure the following:
- Contact - Enter a Contact's name. The software's type ahead functionality will display options as you type.
- Content Status - Select status of this testimonial. The content will not display on your web-sites until status is marked as Approved.
- Title/Subtitle - Enter a title and subtitle. Both of these will be displayed on your website.
- Tags - Add tags to enable filtering and searching.
- Description - Provide a description. This is the testimonial, and will display on your web-site.
- Search Description / Teaser Text
- Content Date - Enter the date the testimonial was created.
- Publish Start - Enter the date the testimonial should start to be published to your sites.
- Publish End - Enter the end date for the testimonial to be published.
- Require Approval After Edit - if your designated staff must approve the content prior to publication, click this check-box.
- Category - Select a category(s) from the list.
- Click the Images tab to add images to your testimonial.
- Click Done when you have completed configuration.