Event Management
Contents
- 1 Events Initial Setup
- 2 Add a New Event
- 3 Copy An Existing Event
- 4 View/Edit Events
- 4.1 Editing Event Details
- 4.2 Set Up Event Registration and Fee Details
- 5 Event Management--Attendees
- 6 Manage Event Exhibitors
- 7 Event Reporting
- 8 Event Sponsor Management
- 9 Event Management FAQ's
Events Initial Setup
Event Settings Defaults
The Event Settings options allow you to configure the defaults to be used for your events. Setting up the defaults will save you time when creating events, and may be over-ridden as needed for individual events.

- Select Setup in the Navigation panel.
- Click Event Settings in the Event section.
- On the Event Settings screen, you may configure the following to be the default for the events that you will setup:
- Payment Gateway - Select the payment gateway you wish to use by default for your events. (Requires Integrated Payment Processing)
- Invoice Line Item Description Option - Select what you like to be included in the invoice line items.
- Confirmation HTML for Event Attendee Registration - Enter the confirmation that you would like displayed to registrants after they have completed their registration. This confirmation message is also included in the Registration Confirmation email.
- Confirmation HTML for Event Sponsor Registration - Enter the confirmation that you would like displayed to a sponsor after they have completed their registration. This confirmation message is also included in the Registration Confirmation email.
- Max Event Invited Attendees to Store: When the Event Invite email is sent out (from the event page), individuals will appear on the Attendees tab with the status of Invited. The number of individuals that will appear on the Attendees tab, will be based on the Max Event Invited Attendees to Store value.
- Default Contact For Event Approval Tasks - Select the individual who will be responsible for approving events submitted from the website or the Info Hub
- Click Save to save your changes.
Create Calendars
To display your events (whether publicly, member only, or internally) you will need to setup your calendars.
- Click Setup in the Navigation Panel.
- Click Calendars in the Event section. A list of calendars currently configured in your system will be displayed.
- Click the Add button.
- On the Add/Edit Calendar screen configure the following:
- Name - This is the name that will display if you choose to publicize this calendar.
- Description - This is a description of the calendar (for internal use.)
- Is Public Viewable- Select this check-box if you wish this calendar to be publishable on your website and viewed by the public.
- Is Member Viewable - Select this option if you wish this calendar to be available in the Info Hub.
- Allow Public Submission - Select this option if you wish to allow the public to submit events on this calendar.
- NOTE: Events submitted by public will require approval by your approver.
- Allow Member Submission - Select this option if you wish to allow your members to submit events on this calendar.
- NOTE: Given the appropriate permissions, members may be allowed to submit events without approval.
- Group - Optional, select a group to associate to this calendar.
- Is Active - Select this check-box to activate the calendar and make it usable at least by staff members. i.e., in order for events to be added to a calendar the calendar must be active, even if it is not published/viewable on your website or Info Hub.
- Click Done to save your new calendar.


Modify an Existing Calendar
You may modify any of your existing calendars.
- Click Setup in the Navigation Panel.
- Click Calendars in the Event section. A list of calendars currently configured in your system will be displayed.
- Click the link for the calendar you wish to modify.
- Make your desired modifications and click Done.
Set Up Goods & Services for Your Event
Prior to setting up your event, you will want to setup the appropriate fee items for the event. Refer to Set Up Goods & Services for details.
Add a New Event
You may add a new event by clicking the Quick Actions button in the header bar, or by clicking the Add Event button on the Events page.

- On the Add New Event screen, configure the following settings:
- Name - Enter a name for the event. This is the name that will display on your web-site.
- Contact - Enter the contact person for the event.
- Description - Provide a description of the event. This description will be displayed on your web-site.
- Location - Enter location information. This information will be displayed on your web-site.
- Publish Date - Enter the date that you wish to begin displaying this event on your web-site.
- Start At/End At - This is the start time and end time of the event.
- Time/Hours Details - This section allows you to enter descriptive information about the time/hours of the event (such as when registration opens, when dinner starts, when auction starts).
- Organization - The name of your chamber/association will be automatically populated. You may change this to associate this event to a different organization.
- Email Address- email address you want displayed on the event page
- Phone- phone number you want displayed on the event page
- Additional Contact Details - This text box allows you to enter further contact information, i.e. name, phone number, email, etc.
- Category - To assist you in filtering, sorting and/or report on this event, you may select a category from the drop-down list. This is optional. Click here for further information on setting up Categories.
- Calendar - Select the calendar(s) on which you want to display this event. The event may be displayed on multiple calendars.
- Published Status - Select the status of this event, only approved events will be displayed on the calendars you have selected.
- Enable Registration - Select this check-box to allow registration for this event. If this is not selected, a registration button will not be displayed on your web-site, however, your staff members would be able to register people from the back-office.
- Event has Sessions/Breakouts - If you are using the Expo module, enabling this option will allow you to add sessions to your event. Click here for further information on setting up sessions.
- Event has Exhibitors - If you are using the Expo module, enabling this option will allow you to manage your exhibitors. Click Here for further information.
- Copy From Existing Event - if you wish, you can copy the details from an existing event to this event. Click Here for further details on copying events.
- Click Save to save the new event.
Copy An Existing Event
If you run the same events regularly, you can copy an existing event and save yourself some setup time. You can determine key setup items you would like to copy, such as Attendee Setup, Tasks, Files, etc.
- Click Events in the Navigation Panel.
- Open the event you wish to copy by clicking on its name.
- Click the Action ribbon on the right.
- Click Copy this Event.
- Update the desired event fields. Be sure to review the new event's name, as the name of the copied event will be part of it. This is easily deleted.Click Here for further instruction on available fields.
- Select the specific event settings you wish to copy from the original event.
- Click Done.


View/Edit Events
You may view your events, by selecting Events in the Navigation Panel OR you may type the event name in the Search box in the header bar. When you select events in the navigation panel all of your events will be displayed. You may view the events in list format or in card format by clicking the icons on the right-hand side of the screen.

Click the name of Event you wish to edit to open the event's page. The Event page is setup with several different tabs that provide the functionality to customize and manage your event.

Editing Event Details
The Overview tab of your event allows you to update the information supplied when the event was first created. Click on the pencil icon to the right of the Section name you want to edit
A few of the sections have options available from the Overview Tab that aren't available during the initial set up
Adding a Map
In the Location section, add the actual address in the address fields. Both the address and the description will display on the event page; the completed address fields will also trigger a map to show

Add Event to Calendar Option
In order for the "Add to Calendar" option to work for the event registrants, the Start Date Time and End Date Time must be populated. Edit the Hours section.

Add a Logo to Your Event

- On the Event page, click the image icon next to the event name. The Image Manager will be displayed.
- On the Image Manager screen, you may either drag & drop the image onto the screen OR click the upload button to browse to your image, and upload.
- Position selection rectangle around area you would like to use.
- Click Crop & Save.
This image is the "search logo" for the event and will be displayed next to the event when viewing the events in List View on the website or in the Info Hub
Add an Image Gallery to Your Event Page
- In the Images section click the Add button
- You may drag an image into the image box OR click the Upload button to browse to your image.
- Enter a Title and Caption for the image if you choose
- Click Crop & Save.

Follow the steps above to add additional images. You may change the order in which images are displayed by clicking the Reorder button.
Add a Video to your Event Page
- Copy the URL of the video you want to display from where ever it is being hosted, (likely YouTube) [you are simply "pointing to" the video in order to embed it, you are not uploading it]
- In the Videos section click the orange Add button
- Paste the URL to the location of your video.
- Click Done.

Set Up Event Registration and Fee Details
Your event registration form. fees, discounts, and so on, are setup on an Event's Attendee Setup tab.
Setup Overall Registration Options
You can configure: your registration open/end dates, maximum attendees, visibility, and so on under the Overall Registration Options.
- On the Attendee Setup tab, click the pencil icon adjacent to Overall Registration Options.
- Configure the following settings:

- Registration Start Date - This is the date that you wish registration to start; until this date, the Register button will not be displayed on your web-site.
- Registration End Date - This is the date that you wish to close registration. After this date, the Register button will no longer display on your web-site, and a message indicating that registration is closed will be displayed.
- Max Attendees - This setting allows you to define the maximum number of people who may register for the event. Once the maximum has been reached, the Register button will no longer display on your web-site, and a message will be displayed. If this field is left blank, there is no limit to your attendance.
- External Registration Link - If you are including an event on your calendar, but registration for this is not managed through your software, enter the URL for the registration site here.
Options
- Enable Registration - Click this option to enable registration (assuming the user is in the time frame indicated above). If the event does not require registration and you want it on your calendar, (a Farmer's Market, for instance), you would not check this box.
- NOTE: Staff members would be able to register people for the event from the back-office even if this box is not checked.
- Allow Waiting List - Click this option to allow a waiting list. If this option is selected, when your maximum number of attendees has been reached, registrants will be notified that they can be added to a waiting list.
- Show Registered Attendees Publically - Click this option if you wish to display the registered attendee list on your public web-site.
- Show Registered Attendees To Members - Click this option if you wish to display the registered attendees for the event in Info Hub.
- Collect Donations - If you are using the Fundraising module, this check box will allow you to also add a donation collection option to your registration form.
- NOTE: If this option is checked, an option will be added to the screen to select the Fundraiser Receipt Template.
- Allow Invoicing - Click this option if you want to give your registrants to option to be invoiced rather than pay online with a credit card
- Allow Purchasing of Multiple Registration Types - Click this option to allow registrants to register for more than one registration type.
- NOTE: Perhaps your event has pre-event meeting, the event itself, and a banquet... Allow Purchasing of Multiple Registration Types allows your registrants to register for 1, 2, or all three of these without you having to set them complicated registration scenarios
Member Validation Options - These settings allow you to set how you want your members to prove that they are members so they can receive member pricing. Select one of the following three options:
- Allow anyone to receive member pricing: This is the least restrictive option. By leaving it open, with an "on your honor" type approach, members will be able to get member pricing without having to log in and/or remember a password. That would mean that anyone would be able to use the member pricing during registration. In the event (no pun intended) that a non-member then signs up with member-only pricing, a staff member could watch for such instances and even use the opportunity to reach out to that individual with membership benefit information. This is also the option you would use if there is no different between member and non-member pricing.
- Email address is an exact match to an active member: With this setting, membership validation is based on email addresses. The first step in the event registration process has the user put in their name and email address. If the email address used is an exact match to an active member, it will recognize that and automatically show member pricing.
- Only if the member logs in: This is the most restrictive setting. If members come into an event through the INFO HUB or through a member email invitation, they will already be logged in. If a member comes to the registration page not already authenticated, they will only be able to see member pricing, by clicking "Know your member login? Login Now" and logging in.
One more option...
- Session Changes Allowed Until - If you are using the Event Expo module and will be setting up Sessions, this check box allows you to set a time limit on when registrants can make changes to the sessions they have signed up for.
When all of your options have been set, Click Done.
Configure Your Registration Form Settings
By default, the registration form for an event will require name and email address (organization will be included on the form, but is not required). You may configure the fields you wish to require on the registration form and add custom fields in the Registration Form Settings section of the event's Attendee Setup tab.

- Click the
 icon in the Registration Form Settings section.
- Configure the following as desired:
- Display Address
- Require Address
- Display Cell Phone
- Require Cell Phone
- Require Additional Attendees Email
- Allow Registration Without Session Selection (may not appear if you do not have the Event Expo or the Event does not have Sessions)
- Require Company
- Require Title
- Term for Additional Attendees (e.g. Guest)
- Click Done.

Add Custom Fields to Event and/or Event Registration Form
You can easily create custom fields to add to the Registration form.

- Click Add Custom Field in the Manage Custom Fields section of the Attendee Setup tab

- If you have previously created a custom field for events, you can select it from the Use Existing Field list OR
- Enter a Name for the custom field. This is used internally in the database.
- Enter a Display Name. This is the name that will be displayed on the registration form.
- Select the Custom Field Data Type. This is the type of response that you expect for this custom field. For Example: If you want to know if the attendee has any dietary restrictions, you can select the Yes No data type.
- Group/Section. N/A for Event Registration custom fields.
- The Characters Allowed option lets you define the number of characters that may be entered when a Text data type is selected.
Properties
- Is for Attendees - check if this field should be displayed on the registration form.
- Public - N/A for Event Fields
- Member Hub - N/A for Event Fields
- Required - check if registrants must fill out this field.
- Archived - you are no longer using this field
- Is Required for Staff - check to require staff members to complete this field when they are registering an attendee from the back-office.
- Click Done to save the new custom field.
Setup your Event Fees
In order to set up event fees you will need to have created at least one fee item, or Goods & Service. Click Here for further information on setting up goods & services.
The registration fees for your event are configured in the Registration Types section of the Attendee Setup tab.

Different registration types may be added by clicking the down arrow on the Add Type button.

Add a Free Registration Type
- Click the Add Type button.
- Enter a Name for the Free Registration Type.
- Enter the Registrations Available (0 if unlimited). This option will limit the number of free registrations available, and will not allow registration with this type when the limit has been met.
- Enter the Number Of Attendees (0 if unlimited). This option will limit the total number of attendees for this type of registration.
- Enter a Description for this registration type. Registrants will be able to view the description of the fee item by clicking on the fee item link on the registration page. Show Me
- Settings options - these settings allow you to define which users can register with this type of registration. This would also display the registration types on your public page.
- Select the Allow Members check-box if you want this registration type to be available to your members.
- Select the Allow Non-Members check-box if this registration type is also available to non-members.
- Select the Is Displayed For Non-Members check-box if you wish to display this registration type to non-members, even if you have not chosen to allow this registration type for them.
- Click Done.

Add a Paid Registration Fee
- Click the down arrow on the Add Type button.
- Click Add Simple Paid Registration Fee.
- Follow Steps 1-6 for Adding a Free Registration Type
- Select a fee item from the Item list. This is the previously setup registration fee for this event. Click here for further information on setting up fees.
- Enter, override or accept the Price.
- Click Done.

Add a Table/Group Registration Fee
- Click the down arrow on the Add Type button.
- Click Add a Table/Group Registration Type.
- Enter a Name for the Free Registration Type.
- Enter the Registrations Available (0 if unlimited). This option will limit the number of free registrations available, and will not allow registration with this type when the limit has been met. If you are setting up a registration type based on tables, this would be the number of tables available.
- Enter a Description for this registration type. Registrants will be able to view the description of the fee item by clicking on the fee item link on the registration page. Show Me
- Settings options - these settings allow you to define which users can register with this type of registration. This would also display the registration types on your public page.
- Select the Allow Members check-box if you want this registration type to be available to your members.
- Select the Allow Non-Members check-box if this registration type is also available to non-members.
- Select the Is Displayed For Non-Members check-box if you wish to display this registration type to non-members, even if you have not chosen to allow this registration type for them.
- Select the Reserve All Attendees check-box to reserve all attendees. This setting is enabled by default and ensures that all attendees for this group reservation are reserved even when names are not entered. (The system with use Additional Attendee if no name is entered. The name of the actual attendee can be added by a staff member when it is known.)
- Select a fee item from the Item list. This is the previously setup registration fee for this event. Click here for further information on setting up fees.
- Enter, override or accept the Price.
- Enter the number of attendees per registration in Attendees per Table/Group.
- Click Done.

Set Up Discounts for your Event
Discounts are setup on the Event Attendee Setup tab.

There are 4 discount types"
- Early Registration
- Promo Code
- Membership Type
- Volume
All of the options for all of the types are the same except for the specific criteria:
- Name
- Available Starting On - Enter the date this discount takes effect.
- Ends On - Enter the date this discount is no longer valid.
- Discount Type Previously created discount types will be included in the list. Click the + button to add a new discount type. This is important for reporting.
- Discount Price Method:
- Reduce Price by Percentage - Enter the percentage by which the standard price will be discounted.
- Reduce Price by Amount - Enter the dollar amount that will be subtracted from the standard price.
- Set Price To - Enter the price that will be used instead of the standard price.
Advanced Options Applies To (Registration Type) - Selecting a registration type allows you to limit the use of this discount to that specific registration type. For example, if you have setup registration types for members and non-members, you could choose to have a discount only apply to members.
Total Available - Allows you to limit the number of registrations that can use this discount. Limit Per Purchase - This allows you to limit the number registrants that can use this discount type from the same registration form.
Setting the Specific Criteria
Early Registration - provides a discount if a registration comes in between the Starting On date/time and the Ends On date/time

Promo Code - provides a discount if the registrant enters the code on the registration form. If selected, the registration form will automatically add a field for the code.

Membership Type - provides a discount based on the membership type of the registrant. Similar to Registration Type (above), only one membership type can be selected per discount. If you want more than one but not all membership types to receive the discount you will need to create a discount type for each.

Volume - provides a discount if the Minimum Quantity for Discount is reached on a single registration form

Click the drop-down arrow on the Add Discount tab to select the type of discount you wish to setup.

- NOTE: The Event Discount Use Report may be used to analyze how discounts have been used for an event. Click Here for instructions on running the report.
Add Additional Items for Sale during Event Registration
If you wish to sell additional items during the event registration process (for example you may wish to be able to sell mulligans for your golf tournament at the time of registration, or a commemorative hat), these items may be added in the Additional Items section on the event's Attendee Setup tab. Additionally, individuals who just wish to purchase an add on item, and not register for the event will be able to do so on the event registration page.

- Click the Add Item button in the Additional Items section

- Enter a Name for the additional event item.
- Select the desired Availability of the additional item.
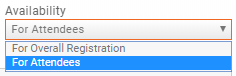
- To allow only those who register for the event to purchase the item, select For Attendees.
- To allow individuals to purchase the item without registering for the event, select For Overall Registration.

'
- Enter a Description of the item.
- Select the desired Goods/Service from the drop-down list.
- Enter, edit, or accept the default Price.
- Select the Is For Members check box to allow members to purchase this item.
- Select the Is For Non Members check box to allow non-members to purchase this item.
- Select the Is Active check-box to allow the item to be displayed on the event registration form.
Customize Registration Instructions and Confirmation Messages
On the Event Attendee Setup page, you can customize the instructions displayed on your registration page. You can also customize the confirmation displayed after registration is completed. The confirmation message is also added to the Confirmation Email registrants receive following their registration.

Click the pencil icon to edit your messages.
Note that you have robust editing features for these spaces, including adding links and images.

Event Management--Attendees
The Events Module provides a variety of ways to manage your event attendees, starting with sending invitations all the way through your post-event reports.
Sending Emails
Templates have been designed to help you easily communicate new events to your members, resend emails, send reminders, etc.
Sending Invitations and Other Emails
- Click on the Actions ribbon on the right hand side of any page within the event
- Click Send Event Invite Email.
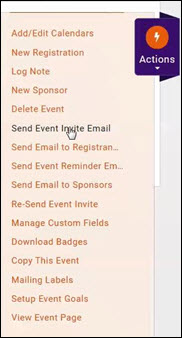
- This will trigger the Send Email window with the Event Invite template already selected.
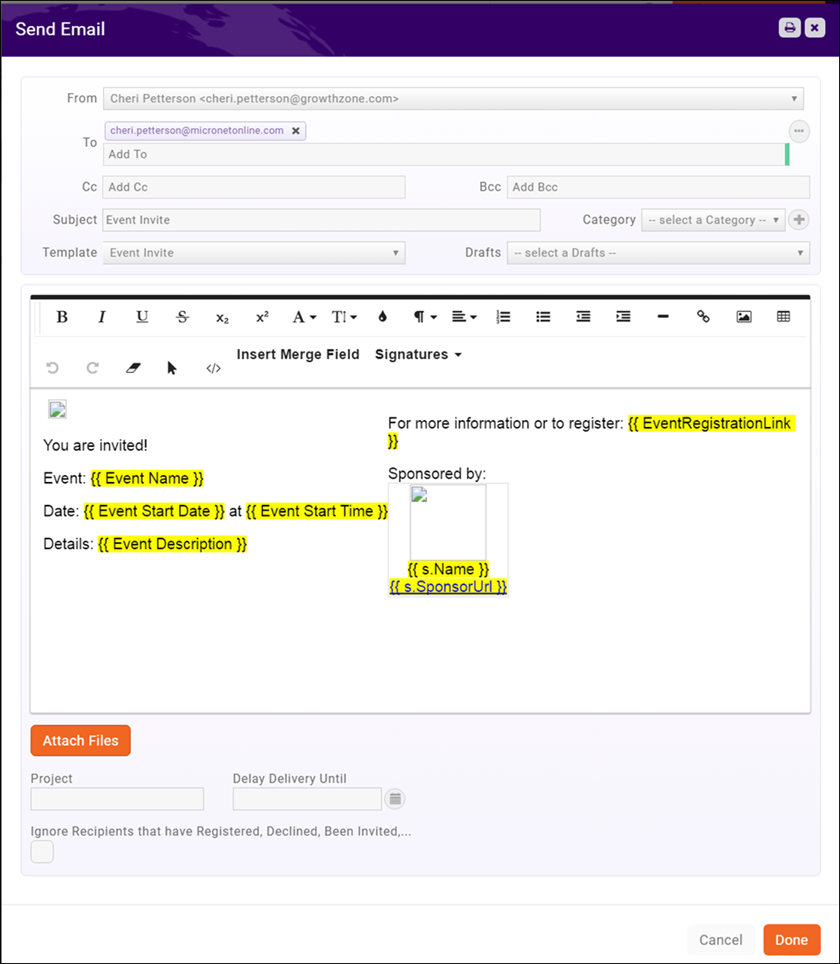


The use of merge fields personalizes the invite for each recipient, and provides information specific to the event that you are working with. You may edit the template to meet your specific needs.
If you want to schedule the email to be sent at a future date, enter a date in the Delay Delivery Until text box.
If you have previously sent an Event Invite, clicking Ignore Recipients that have Registered, Declined, Been Invited,... check-box will limit the email to those individuals who have not previously received the invite.
Note: You will be able to view a list of the contacts invited on the attendees tab, by filtering Shown Only on Invited.

Re-send a Previously Sent Event Invite
- Select the Attendees tab.
- Click the Actions button.
- Click Re-send Event Invite.


The Send Email screen will automatically populate the subject "Event Invite", you may change this to better describe your event. The message will default to the Event Invite template, including merged fields. The use of merge fields personalizes the invite for each recipient, and provides information specific to the event that you are working with. You may edit the template to meet your specific needs.
If you want to schedule the email to be sent at a future date, enter a date in the Delay Delivery Until text box.
Send Event Reminder
- Select the Attendees tab.
- Click the Actions button.
- Click Send Event Reminder.

A default template has not been created for Event Reminders. You can create the message on the Send Email screen, or, if you have a standard Event Reminder email that you send out, you may create a template. See Create and Manage Email Templates for instruction on creating email templates.
Managing Event Registrations
Matching/Adding Event Attendees to Your Database
As people register for events, the software will attempt to match those registrants to existing contacts in the database. If the system is unable to match, icons will be displayed on the attendee tab to notify you that you have contacts information that may need updating, possible matches to individuals or businesses, or new contacts that need to be created in your database.
On the event Attendee tab, a different icon will be displayed for each of the following scenarios:
- Updating an organization - The Update Organization icon
 will be displayed if someone has changed organization, but everything else (name, email, etc.) matches. For Example: Oaks Golf vs Oak Golf Club.
- Use the following procedure to update the organization:
- Click the icon.
- Select from the following options:
- Use suggested - We've found a possible match - If the software is able to find a suggested match, a table of matches from the database it will be displayed. Click the radio button for the desired organization to associate the registrant to that organization. NOTE: If there are no "suggestions" then this option will not be displayed.
- Find existing - Search your database - if a suggested match is not displayed, or is not accurate, select this radio button to search for the desired organization. A type ahead text box will be displayed. Begin typing the name of the organization you wish to locate.
- Create new - Create a new organization record - If the registrant's business is brand new to your database, click this option. A new business will be added using the Company name provided by the registrant.
- Click Save.
- Click the

- Match to Contact: The Match to Contact
 icon will be displayed when there is a potential or no match in your database.
- Click the icon.
- Select from the following options:
- Find existing - Search your database - if a suggested match is not displayed, or is not accurate, select this radio button to search for the desired organization. A type ahead text box will be displayed. Begin typing the name of the organization you wish to locate. When selected the invoice for this registration will be associated with the selected organization.
- Create new - Create a new contact record - If the registrant is brand new to your database, click this option. A new individual contact will be added to your database as a non-member.
- Click Save.
- Click the

- Update Contact: The Update Contact
 icon will be displayed when a match is found for some of the data submitted during registration (email or name).
- Click the icon.
- Select from the following options:
- Update contact - Select fields that should be updated in the contact record - if this option is available, a table will be displayed from which you may select the fields you wish to update in the database.
- Create new - Create a new contact record - if this option is selected, a new contact based on the Data Submitted from Registration will be added to your database.
- Click Save.
- Click the

Managing Event Payments
Send Event Registration Invoice
Event Invoices can be sent directly from the event Attendees tab.
- On the Event Attendees tab, click the down arrow on the Actions button for the invoice to be paid.
- Click Send Invoice.

The Send Email screen will be displayed, and the invoice is automatically attached.

Make a Payment on Event Registration
Payments for event registrations can be made directly on the Attendees tab or in the Billing module.
- On the Event Attendees tab, click the down arrow on the Actions button for the invoice to be paid.
- Click Enter Check/Payment.
- Enter the Check Number and Amount.
- Click Done.


Cancel a Registration
You can cancel a registration on the event Attendees tab.
- On the Event Attendees tab, click the down arrow on the Actions button for the attendee you want to cancel.
- Click Cancel Registration.
- Review the Cancel Attendance screen and click Done.


Download Event Badges
- On the Event Attendees tab, click the down arrow on the Add Registration button.
- Click Download Badges.
- Select the Avery badge type from the Document Generation Template drop-down.
- If you wish to display your logo on the badges, click the Show Tenant Logo check-box.
- Select which attendees you wish to print badges for Exhibitors, Non-Exhibitors, or both.
- Click the Show "Exhibitors" on Exhibitor Badges check-box if you wish to display Exhibitor on the exhibitor badges.
- Select the desired Sort Order. This is the order in which the badges will be printed.
- Click Done.


Manage Actual Attendance/No-Shows
You can easily check-in your attendees, and document no-shows through the database.
- On the Event Attendees tab, click the down arrow on the Add Registration button.
- Click Actual Attendance/No Shows.
- For each attendee, select the appropriate attendance status: Attended, No Show, Unknown.
- Click Done.

Generate the Event Activity Report
The Event Activity Report allows you to generate a list of all contact activity. The report may be filtered to view just the event activity for an individual contact, a specified date range, a specific event, registration status, and customized filtering criteria.
- On the Event Attendees tab, click the Actions button.
- Click Event Activity Report. This links you directly to the report, filtered down to the event you are coming from.

Click Here for further information on the Event Activity Report.
Generate the Event Discount Use Report
The Event Discount Use Report will provide you with statistics on how discounts are being used. You can generate the report for a specific date range, one or more events, and by adding additional filtering criteria you may view specific information such as use of a particular discount.
- On the Event Attendees tab, click the Actions button.
- Click Event Discount Use Report. This links you directly to the report, filtered down to the event you are coming from.
Click Here for further information on the Event Discount Use Report.
Manage Event Exhibitors
If you are using the Expo module, you can add and manage exhibitors to your events on the Event page.
Setup Exhibitor Registration Page
- On the Event page, click the Exhibitor Setup tab.
- Configure your Exhibitor Registration Optionsby clicking the pencil icon for Exhibitor Registration Options.
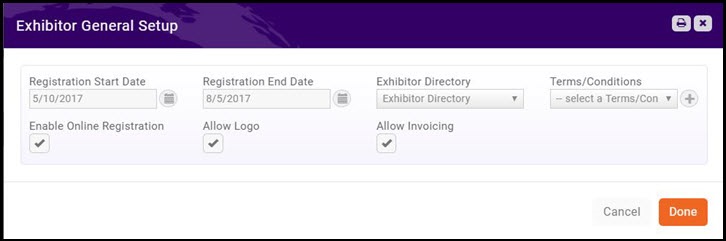
- Enter a Registration Start Date - This is the date you wish to open registration for your exhibitors.
- Enter a Registration End Date - This is the date that registration will close for exhibitors.
- Select an Exhibitor Directory to be used for the exhibitors. You can add a new directory by clicking the + button.
- Select your Terms/Conditions - These are terms/conditions that an exhibitor must agree to.
- Enable Registration - Click the check-box to enable on-line registration.
- Allow Invoicing - Select this option to allow the exhibitor to request to be invoiced.
- Allow Logo - Select this option to allow the exhibitor to upload a logo when registering for the event.
- Click Done.
- Configure Booth Types (Available For All Events) - The Booth Types (Available For All Events) section of the Exhibitor Setup page allows you to define the different types of booths (and the numbering of the booths) that you will make available to your exhibitors. Click the + button in the Booth Types (Available For All Events) to add new booth types.
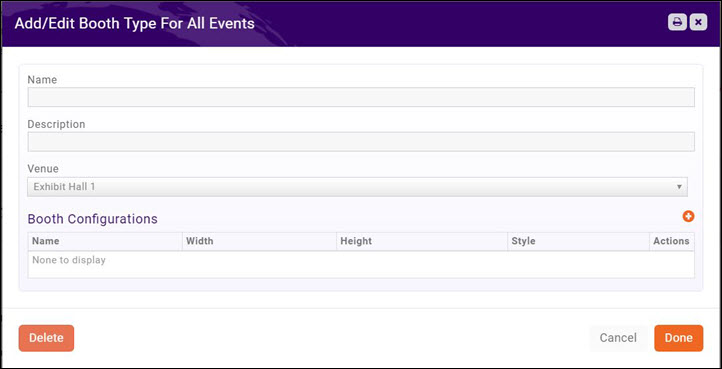
- Enter a Name for the booth type.
- Enter a Description of the booth type.
- Select a Venue for the booth type. This indicates the location of the booth. If you have previously created venues, you may select one from the drop-down OR click the + button to add a new venue.
- Setup your Booth Configurations. This function allows you to define booth configuration types, sizing and style of booth, as well as define your booth numbers. NOTE: The booth configurations, once setup, will be available any time you are setting up exhibitors. Click the + button to add a new Booth Configuration.
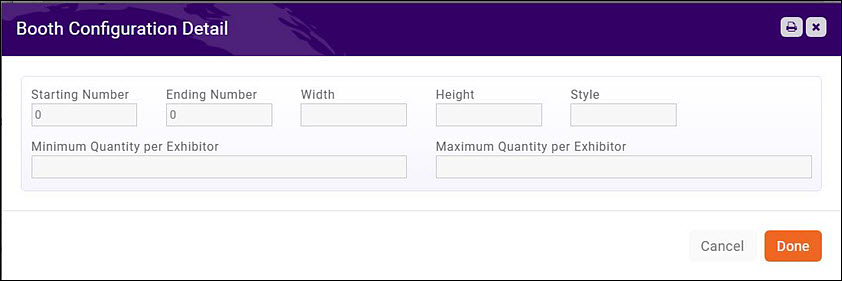
- Enter the Starting Number. This is the first booth number of this configuration type.
- Enter the Ending Number. This is the last booth number of this configuration type.
- Enter the Width and Height of this configuration type.
- Enter the Style of this configuration type.
- Minimum Quantity per Exhibitor - Enter the minimum number of this configuration type that an exhibitor may register for.
- Maximum Quantity per Exhibitor - Enter the maximum number of this configuration type that an exhibitor may register for.
- Click Done.
- Configure Exhibitor Types - Exhibitor Types allow you to associate booth types to registration fees.
- Click the + icon to add a new Exhibitor Type.
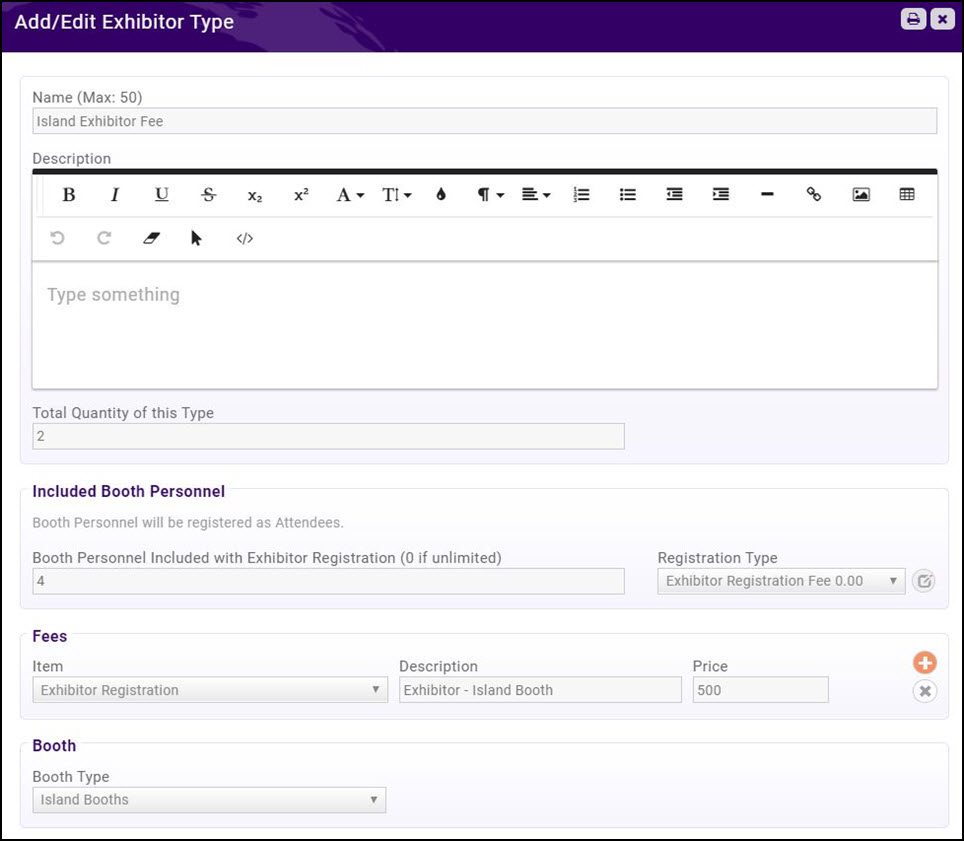
- Enter a Name for the Exhibitor Type - this name will be displayed on your web-page.
- Enter a Description of the Exhibitor Type - the description will be displayed on your web-page.
- Enter the Total Quantity of this Type - this is the total number of this type of booth. The software will track the number available/sold, and close sale of this type when total quantity is reached.
- Included Booth Personnel
- Enter Booth Personnel Included with Exhibitor Registration (0 if unlimited) - this setting allows you to limit the number of personnel the exhibitor can include as attendees. If set to 0 there is no limitation.
- Select a Registration Type from the drop-down list. NOTE: Registration fees may be added on the Attendee Setup tab for exhibitor type configuration, or you may click the
 to add a new registration type. Refer to Setup Your Event Fees for further instruction on setting up fees.
- Fees
- Click the
 icon to add fees.
- Click the

- Select a previously configured fee item from the Item drop-down list.
- Enter a Description of the fee item (Optional)
- Edit and/or Enter the Price of the fee item.
- Booth
- Select a Booth Type from the drop-down list. Click the icon to add a new booth type.
- Select a Booth Type from the drop-down list. Click the
- Click Done.


Event Reporting
Event Attendees Report
The Event Attendees Report allows you to generate a list of event attendees, filtered by a specific date range, event category, calendar, list, event, attendee registration status, and/or customized search criteria. Example usage of this report include analyzing attendance in specific event categories, or to view a list of all contacts who have been invited to events in a specified date range, but have not attended.
- Click Reports in the Navigation Panel
- Select Event Attendees Report.
- Select your search filtering criteria.
- Optional - Enter a Search/Filter query.
- Select Display Options. They system is setup with default fields to display in your report. You may add or remove fields by clicking on the Fields to Display drop-down arrow.
- Select Summarize by criteria. This optional field allows you to select how you wish report results grouped. For example, you may choose to group results by Event Name.
- Click Run Report.


You can perform the following actions with the report by clicking the down arrow on the Run Report button:
- Export as PDF
- Export as Excel.
- Export Summary as PDF
- Export Summary as Excel
- Email Report
- Add to List - This option will allow you to add the members to an existing list, or create a new list (by clicking the + button on the Add Contacts to list screen). This can help you in sending emails to this group as necessary.

- Save as New Report - If you want to use this report with the same filtering options in the future, you can save the report.

- Add as a Favorite Report - you may save the report as a favorite, then easily identify it when filtering reports in the Reports module. NOTE: If the report has already been added as a favorite, this option will not be available.
Event Activity Report
The Event Activity Report allows you to generate a list of all contact activity. The report may be filtered to view just the event activity for an individual contact, a specified date range, a specific event, registration status, and customized filtering criteria.
- Click Reports in the Navigation Panel
- Select Event Activity Report.
- Select your search filtering criteria. NOTE: To exclude event attendees that are not contacts, click the Display Only Contacts check-box.
- Optional - Enter Search/Filter query.
- Select Display Options. They system is setup with default fields to display in your report. You may add or remove fields by clicking on the Fields to Display drop-down arrow.
- Select Summarize by criteria. This optional field allows you to select how you wish report results grouped. For example, you may choose to group results by Event Name.
- Click Run Report.


You can perform the following actions with the report by clicking the down arrow on the Run Report button:
- Export as PDF
- Export as Excel.
- Export Summary as PDF
- Export Summary as Excel
- Email Report
- Add to List - This option will allow you to add the members to an existing list, or create a new list (by clicking the + button on the Add Contacts to list screen). This can help you in sending emails to this group as necessary.
- Save as New Report - If you want to use this report with the same filtering options in the future, you can save the report.
- Add as a Favorite Report - you may save the report as a favorite, then easily identify it when filtering reports in the Reports module.
Event Discount Use Report
The Event Discount Use Report will provide you with statistics on how discounts are being used. You can generate the report for a specific date range, one or more events, and by adding additional filtering criteria you may view specific information such as use of a particular discount.
- Click Reports in the Navigation Panel
- Select Event Discount Use Report.
- Select your search filtering criteria. For example, if you wish to view discount use for a specific event, select an option from the Event drop down-list.
- Optional - Enter a Search/Filter query. For example, if you wish to view the report based on a specific discount select Discount Name.
- Select Display Options. They system is setup with default fields to display in your report. You may add or remove fields by clicking on the Fields to Display drop-down arrow.
- Select Summarize by criteria. This optional field allows you to select how you wish report results grouped. For example, you may choose to group results by event name.
- Click Run Report.


You can perform the following actions with the report by clicking the down arrow on the Run Report button:
- Export as PDF
- Export as Excel.
- Export Summary as PDF
- Export Summary as Excel
- Email Report
- Add to List - This option will allow you to add the members to an existing list, or create a new list (by clicking the + button on the Add Contacts to list screen). This can help you in sending emails to this group as necessary.
- Save as New Report - If you want to use this report with the same filtering options in the future, you can save the report.
- Add as a Favorite Report - you may save the report as a favorite, then easily identify it when filtering reports in the Reports module.
Event Sessions Report
The Event Sessions Report may be used to generate a list all registrants in the various sessions you have setup for an event. The report may be filtered by specific event(s), session(s) if you have selected a specific event, timeslot(s) if you have selected a specific event. Additional filtering criteria may be added to further filter your report. For Example: If you wish to view registration balances, you can add this in the Criteria/Filters. NOTE: When adding additional search criteria you must ensure that those fields are displayed. By default the report will display Session Name, Sessions Start Date/Time, Session End Date/Time, Location, Attendee Name, Organization, and Attendee/NoShow Status. You may add or remove report fields by clicking on the Fields to Display.
- Click Reports in the Navigation Panel
- Select Event Sessions Report.
- Select your search filtering criteria.
- Optional - Enter a Search/Filter query.
- Select Display Options. They system is setup with default fields to display in your report. You may add or remove fields by clicking on the Fields to Display drop-down arrow.
- Select Summarize by criteria. This optional field allows you to select how you wish report results grouped. For example, you may choose to group results by session name.
- Click Run Report.


You can perform the following actions with the report by clicking the down arrow on the Run Report button:
- Export as PDF
- Export as Excel.
- Export Summary as PDF
- Export Summary as Excel
- Email Report
- Add to List - This option will allow you to add the members to an existing list, or create a new list (by clicking the + button on the Add Contacts to list screen). This can help you in sending emails to this group as necessary.
- Save as New Report - If you want to use this report with the same filtering options in the future, you can save the report.
- NOTE: To make this report available to all users, do not select the Hide This Report From Other Users check-box. If selected, the report will only be available to you.
- Add as a Favorite Report - you may save the report as a favorite, then easily identify it when filtering reports in the Reports module. NOTE: If the report has already been saved as a favorite, this option will not be available.
Event Sponsorships By Contact Report
UNDER DEVELOPMENT
Event Sponsorships Report
UNDER DEVELOPMENT
Exhibitor Activity Report
The Exhibitor Activity Report will allow you to generate a report of all exhibitors activity during a selected date range. This report is useful in viewing many events a contact has exhibited in, as well as how much revenue that has generated.
- Click Reports in the Navigation Panel
- Select Exhibitor Activity Report.
- Select your search filtering criteria. For example, if you are looking for the activity of a specific contact, type the contact's name in the Contact field.
- Optional - Enter a Search/Filter query.
- Select Display Options. They system is setup with default fields to display in your report. You may add or remove fields by clicking on the Fields to Display drop-down arrow.
- Select Summarize by criteria. This optional field allows you to select how you wish report results grouped. For example, you may choose to group results by event name.
- Click Run Report.


You can perform the following actions with the report by clicking the down arrow on the Run Report button:
- Export as PDF
- Export as Excel.
- Export Summary as PDF
- Export Summary as Excel
- Email Report
- Add to List - This option will allow you to add the members to an existing list, or create a new list (by clicking the + button on the Add Contacts to list screen). This can help you in sending emails to this group as necessary.
- Save as New Report - If you want to use this report with the same filtering options in the future, you can save the report.
- NOTE: To make this report available to all users, do not select the Hide This Report From Other Users check-box. If selected, the report will only be available to you.
- Add as a Favorite Report - you may save the report as a favorite, then easily identify it when filtering reports in the Reports module. NOTE: This option will not be available if the report has already been saved as a favorite.
Event Sponsor Management
Using the Sponsors/Ads module in conjunction with your events allows you to generate additional revenue and have GrowthZone do a lot of the work for you—-win win!
- NOTE:Sponsorship module is required to use this functionality.
Setting up Sponsorship Benefits
Benefits consist of any combination of the Sponsor Name, Logo, and/or URL appearing on the Event Page, Emails, and/or Registration page. For example, perhaps a Bronze sponsor has only their Name on the Event Page, the Event Emails, and the Registration Page; the Silver sponsor has their Name AND Logo on all three, and the Gold sponsor gets their Name, Logo, AND url on all three. You can create any combination; the only caveat is that if you want to display the url you must also display the name and logo.
- Go to Setup in the left navigation, then Event > Event Sponsorship Benefits. Any existing benefits will be displayed.
- Click the Orange Add button
 to add a benefit
- Name the new Benefit
- Determine the benefit (combination of Name/Logo/url on Event Page/Emails/Registration Page)
- Determine the Display Order of this Benefit (Assuming Gold sponsors are displayed before Silver, and Silver before Bronze, Gold would have a Display Order of 1, Silver would be 2 and Bronze would be 3.
- Click Done
- Repeat to add additional benefits.


Adding Sponsors to an Event
- Go to the Events module and open the event to which you want to add sponsors
- Click on the Sponsor Setup Tab. Any existing Sponsor Registration Types will be displayed. If you haven't added any Sponsors yet you will only see the column titles
- Click the Orange Plus button
 to add a Sponsor Registration Type
- On the Add Sponsorship Type screen, configure the following:
- Sponsorship Type-Enter a name for the new sponsorship type. (Gold, Silver, Bronze...)
- Description-Description of the Sponsorship Type, this in internal only
- Position-Confirm the Order this sponsorship will be (Should be the same as the Sponsor Benefit it will be associated with in a later step)
- Sales Goal Quantity-Optional and internal. If you have a goal of X number of sponsorships of this type, enter that number here and the system will help keep track for you.
- Maximum Quantity-Optional and internal. If you are limiting the number of this sponsorship type for this event, enter that number here.
- Fees
- Item Select the Goods & Service Item this Sponsorship Type will be using
- Quantity Enter the default quantity for this item. (Probably "1")
- Price Enter the price for this Sponsorship Type
- Hide on Invoice Check this box if the sponsorship is part of a bundle and you do not want it to appear as a separate line item on the invoice. The amount will roll into another invoice item and still be included in the total.
- Click on the orange plus sign to add another fee item to this sponsorship type
- Sponsor Benefits
- Select the Sponsor Benefits this sponsorship type is related too.
- Fees
- Click Done


Registering Event Sponsors
Currently sponsors can only be registered through the back office by a staff member.
- Go to the Sponsors tab of the Event. Any sponsors already registered will appear here.
- Add a new sponsor by clicking on the orange Actions button and selecting Add Sponsor,
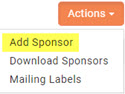
- You could also select New Sponsor from the Actions Ribbon on the right side of the screen on any page within the event

- You could also select New Sponsor from the Actions Ribbon on the right side of the screen on any page within the event
- On the Add Sponsor window, fill in the fields with the relevant information:
- Sponsor Name The name of the sponsor--this contact must already be in your database.
- Select the Address and Email if it does not populate automatically
- Registration Date Optional. Enter the date the sponsor registered. (can be backdated)
- Sponsorship Level Select the Sponsorship Type they are purchasing
- Description This will default to the description you entered when you created the Sponsorship Type. It can be edited
- Qty This will default to the quantity you entered when you created the Sponsorship Type. It can be edited.
- Price and Total are populated automatically based on the Qty and the Price you entered when you created the Sponsorship Type. They cannot be overridden.
- Message This message will appear on the invoice
- Internal Memo This is a note to yourself or your staff regarding this sponsor. It is not required and is not public.
- Sponsor Url Enter the url you want users to go to IF the url is displayed and they click on it.
- Click Done


- Assuming you want a logo added,
- Click on the # (number) of the Sponsorship (the first column on the Sponsors tab)

- The Edit Sponsor window now has a place to upload an image,
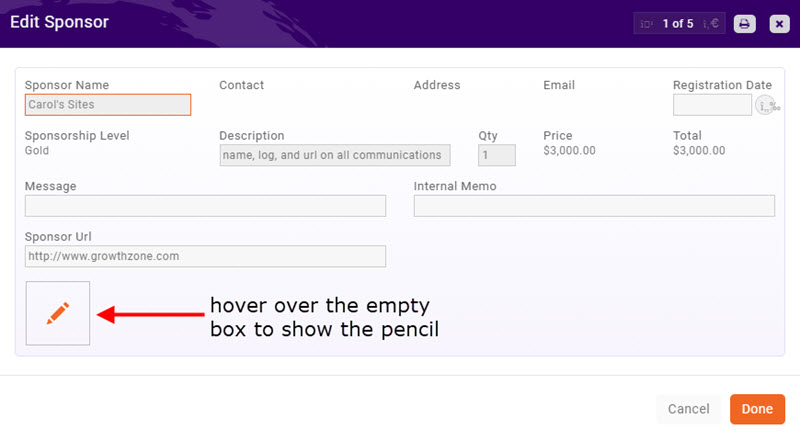
- Click on the Pencil Icon to bring up the Image Manager
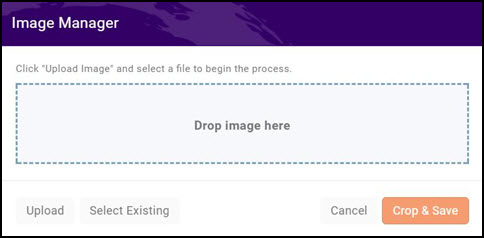
- Click the Upload button to upload the image.
- Click Crop & Save.
- Click Done


Event Management FAQ's
- How can I change the way fees are displayed on invoices? Click here.
- How can I generate a list of all session attendees? Click Here
- How can I setup my fees so that I can defer revenue revenue recognition to the date the event starts?
- Select Setup.
- Click Goods/Services in the Services, Products and Commerce section.
- Click New.
- Setup your goods/services for the event as you normally would (Click Here for full details of setting up Goods/Services) , with specific configuration of:
- Revenue Recognition Type: This setting allows you to configure when the revenue will be recognized. Select Fully on Event Start Date to defer revenue recognition until the start date of the event.
- Deferred Income Account: Select the deferred income account for this good/service. The drop-down list will be populated with the deferred income accounts configured in you Chart of Accounts. If you have chosen to defer the revenue for this event to a specific point in time, the revenue will be held in the deferred income account until that point in time.

With this goods/service, as registration fees are processed, the revenue will be placed in the deferred income account selected for the goods/service. On the day of the event, the revenue will be moved to the income account you selected for the goods/service. Income in the deferred revenue account can be monitored by running the Accounting Transaction Report or the Sales by Account Report. Click Here to view reports.