Difference between revisions of "Info Hub"
Cpetterson (talk | contribs) |
Cpetterson (talk | contribs) |
||
| Line 66: | Line 66: | ||
#'''Link URL''': Enter the link URL. | #'''Link URL''': Enter the link URL. | ||
#'''Display Order''': Enter the desired location of the link in the left-hand navigation. You may used negative numbers to display the links below the web content items. | #'''Display Order''': Enter the desired location of the link in the left-hand navigation. You may used negative numbers to display the links below the web content items. | ||
| − | #'''Hub Icon''': (Optional) You may enter a a Font Awesome icon to be displayed on the navigation panel for this item in the Info Hub. For Example: Entering fa-shopping-basket will display a shopping basket in the Info Hub menu. Visit the [https://www.screencast.com/t/ZX8ijj7V Font Awesome website] for supported | + | #'''Hub Icon''': (Optional) You may enter a a Font Awesome icon to be displayed on the navigation panel for this item in the Info Hub. For Example: Entering fa-shopping-basket will display a shopping basket in the Info Hub menu. Visit the [https://www.screencast.com/t/ZX8ijj7V Font Awesome website]. The icons you choose must be for supported '''FREE''' icons version 5.0.12 or less. |
#Click '''Done'''. | #Click '''Done'''. | ||
Revision as of 18:58, 28 June 2018
One of the great features of GrowthZone is The Info Hub, a member center that enables your users to access key information and actively engage with your organization. The Hub allows users to search the directory of other members, see upcoming events, submit events, signup for lists and committees, view their membership details, view and complete billing-related steps (pay invoices, view past billing, see open invoices, etc.), see completed certifications (if applicable) and more.
Contents
- 1 Customize Info Hub Display
- 2 Setup Info Hub Access
- 3 Logging in to Info Hub
- 4 Update Contact Information in the Info Hub
- 5 Update Related Businesses Information in the InfoHub
- 6 Update Related Contacts in the InfoHub
- 7 Send a Referral from the Info Hub
- 8 View Billing Transactions and Pay Invoices in InfoHub
- 9 Update Directory Listing Information in the Info Hub
- 10 Managing Events in the Info Hub
- 11 Working with Web-Content
Customize Info Hub Display
The display of your Info Hub may be customize to suit your specific needs. You can customize the greeting your members will see when they log-in, customize the header and footer, and choose to hide/show certain elements.
Add a Greeting Message to Info Hub
You may personalize the initial Info Hub greeting message.
- Click Setup in the Navigation Panel.
- Click Info Hub Settings in the Website section.
- Update the Welcome Message as needed. You may use the standard word processing tools (i.e. bold, italics, etc.) as well as add images and links.
- Click Done to save your changes.

HTML may be added to inject css/js into the Info Hub Pages. This is useful if you wish the look and feel of the Info Hub to match your web-site. Header/footer and colors can be configured to better match your web-site. Please contact GrowthZone for further information on this feature.
- Click Setup in the Navigation Panel.
- Click Info Hub Settings in the Website/Content Management System section.
- Enter desired HTML for headers and footers
- Click Done to save your changes.

Info Hub Terms/Acceptance
If you wish to require that your members see your privacy policy and consent prior to accessing the Info Hub, select your Hub Terms/Acceptance in the Term/Acceptance section of the Info Hub Settings.

Select your Hub Terms/Acceptance from the drop-down list. Terms/Conditions that you created under Services, Products and Commerce will be displayed in the drop-down. If you wish to create a new Term/Acceptance, leave the drop-down set to Select a Hub Terms/Acceptance and click the ![]() . See Setup Your Terms & Conditions for further instructions.
. See Setup Your Terms & Conditions for further instructions.
Once the user has accepted the terms/conditions, they would not be prompted to accept the terms in the future. However, if a change is made to the terms/conditions and you wish to have user re-accept, click the Reset Users Terms/Acceptance button.
How to view who has accepted your Hub Terms/Conditions
If you have enabled Terms/Acceptance settings, you can easily see who has accepted your terms, and which version of the terms they have selected.
- Click Setup in the left-hand navigation panel.
- Click Info Hub Settings.
- Click View Acceptance in the Info Hub Terms/Acceptance section.

When terms are accepted the system will log :
- Contact Name/ID
- Accepted (or Null)
- Terms/Conditions Name
- Timestamp
- IP & Browser info
External links may be added directly to the left navigation panel in the Info Hub. The links will be displayed in the same section as the Web Content (jobs, hot deals, etc.)
- Click Setup in the left-hand navigation panel.
- Click Info Hub Settings.
- Click the Links tab. A list of the links you have currently configured for your system will be displayed.
- Click the Add button.
- Name: Enter a name for the link. This is the name that will appear in the left-hand navigation.
- Link URL: Enter the link URL.
- Display Order: Enter the desired location of the link in the left-hand navigation. You may used negative numbers to display the links below the web content items.
- Hub Icon: (Optional) You may enter a a Font Awesome icon to be displayed on the navigation panel for this item in the Info Hub. For Example: Entering fa-shopping-basket will display a shopping basket in the Info Hub menu. Visit the Font Awesome website. The icons you choose must be for supported FREE icons version 5.0.12 or less.
- Click Done.


Setup Info Hub Access
The actions that your members may perform via Info Hub are driven by the Access Level you have granted to them. By default, your new contacts will be given "View Only" access to the hub when you first set them up. "View Only" will allow the member to view the Info Hub, and update their own info, access their billing information, and pay bills. They would not, however, have rights to enter new hot deals, job posting, events, and so on. Click Here for further information on access levels.
Setup User Info Hub Login Settings
The default access level provided to new contacts is set in the Login Settings

- Click Setup in the Navigation Panel.
- Click Login Settings in the Users Section.
- Configure the following settings:
- Allow Contacts to create their own accounts - Selecting this option enables the Create Account button on the Info Hub login screen. The Activation Options discussed below are used for authentication of the new user. When enabled, a contact must enter their email address to authenticate to the database that they have rights to sign up for the Info Hub. If their email address is present, they will be able to create log-in credentials.
- Default Access Level - Select the access level that you wish to, by default, provide to new contacts. The following options are populated in the system by default, and you may create additional access level to meet your needs. Click here to view the steps to create new Access Levels.
- User - View Only in Info Hub - this access level provides view only access in Info Hub.
- User - Create/Edit/View in Info Hub - this access level provides Create/Edit in Info Hub but not the ability to delete. Note: With this access level, the user may update their own profile information and add web content, if this module is enabled. Web content (hot deals, job posting, etc.) would require approval by your internal staff.
- User - Primary - this access level provides full control in Info Hub. Users with this access would be able to add content without staff approval.
- Enable Context Aware Staff Permissions - enabling this setting will allow you to create user (member) access levels that provide access to the back office. Click here to view the steps to create new Access Levels.
- Enable Password Reset Challenge - if selected, when a member creates their password they will be prompted to answer a security questions. This will then be an option in assisting them with resetting their password. The security question options users will have to choose from are:
- What was the name of your favorite pet?
- What was the name of your elementary school?
- What was the name of your childhood best friend?
- NOTE: For members who have already created their password, the next time they log into the system they will be presented with: If enabled, the next time a user logs into the hub, they will be presented with the message: Please complete your password challenge question. The question will also be presented when a user wishes to reset their password.
- Activation Options - these settings allow you to define how a user can activate their access to the Info Hub. NOTE: These settings are only displayed if Allow Contacts to create their own accounts is enabled. See above.
- Allow Email Activation - The system will validate the user login if the email address they have entered matches an the email address of a contact in your database. It is recommended that this option be enabled. If the email address is not found in the database, it will not allow them to login.
- Allow Invoice Activation - N/A at this time.
- Allow Membership Activation - If this setting is selected, completion of the membership application would authenticate the user, and allow them to create their login credentials. It is recommended that this option be enabled.
- Single Sign On - CURRENT STATE (2/13/2018) Allows a member of any IIABA state associations the ability to login to the Hub or register for an event with their national login/password. To do this we SAML V2.
- Require Members To Login With SAML - Enable this setting if members must use their national login/password.
- SAML Identity Provider (IdP) - Enter your SAML Identity Provider (IdP)
- Advanced Options - if you wish to set specific password conventions, click the Advanced Options check-box. Here you can define the minimum length of passwords, minimum number of alphabetic characters, and minimum number of numeric characters.

- NOTE: If you have enabled password conventions, along with allowing individuals to create their own accounts, the password conventions will be enforced when a member attempts to create the account on the Info Hub log-in screen.
- If you have made changes, click the Save button.


Setting up Individual's Info Hub Access
If you have configured your Member Application form to automatically provide Info Hub access, the individual filling out the member application will be routed to the log-in page where they will be able to create their own account and will be given the access level you selected in the Log-in settings. Additionally, when you add new contacts through the database, the contacts will be given the default access you have setup in the Log-in settings.
When you add new individuals to your data base (Click Here to learn more about adding new individuals), you will need to send them an email with instructions on how to setup their log-in credentials to the Info Hub:
- From the individual contact profile tab, click the Actions button.
- Click User Login.
- Select the User Access Level you wish to provide this user from the list. The default user access level (defined in Setup > Users > Login Settings) is displayed.
- If the user is affiliated to an organization (s), select the access level the user should have for each organization. NOTE: When the user accesses the Info Hub, the system will given them the greater of the two access levels.
- Ensure the Send Login Instructions Email check-box is selected.
- Click Done.


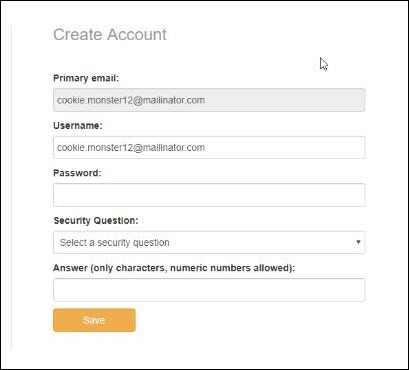
An email with instructions on setting up their log-in credentials will be sent, as shown below. When a receives the email to create an account and clicks the link, the user name is pre-populated with an email address to try to push customers to use this standard convention for usernames. The link in the email has a 72 hour expiration. So the link no longer usable after 72 hours. When a user clicks on one of those links in the email after that timeframe they will be prompted to request a new link.

Within the email sent to the member, they will find a link to access the Create an Account screen.

- The members email address is listed as recommended Username but they may change this.
- They may then enter their own Password. They must repeat the password; if the passwords do not match The Passwords do not match will be displayed. The user must fix the mismatch before they will be able to save the credentials.
- Click Save. The upon submission, the log-in screen will open. They will then enter their credentials to access the system.
Change an Individual's Info Hub Access
If you have configured your Member Application form to automatically provide Info Hub access, the individual filling out the member application will be routed to the log-in page where they will be able to create their own account and will be given the access level you selected in the Log-in settings. Additionally, when you add new contacts through the database, the contacts will be given the default access you have setup in the Log-in settings.
You can change an individual's access to the Info Hub:
- Open the contact's profile page.
- Click the Actions button.
- Click User Login.
- Select the desired Access Level from the list.
- Manually Set Password - Use this option when you need to reset a user's access from the back-office.
- (Optional) - Click Advanced Options
- When you set the Access level (top of screen) for the Contact, if that contact has related organizations, default the same access level to those related organizations.
- Click Done.
Reset a User's Password
If an individual has forgotten their password, they have the option to click the Forgot your Username or Password? from the Info Hub log-in screen.

If needed, you can reset an individual's password manually from the back office.
- Open the individual's profile page.
- Click the Actions button.
- Click User Login.
- Enter the new password in the Manually Set Password text box.
- Click Done.
Logging in to Info Hub
You may include a member login link on your web-site to open the Info Hub log-in screen.

- Enter User Name.
- Enter Password.
- Click Sign In.
NOTE: Menu options and permissions available to the member are driven by the access level that they have been assigned.
If a member has forgotten his/her password, clicking the Forgot your Username or Password? link will allow them to Enter your email address to receive an email with your login(s) or Or Enter your username to reset your password.

If the member does not have a user name and password, they can click the create an account button to create their user name and password.

- Enter First Name.
- Enter Last Name.
- Enter Email Address. NOTE: Your database will review the email address entered, if the email address exists in the system, the user will receive the following notification in the browser "An activation email has been sent to you. Please check your inbox to complete your account setup. Back to Member Login". Within the email sent to the member, they will find a link to access the Create an Account screen.

- The members email address is listed as recommended Username but they may change this.
- They may then enter their own Password.
- Click Save. The upon submission, the log-in screen will open. They will then enter their credentials to access the system.
Changing Organization
In the situation where a member is associated with multiple organizations, a Change Org link is displayed under that member's name in the Info Hub.

NOTE: When the member changes organizations, the permissions associated to the selected organization will immediately be applied.
Update Contact Information in the Info Hub
A member may update their own existing contact information or add new contact information in the Info Hub.
- Click My Info in the Navigation Panel. The screen will display the Contact info tab.
- Click the
 icon in Contact Info to add additional contact details OR click the pencil icon to edit existing contact details.
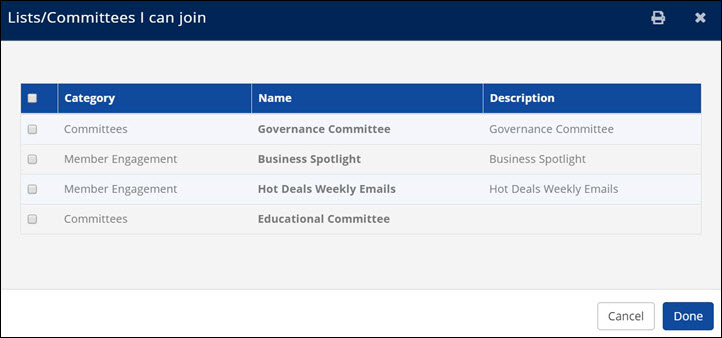
- The LISTS/COMMITTEES section will display committees to which this member belongs.
- The member can click the X adjacent to a list/committee that they no longer wish to belong to, OR
- The member can click the
 icon in the Lists/Committees section to view the lists/committees available to join and join.
- -
- NOTE: Only lists/committees that you have configured for Users Can Join will be displayed in the list. See Working with Lists/Committees for further information.


Update Related Businesses Information in the InfoHub
A member may update related organization information via the InfoHub.
- Click My Info in the Navigation Panel.
- Click the Related Businesses tab.
- Click the icon to add additional organization information. NOTE: You must have Create privileges to add new information.
- OR
- Click the
 to edit existing information.
 - Click Save if changes have been made.

Update Related Contacts in the InfoHub
A member may add or edit additional contacts related to a business via the Info Hub.
- Click My Info in the Navigation Panel.
- Click the Related Contacts tab.
- Click the Add Contact button to add a new contact. NOTE: Create privileges are needed to add new information.
- OR
- Click the to edit existing information. NOTE: This option also allows the member to send the reset password email to the contact.
- Click Save if changes have been made.

Send a Referral from the Info Hub
The Info Hub makes it easy for your members to refer non-members to your organization.
- Click My Info in the Navigation Panel.
- Click the Refer Others tab.
- Fill in the required field (Organization, First Name, Last Name, Email Address)
- (Optional) Enter Comments.
- Select whether the organization may mention you as the person who referred them.
- Click Submit.

View Billing Transactions and Pay Invoices in InfoHub
Members may view their account history, and pay bills within the InfoHub.
- Click My Info in the Navigation Panel.
- Click the Account tab.
- Scheduled Billing Items: This section displays any current recurring billing configured for the member. The member may ONLY assign or change the stored payment profile associated to the schedule (by clicking the icon). A change to the actual schedule must be made by staff in the back office.
- Payment Profiles: Any stored payment profiles will be displayed in the section.
- Balances: The balances section will display the current balances for this members.
- Open Invoices: The open invoices section will display all of the open invoices for this member.
- Billing History: This section will display all transaction history, including payments, invoices, refunds, credits and so on.


Pay an Invoice in the InfoHub
- Click My Info in the Navigation Panel.
- Click the Account tab.
- Click the arrow on the Actions button for the invoice to be paid.
- Click Enter Credit Card.
- Enter Credit Card Information OR select a previously stored credit card. If entering a new credit card, you may elect to store the credit card for future purchases by enabling Store Payment Info For Future.
- Select the invoices you wish to pay.
- NOTE: If you wish to pay invoices for other contacts related to the organization, enable the Advanced Options and enable the Display Related Contacts' Invoices. The invoices for all contacts related to the organization will be displayed in the invoice list for selection.
- Click Done.


Download an Invoice from the InfoHub
If you wish a copy of an invoice, you may download it from the Account tab in the InfoHub.
- Click My Info in the Navigation Panel.
- Click the Account tab.
- In the Open Invoices or Billing History section, click the arrow on the Actions button for the invoice you wish to download.
- Click Download Invoice.
Update Directory Listing Information in the Info Hub
The settings available to be updated will be dependent on the directory listing type this member has been provided:
- Click Directory Listing in the Navigation Panel. The current directory listing type will be displayed.
- In the Actions column, click the pencil icon.
- The following directory listing settings may be updated.
- Alternative Display Name (Leave Blank if Same as Contact) - This is the name of the organization that will be displayed in the directory.
- Short Description - The short description is displayed with the search results.
- Description - The description is displayed when the organization is selected from the directory.
- Keywords - Keywords are used to search the directory.
- Highlights (for Directory) - Provides ability to add additional description of the organization in the directory.
- Categories - Select the business categories under which the organization will be displayed in the directory.
- Images - Click the Add button to add images to be displayed in the directory.
- VIDEOS - Click the + button and enter a URL for video(s) to be displayed in the directory.
- Custom Fields - if you have added custom fields, such as pricing or driving directions, these may also be updated for the directory listing.
- Click Done.


Managing Events in the Info Hub
Info Hub users may view events, register for events, and add/edit their own events via the Info Hub.
Register for an Event via the Info Hub
Upcoming events that have been configured to display in the Info Hub will be shown on the Info Hub Home page. If registration is available, simply click the Register button to open the event registration page.

Alternately:
- Click Events in the left-hand navigation. The Events Calendar will be displayed in Month View, or the user may change the view to List View.
- Click the event from the list, or scroll through the calendar to find and click the desired event. The Event description page will be displayed.

Working with Web-Content
NOTE: Info Hub users must have a minimum of Create access to Web Content to add new hot deals, jobs, etc. A user with Create access may enter web content, but the content must be approved by association staff before it is published. A user with Full Control may add web content without your staff approval.
Adding a Hot Deal
- Click Hot Deals in the left-hand navigation.
- Click the
 button.